Single-Arm Push-Up (Chest Focus): Proper Form, Sets, Progressions & Tips
Master the Single-Arm Push-Up with chest emphasis. Learn proper form, step-by-step execution, sets and reps by goal, common mistakes, progressions, and safety tips for advanced bodyweight strength.
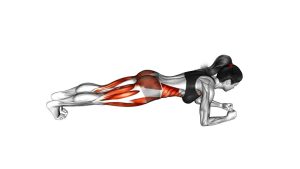
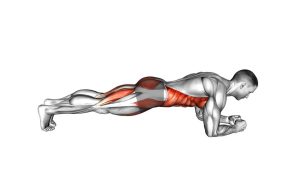
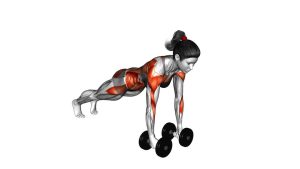
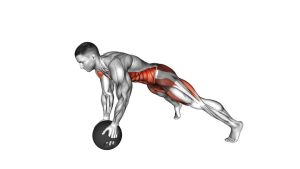
Single-Arm Push-Up (Chest Focus)
This variation is best treated as a strength skill. Your goal is a controlled descent, a stable shoulder, and a smooth press back to lockout—without shifting, bouncing, or “worming” the torso. If you can’t keep the hips quiet, scale down with incline, assistance, or a progression (archer push-ups / negative reps).
Quick Overview
| Body Part | Chest |
|---|---|
| Primary Muscle | Pectoralis major (chest) |
| Secondary Muscle | Triceps, anterior deltoid, serratus anterior, core (anti-rotation) |
| Equipment | None (optional: push-up handles/parallettes, resistance band, yoga mat) |
| Difficulty | Advanced (requires strong pressing strength + core stability) |
Sets & Reps (By Goal)
- Max strength (low reps): 4–6 sets × 1–4 reps/side (2–3 min rest)
- Strength + control (quality reps): 3–5 sets × 3–6 reps/side (90–150 sec rest)
- Hypertrophy progression (scaled): 3–4 sets × 6–10 reps/side (incline or band-assist, 60–120 sec rest)
- Skill practice: 6–10 singles/side across the session (stop 1 rep before form breaks)
Progression rule: Earn cleaner reps before harder reps. First reduce torso twist, then slow the eccentric, then increase depth. Only then add reps or decrease assistance.
Setup / Starting Position
- Hand position: Place the working hand under the shoulder (fingers forward or slightly turned out for comfort).
- Wide base: Step the feet wider than a normal push-up to improve balance and reduce unwanted rotation.
- Non-working arm: Place it behind your back or on your hip (no pushing from that side).
- Brace: Squeeze glutes, lock ribs down, and keep a straight line from head to heels.
- Shoulder set: Keep the shoulder blade stable (think “strong shoulder,” not shrugged).
Tip: If wrists get cranky, use push-up handles or parallettes to keep the wrist neutral.
Execution (Step-by-Step)
- Inhale and brace: Lock the torso like a plank—glutes tight, abs on.
- Lower under control: Bend the working elbow and descend slowly (2–4 seconds). Let the chest move slightly toward the working hand.
- Keep alignment: Avoid hip drop or torso twist. The body should move as one unit.
- Reach a strong bottom: Stop at the deepest position you can hold with a stable shoulder (no collapsing).
- Press up smoothly: Drive the floor away and exhale near the top. Finish with a stable lockout—don’t “snap” the elbow.
Pro Tips & Common Mistakes
Pro Tips
- Use a wide stance: Wider feet = more balance and less unwanted twisting.
- Slow eccentrics build the rep: A 3–5 second lower improves strength and stability fast.
- Keep the shoulder “packed”: Think stable shoulder blade—no shrugging or collapsing.
- Own the bottom: Only go as deep as you can keep the shoulder safe and the torso rigid.
- Progress with assistance: Band-assist or incline lets you accumulate clean volume.
Common Mistakes
- Twisting the hips: Usually caused by a base that’s too narrow or weak anti-rotation core.
- Shoulder collapse: Dropping into the front of the shoulder—reduce depth and strengthen control.
- Elbow flare + shrug: Can irritate the shoulder; keep the shoulder stable and angle elbow naturally.
- Rushing the reps: Momentum hides weak positions—slow down and own the range.
- Wrist pain from extension: Use handles/parallettes or adjust hand angle.
FAQ
Where should I feel a chest-focused single-arm push-up?
You should feel the working side chest and triceps doing most of the pressing, with the core working hard to prevent rotation. If you feel mostly shoulder pinching, reduce depth and improve scapular control.
What’s the best progression if I can’t do one strict rep?
Start with incline single-arm push-ups, band-assisted reps, and slow negatives. You can also use archer push-ups to build unilateral strength before going fully single-arm.
How wide should my feet be?
Wider than a normal push-up is ideal for most people. A wide stance improves balance and reduces twisting. As you get stronger, you can gradually narrow the stance to increase the challenge.
Should my elbow stay tucked or flare out?
Neither extreme. Most people do best with a natural, moderate elbow angle. Too tucked becomes triceps-dominant and awkward; too flared can stress the shoulder. Focus on a stable shoulder and smooth path.
Is this safe for the shoulder?
It can be safe if you maintain control, avoid collapsing into the bottom, and use a progression that matches your strength. If you have a history of shoulder pain, start with incline/band assistance and build gradually.
Recommended Equipment (Optional)
- Push-Up Handles — reduces wrist extension and helps keep reps stable
- Parallettes Bars — increases range of motion and keeps wrists neutral
- Resistance Bands Set — useful for band-assisted single-arm push-up progressions
- Non-Slip Exercise Mat — improves grip and comfort for hands/feet during strict reps
- Push-Up Board (Optional) — handy for structured hand placement and variety (use only if stable)
Tip: If any tool changes your mechanics (slipping, shoulder discomfort, wrist pain), remove it and regress the variation. Strong single-arm reps come from control more than intensity.