Smith Machine Decline Bench Press: Lower Chest Form, Sets & Tips
Learn how to perform the Smith Machine Decline Bench Press with proper form to build the lower chest. Step-by-step setup, execution cues, sets & reps by goal, common mistakes, and safety tips.
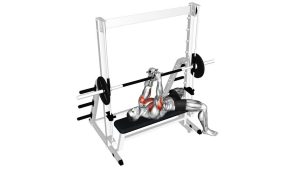
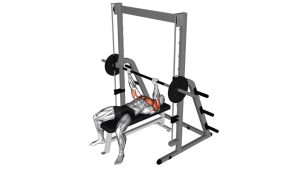
Smith Machine Decline Bench Press
This lift shines when you prioritize consistent range and clean tension. Because the Smith machine stabilizes the bar, it’s easier to focus on the pecs—especially if you keep your shoulders packed and avoid turning the press into a triceps-only lockout.
Quick Overview
| Body Part | Chest |
|---|---|
| Primary Muscle | Lower pectoralis major (sternal fibers) |
| Secondary Muscle | Triceps, anterior deltoids (assist), serratus & upper back (stabilization) |
| Equipment | Smith machine, decline bench |
| Difficulty | Intermediate (stable setup, but form matters for shoulder comfort) |
Sets & Reps (By Goal)
- Muscle growth (hypertrophy): 3–5 sets × 6–12 reps (60–120 sec rest)
- Strength focus: 4–6 sets × 3–6 reps (2–3 min rest)
- Chest pump / finisher: 2–4 sets × 12–20 reps (45–75 sec rest)
- Technique / control: 2–3 sets × 6–10 reps (slow eccentric, 60–90 sec rest)
Progression rule: Add reps first until you hit the top of your range, then add a small amount of load. Keep every rep consistent (same bar touch point, same depth, same tempo).
Setup / Starting Position
- Set the decline bench: Use a moderate decline (avoid extreme angles that reduce range or shift stress).
- Align under the bar: When unracked, the bar should sit above your lower-chest line.
- Grip width: Slightly wider than shoulder-width (wrists stacked, forearms close to vertical at the bottom).
- Lock in the upper back: Pull shoulder blades back and down and keep the chest “proud.”
- Foot/leg stability: Anchor your legs securely (bench pads or planted wide) to prevent sliding.
- Set safeties: Adjust stops so the bar can’t pin you if a rep fails.
Tip: Think “bend the bar” (gentle external rotation) to keep shoulders stable and elbows in a strong track.
Execution (Step-by-Step)
- Unrack with control: Rotate the bar out and stabilize it above your lower chest.
- Lower slowly: Bring the bar down in a smooth, controlled path toward the lower chest/upper sternum.
- Elbows track strong: Keep elbows about 30–45° from your torso (avoid extreme flaring).
- Light touch / consistent depth: Touch gently (or hover) without bouncing off the chest.
- Press up smoothly: Drive the bar upward while keeping your chest up and shoulders packed.
- Finish with control: Reach near lockout without slamming your elbows or losing shoulder position.
Pro Tips & Common Mistakes
Pro Tips
- Keep the chest lifted: A stable ribcage and retracted scapula improve pec tension.
- Use a controlled tempo: 2–3 seconds down, 1–2 seconds up for better hypertrophy stimulus.
- Touch the same spot every rep: Aim for the lower-chest line to keep mechanics consistent.
- Stop 1 rep before form breaks: When shoulders start creeping forward, end the set.
Common Mistakes
- Bouncing the bar: Reduces tension and increases risk around the shoulder and sternum area.
- Elbows flared hard: Often shifts stress to shoulders and reduces chest comfort.
- Shrugging at the top: Elevates shoulders and turns the rep into a shoulder-dominant press.
- Too wide grip: Can shorten range and increase shoulder stress.
- No safeties/stops set: A major risk on a decline setup—always set stops.
FAQ
What part of the chest does the decline Smith press target most?
It generally emphasizes the lower chest fibers more than flat or incline pressing. Your exact emphasis depends on decline angle, touch point, and elbow path.
Is the Smith machine version “better” than free weights?
It’s not automatically better—just different. The Smith machine offers a stable bar path and can be great for hypertrophy work, higher reps, and training close to failure with more confidence. Free weights demand more stabilization.
Where should the bar touch on a decline press?
Most lifters do best touching around the lower chest / upper sternum. Touching too low can stress the shoulders; too high can reduce the decline advantage.
My shoulders pinch—what should I change?
Try: (1) tuck elbows slightly more, (2) reduce depth a little, (3) re-pack shoulder blades, and (4) use a moderate grip. If pain persists, swap to a neutral-grip press machine or dumbbell work.
Should I lock out fully at the top?
For hypertrophy, you can stop just shy of a hard lockout to keep tension on the pecs. For strength practice, controlled lockout is fine—just avoid slamming or shrugging.
Recommended Equipment (Optional)
- Wrist Wraps (Lifting) — supports wrist stacking and comfort during heavier pressing
- Lifting Gloves — improves grip and reduces bar discomfort during higher volume
- Adjustable Bench (Incline/Decline) — useful for home setups and consistent decline angles
- Resistance Bands Set — great for warm-ups (band pull-aparts) and shoulder prep before pressing
- Micro Plates (Small Increment Plates) — helps progressive overload when big jumps feel too heavy
Tip: Tools should improve comfort and consistency—not mask pain. Prioritize clean shoulder positioning and safe range first.