Suspended Self-Assisted Chest Dip: Form, Sets & Tips (Straps/TRX Chest Dip)
Learn the Suspended Self-Assisted Chest Dip with suspension straps to build chest and triceps with controlled depth. Step-by-step form cues, sets by goal, mistakes to avoid, FAQs, and recommended equipment.
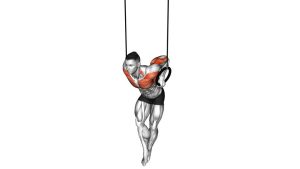
Suspended Self-Assisted Chest Dip
This movement is ideal if full bodyweight dips feel too heavy or uncomfortable. Because the straps can assist and stabilize, you can build strength with clean reps, a controlled range of motion, and less joint stress. Your goal: elbows track back, chest stays proud, shoulders stay down, and the straps stay tight (no slack).
Quick Overview
| Body Part | Chest |
|---|---|
| Primary Muscle | Pectoralis major (chest) |
| Secondary Muscle | Triceps, anterior deltoids, core & scapular stabilizers |
| Equipment | Suspension trainer / straps (TRX-style) |
| Difficulty | Beginner → Intermediate (fully scalable with foot assistance and body angle) |
Sets & Reps (By Goal)
- Strength (dip progression): 3–5 sets × 4–8 reps (90–150 sec rest)
- Hypertrophy (chest focus): 3–4 sets × 8–12 reps (60–90 sec rest)
- Control / shoulder-friendly volume: 2–4 sets × 10–15 reps (45–75 sec rest)
- Warm-up / activation: 1–3 sets × 6–10 reps (easy effort, crisp technique)
Progression rule: First reduce foot assistance (lighter push from the legs), then increase depth, then add reps. Only progress when the straps stay stable and your shoulders feel smooth.
Setup / Starting Position
- Set strap height: Handles around mid-torso to lower chest height (adjust to comfort).
- Stand between straps: Grip handles firmly; wrists neutral and aligned.
- Foot position: Feet on the floor, slightly forward; use them to assist and stabilize.
- Shoulder position: Pull shoulders down and back (avoid shrugging).
- Core tight: Brace lightly to prevent swinging; keep ribs controlled.
- Start tall: Arms nearly straight, chest open, neck neutral.
Tip: If the straps sway, widen your stance slightly and brace your core harder before you begin.
Execution (Step-by-Step)
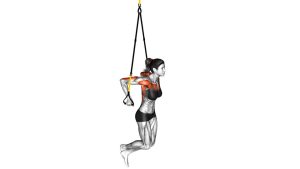
- Initiate the dip: Bend your elbows and lower under control while keeping the straps tight.
- Elbows track back: Keep them close-to-moderate (don’t flare wide).
- Chest stays proud: Slight forward chest angle is fine, but avoid collapsing shoulders forward.
- Reach your depth: Stop around 90° at the elbow or slightly deeper if pain-free.
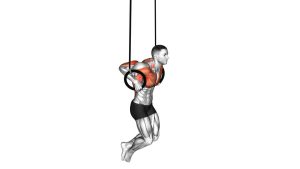
- Press up smoothly: Drive through the hands, extend elbows, and return to tall without swinging.
- Reset balance: Pause briefly at the top to kill any movement before the next rep.
Pro Tips & Common Mistakes
- Use your feet strategically: Light push from the legs helps you stay smooth and scalable.
- Control the eccentric: 2–4 seconds down builds chest and shoulder stability.
- Avoid shrugging: Keep shoulders down to reduce trap dominance and shoulder stress.
- Don’t flare hard: Excessive elbow flare can irritate shoulders; keep a natural track.
- No bouncing at the bottom: Pause briefly if needed; stay in control.
- Reduce swinging: Brace your core, slow your tempo, and reset at the top.
- Chest emphasis cue: Think “chest up” and “press the handles down” rather than leaning too far.
FAQ
Is this more chest or triceps?
With a slightly forward chest angle and controlled depth, it’s very chest-focused. A more upright torso tends to shift emphasis toward triceps. Keep shoulders packed and choose the angle that feels best.
How do I make it harder?
Use less foot assistance, slow the lowering phase, increase depth gradually, or perform more reps. You can also set the straps so you support more of your bodyweight through the handles.
What if my shoulders feel pinchy at the bottom?
Reduce depth, keep the elbows from flaring too wide, and focus on shoulders down/back. If symptoms persist, swap to a strap chest press or push-up variation and build tolerance over time.
Can beginners do this?
Yes—this is one of the best dip progressions for beginners because the straps and your feet can scale the load. Start with small range reps and a slow tempo.
Recommended Equipment (Optional)
- Suspension Trainer (TRX-style) — the main tool for strap dips, presses, rows, and full-body training
- Door Anchor for Suspension Trainer — secure setup option if you don’t have a rack or pull-up bar
- Doorway Pull-Up Bar — convenient mounting point for straps in small spaces
- Thick Exercise Mat — improves comfort and traction during foot-assisted reps
- Gym Chalk / Grip Aid — helps maintain a stable grip when hands get sweaty
Tip: If your setup feels unstable, prioritize a solid anchor point. Smooth reps beat heavy reps—especially on straps.