Barbell Reverse Close-Grip Bench Press: Form, Muscles Worked, Sets, Tips & FAQ
Learn how to do the Barbell Reverse Close-Grip Bench Press with proper form. Discover muscles worked, setup, step-by-step execution, sets by goal, common mistakes, FAQs, and recommended equipment.
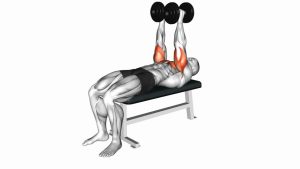
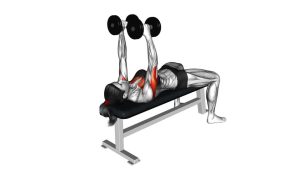
Barbell Reverse Close-Grip Bench Press
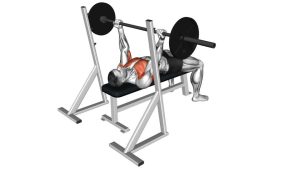
This lift works best when the bar stays balanced over the hands and the elbows track in a controlled path. The close grip increases the pressing demand on the triceps, while the reverse grip can shift the pressing angle slightly toward the upper chest. Use a stable bench setup, keep the bar path smooth, and avoid rushing the eccentric.
Quick Overview
| Body Part | Triceps |
|---|---|
| Primary Muscle | Triceps brachii |
| Secondary Muscle | Upper chest (clavicular pec fibers), anterior deltoids, forearms, shoulder stabilizers |
| Equipment | Barbell, flat bench, rack or spotter, weight plates |
| Difficulty | Intermediate (requires grip control, wrist stability, and safe bench setup) |
Sets & Reps (By Goal)
- Muscle growth: 3–4 sets × 6–10 reps with controlled lowering and full lockout
- Triceps strength: 4–5 sets × 4–6 reps using clean technique and longer rest periods
- Bench accessory work: 3–4 sets × 8–12 reps after your main press
- Technique practice: 2–3 sets × 5–8 reps with a light-to-moderate load and perfect control
Progression rule: Add weight only when your wrists stay stacked, the bar remains steady, and every rep follows the same touch point and lockout path.
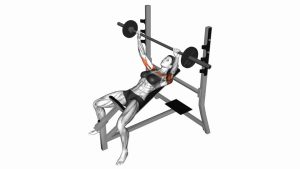
Setup / Starting Position
- Set the bench and rack: Position the bench so you can unrack the bar without overreaching. Safety pins or a spotter are strongly recommended.
- Lie down and build your base: Plant your feet firmly, keep your upper back tight, and lightly arch your lower back while keeping your glutes on the bench.
- Grip the bar underhand: Take a supinated grip around shoulder-width or slightly narrower, depending on wrist comfort and arm length.
- Stack the wrists carefully: Keep the bar as centered in the hands as possible. Avoid letting it sit too high in the fingers.
- Retract the shoulder blades: Pull the shoulders down and back to create a stable pressing platform.
- Unrack to a controlled lockout: Bring the bar above the upper chest with elbows extended and the bar balanced before beginning the rep.
Tip: Start lighter than you would on a standard close-grip bench press. The reverse grip demands more precision and confidence at the wrists.
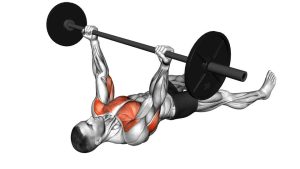
Execution (Step-by-Step)
- Brace before the descent: Take in air, stay tight through the upper back, and keep the bar stable over the upper chest.
- Lower the bar under control: Bring it down slowly toward the lower-upper chest area or high sternum while keeping the elbows tucked close to the body.
- Touch lightly: Do not bounce the bar. Make light, controlled contact with the chest if your mobility and structure allow it.
- Press up smoothly: Drive the bar upward and slightly back toward the shoulder line while extending the elbows.
- Finish the rep at lockout: Fully extend without hyperextending the elbows or losing wrist position.
- Repeat with consistency: Keep every rep smooth, balanced, and identical in bar path.
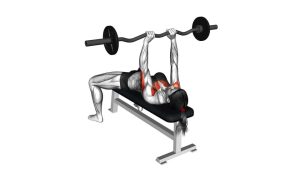
Pro Tips & Common Mistakes
- Keep the grip secure: Squeeze the bar hard so it stays centered in the palm instead of rolling toward the fingers.
- Use a moderate grip width: Too narrow can overload the wrists and make the press awkward.
- Tuck, don’t jam: Elbows should stay close, but not forced into an unnatural position.
- Control the eccentric: Fast lowering makes the reverse grip harder to stabilize safely.
- Don’t flare early: Let the triceps drive the first half of the press before the elbows drift out too much.
- Avoid sloppy unracks: The setup matters more here than on many standard pressing variations.
- Use wrist wraps if needed: They can improve comfort and confidence when the reverse grip feels demanding.
FAQ
What muscles does the Barbell Reverse Close-Grip Bench Press work most?
The main target is the triceps. The upper chest and anterior deltoids assist, while the forearms and shoulder stabilizers help control the bar.
Is reverse grip bench press harder than standard close-grip bench press?
Yes, for most lifters it feels more technical. The underhand grip changes wrist position and usually requires more focus on bar control, setup, and safe loading.
Should I go heavy on this exercise?
You can train it hard, but it is usually best approached with clean, moderate loading first. Earn heavier weights by proving you can control the bar path and wrist position consistently.
Where should the bar touch on the chest?
For most lifters, the bar will touch around the upper abdomen to lower chest / high sternum zone, depending on arm length, grip width, and shoulder structure. The key is a repeatable touch point with tucked elbows.
Is a spotter necessary?
It is highly recommended. Because the reverse grip can feel less secure, a spotter or properly set safety arms adds an important layer of protection.
Recommended Equipment
- Wrist Wraps for Bench Press — helpful for improving wrist support and comfort during the reverse grip setup
- Flat Weight Bench — a stable bench is essential for leg drive, upper-back tightness, and safe pressing
- 7-Foot Olympic Barbell — the standard choice for loaded pressing and bench press variations
- Power Rack with Safety Arms — adds important safety support when training reverse-grip benching without a handoff
- Olympic Weight Plates (2-Inch) — lets you progress the movement gradually while keeping loading consistent
Tip: Prioritize stability and safety over aggressive loading. On this variation, secure setup quality matters more than chasing numbers too early.