Dumbbell Pullover on Exercise Ball: Chest Focus, Form, Sets & Tips
Learn how to do the Dumbbell Pullover on an exercise ball to target the chest while training core stability. Includes step-by-step form, sets & reps by goal, common mistakes, FAQs, and optional Amazon equipment.
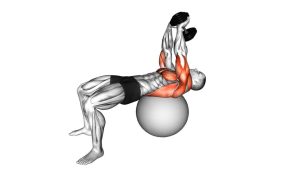
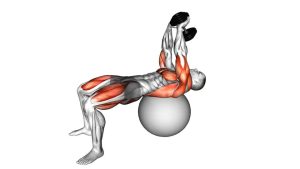
Dumbbell Pullover on Exercise Ball
This variation is most effective when you control the range and keep tension where you want it. You should feel a strong stretch through the chest (and some lats) at the bottom, followed by a steady pull back to the top. Because the ball is unstable, use a load you can control without wobbling, and prioritize a consistent hip bridge throughout the set.
Quick Overview
| Body Part | Chest |
|---|---|
| Primary Muscle | Pectoralis major (chest) |
| Secondary Muscle | Latissimus dorsi, serratus anterior, anterior deltoids, core (anti-extension), glutes (bridge stability) |
| Equipment | Dumbbell + stability (exercise) ball |
| Difficulty | Intermediate (requires shoulder control + core stability) |
Sets & Reps (By Goal)
- Hypertrophy (chest emphasis): 3–5 sets × 8–12 reps (60–90 sec rest)
- Strength-focused accessory: 3–5 sets × 6–8 reps (90–120 sec rest)
- Stability + control: 2–4 sets × 10–15 reps (45–75 sec rest, lighter load)
- Warm-up / mobility-style stretch: 2–3 sets × 8–10 slow reps (easy load, controlled range)
Progression rule: Add reps first (keep the same form and hip height), then increase load in small jumps. If you lose your bridge position or your elbows start bending a lot, the weight is too heavy.
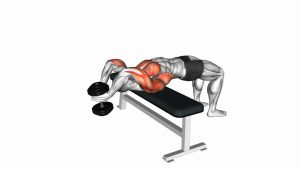
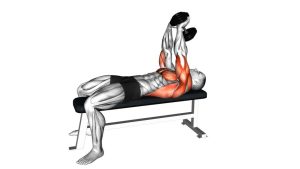
Setup / Starting Position
- Set the ball: Place the stability ball behind you and sit in front of it with a dumbbell ready.
- Upper-back support: Walk your feet out and roll so your upper back/shoulders are on the ball (not your neck).
- Build the bridge: Plant feet firmly, knees bent, and lift hips until your torso is close to level (glutes tight).
- Hold the dumbbell: Grip one dumbbell with both hands (palms supporting the inner plate/handle), arms up over the chest.
- Brace position: Keep ribs down and abs engaged—avoid flaring the rib cage to “cheat” range.
Tip: Choose a load you can move smoothly without wobbling. Stability comes first—heavier is not always better here.
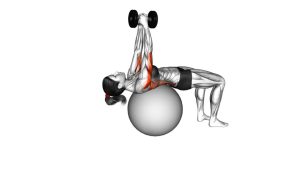
Execution (Step-by-Step)
- Start stacked: Dumbbell above the chest, elbows slightly bent, hips high in a steady bridge.
- Lower in an arc: Inhale and slowly bring the dumbbell back behind your head in a smooth arc (don’t bend elbows into a triceps extension).
- Control the bottom: Stop when you feel a deep chest/lat stretch while shoulders still feel safe and stable.
- Pull back to top: Exhale and bring the dumbbell back over your chest using a controlled arc—keep ribs down and hips steady.
- Finish clean: Return to the top position without letting the dumbbell drift too far toward the face or over-arching the back.
Pro Tips & Common Mistakes
- Keep elbows “soft”: A slight bend protects the elbows/shoulders and keeps the movement a pullover, not a skull crusher.
- Don’t let ribs flare: Excessive rib flare usually means the low back is taking over—brace harder and reduce range.
- Own the eccentric: Lower for 2–4 seconds for better chest loading and safer shoulder positioning.
- Bridge stays locked: Dropping hips turns this into a sloppy pullover and can stress the low back.
- Stop before shoulder pinch: Range is individual—go deep only if it stays pain-free and controlled.
- Think “arc,” not “straight line”: The dumbbell should travel in a consistent arc behind you and back over the chest.
FAQ
Is this exercise more for chest or lats?
It can train both, but this setup often feels more chest-focused when you keep ribs down and pull the dumbbell back over the chest. You’ll still get a lat stretch and support, especially at the bottom.
How heavy should I go on a stability ball pullover?
Use a load you can control without wobbling or losing hip height. The instability increases demand, so most people use lighter weight than a bench pullover and focus on slow, strict reps.
What if I feel it mostly in my shoulders?
Reduce range, keep elbows slightly bent, and avoid letting the dumbbell drift too far behind the head. Also focus on keeping ribs down—over-arching often shifts stress into the shoulders.
Is it okay if my hips drop near the end of the set?
That’s usually a sign the set is too long or the load is too heavy. Stop the set when you can’t keep the bridge stable, or switch to a bench pullover if you want to push heavier loads.
Who should avoid this variation?
If you have shoulder impingement symptoms, painful overhead positions, or low-back sensitivity to bridging, start with a floor or bench pullover and use a smaller range until you build control.
Recommended Equipment (Optional)
- Anti-Burst Stability Ball — stable base for upper-back support and bridge positioning
- Hex Dumbbells — easier to grip and safer to set down between sets
- Adjustable Dumbbell — quick load changes for progressive overload at home
- Thick Exercise Mat — better footing and comfort for feet/hips during bridging
- Resistance Bands Set — great for warm-ups (pull-aparts) and pairing with chest training
Tip: Choose equipment that improves stability and comfort first. A smoother setup usually leads to cleaner reps and better results.