Wide Wall Push-Up (Chest-Focused): Form, Sets & Reps, Tips & FAQ
Learn the Wide Wall Push-Up for chest-focused pressing with less joint stress. Step-by-step form cues, sets & reps by goal, common mistakes, FAQs, and recommended equipment.
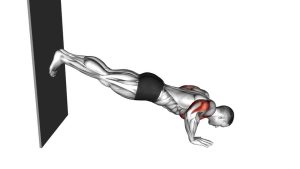
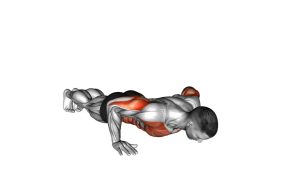
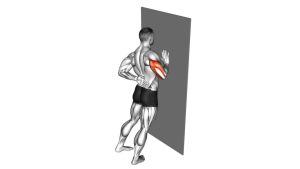
Wide Wall Push-Up (Chest-Focused)
Because the wall reduces the load, this variation lets you practice clean push-up mechanics while keeping wrists and shoulders more comfortable. The wide grip increases horizontal pressing demand, so your chest should feel like it’s doing most of the work—without excessive shoulder shrugging or low-back arching.
Quick Overview
| Body Part | Chest |
|---|---|
| Primary Muscle | Pectoralis major (chest) |
| Secondary Muscle | Anterior deltoids, triceps, serratus anterior (stability), core (bracing) |
| Equipment | Wall (optional: push-up handles, resistance band) |
| Difficulty | Beginner (excellent push-up regression and chest activation drill) |
Sets & Reps (By Goal)
- Technique & beginner strength: 3–4 sets × 6–12 reps (60–90 sec rest)
- Chest activation (warm-up): 2–3 sets × 10–15 reps (30–60 sec rest, smooth tempo)
- Hypertrophy (controlled burn): 3–5 sets × 8–15 reps (45–90 sec rest)
- Rehab-friendly pressing: 2–3 sets × 8–12 reps (easy effort, stop well before fatigue)
Progression rule: First add reps (or slow tempo), then increase difficulty by stepping your feet farther from the wall (more body angle), lowering hand height, or moving to an incline bench push-up.
Setup / Starting Position
- Face a wall: Stand about 1–2 steps away. The farther your feet, the harder it feels.
- Hands wide on the wall: Place palms at chest height, wider than shoulder width. Fingers point up or slightly out.
- Body line: Brace your core and squeeze glutes lightly so your body stays straight from head to heels.
- Shoulders “down”: Keep shoulders away from ears—no shrugging. Neck stays neutral.
- Elbow angle intention: With a wide grip, elbows will naturally flare a bit—keep it controlled and pain-free.
Tip: If wrists feel cranky, use push-up handles or place hands on a slightly inclined sturdy surface (like a countertop edge) to find a comfortable angle.
Execution (Step-by-Step)
- Inhale and brace: Keep ribs down and core tight so your lower back doesn’t arch.
- Lower toward the wall: Bend elbows and bring your chest toward the wall under control (1–3 seconds).
- Stay aligned: Head, ribs, hips move together—avoid jutting your chin forward or letting hips sag.
- Brief pause: Stop when your chest is close to the wall and you still feel stable (no shoulder pinch).
- Press back: Push the wall away until elbows are nearly straight (don’t slam into lockout). Exhale as you press.
Pro Tips & Common Mistakes
- Pro tip — “chest to wall”: Lead with the chest, not the face. Keep your neck neutral.
- Pro tip — slow the lowering: A 2–3 second eccentric makes light resistance feel productive.
- Pro tip — brace your core: If your low back arches, step closer to the wall and rebuild control.
- Mistake — shrugging: Shoulders creeping to ears reduces chest work and irritates the neck.
- Mistake — bouncing off the wall: Keep tension—pause near the wall instead of rebounding.
- Mistake — hands too high: If hands are near face height, you’ll shift more into shoulders. Start around chest height.
FAQ
Where should I feel the wide wall push-up?
Mostly in the chest, with some work in the front shoulders and triceps. If you only feel shoulders/neck, reduce range, lower hands to chest height, and keep shoulders down.
How do I make it harder without doing floor push-ups yet?
Step your feet farther from the wall, lower your hand height, slow the lowering phase, or move to an incline push-up on a bench/counter. Keep form clean before increasing difficulty.
Is a wide grip safe for everyone?
Wide grips can feel great for chest emphasis, but they can also stress the front of the shoulder if you go too wide or too deep. Use a “comfort-wide” hand position and stop the descent before any pinching occurs.
What if my wrists hurt?
Try push-up handles, place hands higher, or adjust the hand angle slightly outward. You can also use fists on a soft pad (only if comfortable). Wrist discomfort should improve with better alignment and reduced load.
Recommended Equipment (Optional)
- Push-Up Handles — more wrist-friendly pressing angle and better comfort
- Resistance Bands Set — add light resistance or pair with rows/pull-aparts for shoulder balance
- Thick Exercise Mat — useful when you progress to incline/knee push-ups on the floor
- Suspension Trainer — scalable push-up angle progression beyond the wall
- Doorway Pull-Up Bar — great companion tool for back training to balance pressing volume
Tip: Equipment is optional—this exercise is effective with just a wall. Use tools mainly to improve comfort or to progress load gradually.