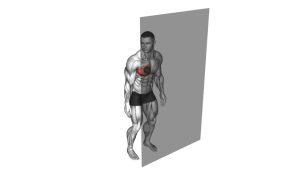
Chest Foam Rolling: Pectoral Release for Better Shoulder Mobility & Posture
Relieve tight pecs with chest foam rolling. Learn exact setup, step-by-step technique, timing by goal, common mistakes, FAQs, and the best foam rollers for pec release.
Chest Foam Rolling (Pec Release)
This technique works best when you move slowly and breathe. Aim for a “good pressure” feeling on the pec tissue — not sharp pain, tingling, numbness, or discomfort that shoots into the shoulder or arm. Use your legs and free arm to control how much bodyweight sinks into the roller.
Quick Overview
| Body Part | Chest |
|---|---|
| Primary Muscle | Pectoralis major (upper & mid chest fibers) |
| Secondary Muscle | Pectoralis minor (angle-dependent), anterior deltoid (passive), chest fascia |
| Equipment | Foam roller (optional: lacrosse ball/peanut roller for deeper precision) |
| Difficulty | Beginner (pressure tolerance + control focused) |
Sets & Reps (By Goal)
- Warm-up (before pressing): 1–2 rounds per side × 30–60 sec (easy pressure, steady breathing)
- Mobility (posture/shoulder comfort): 2–3 rounds per side × 60–90 sec (slow passes + brief holds on tight spots)
- Recovery (after training): 2–4 rounds per side × 45–75 sec (moderate pressure, calm tempo)
- Trigger-point focus: 3–5 “hot spots” per side × 10–20 sec holds each (never sharp pain)
Progression rule: First improve control and breathing. Then increase time slightly or use a firmer roller. Avoid “chasing pain” — better results come from steady, repeatable pressure.
Setup / Starting Position
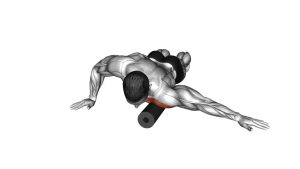
- Place the roller: Put a foam roller on the floor and position it under one side of your chest (pec), slightly below the collarbone and toward the shoulder attachment.
- Go prone: Lie face-down with the roller under the pec. Keep legs long behind you for stability.
- Support with your free side: Use your opposite forearm/hand and legs to control how much bodyweight sinks into the roller.
- Open the chest: Reach the rolling-side arm forward or slightly out to the side to expose the pec tissue (choose the angle that feels best).
- Find a starting spot: Start on the meaty part of the pec — avoid direct pressure on the front of the shoulder joint.
Tip: If pressure feels too intense, shift more weight to your supporting arm and legs. You control intensity.
Execution (Step-by-Step)
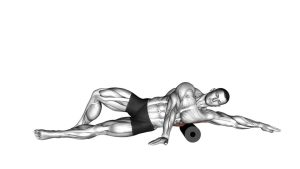
- Set pressure: Relax into the roller with moderate pressure. Inhale slowly through the nose.
- Small passes: Roll 2–4 inches forward/back across the pec fibers — slow, controlled, no rushing.
- Angle changes: Slightly rotate your torso or change arm position to target upper, mid, and outer pec fibers.
- Pause on tight areas: When you find a tender spot, hold 10–20 seconds while breathing calmly.
- Switch sides: Repeat the same process on the other pec with equal time and pressure.
Pro Tips & Common Mistakes
- Breathe to release: Slow exhale helps the pec relax and improves tolerance.
- Keep passes small: Big, fast rolling is less effective and often irritates the shoulder.
- Don’t roll on the shoulder joint: Stay on the pec muscle belly, not the front delt/AC area.
- Use arm angles strategically: Arm forward hits different fibers than arm out to the side.
- Moderate pressure wins: Too much pain makes you tense up and reduces the benefit.
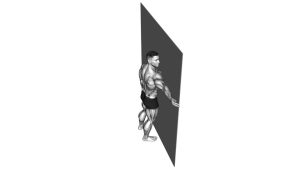
- Pair it with movement: After rolling, do light band pull-aparts, wall slides, or an easy chest opener for better carryover.
FAQ
Where should I feel chest foam rolling?
You should feel pressure and mild tenderness in the pec tissue—especially near the shoulder attachment. Avoid sharp pain or pinching directly in the shoulder joint.
How long should I foam roll my chest?
Most people do well with 30–90 seconds per side. If you’re very tight, use shorter sessions more often rather than one aggressive session.
Should I foam roll before or after a chest workout?
Both can work. Before training, keep it brief and light (30–60 sec/side) to improve movement quality. After training, you can go a bit longer at moderate pressure for recovery.
Is a ball better than a foam roller for pec release?
A foam roller is more comfortable and beginner-friendly. A lacrosse or massage ball is more precise and can feel much deeper, so it’s best used after you can tolerate the roller well.
Who should be cautious with this technique?
If you have an acute shoulder injury, severe pain, or nerve-like symptoms (numbness/tingling down the arm), avoid aggressive rolling and consider professional guidance.
Recommended Equipment
- High-Density Foam Roller — firmer pressure and longer-lasting support for chest/upper-body release
- Textured Foam Roller (Grid Style) — adds targeted pressure points without needing a ball
- Peanut Massage Roller — great for upper back and chest-edge work; more precise than a standard roller
- Lacrosse / Massage Ball — most precise option for stubborn pec tightness (use gently)
- Massage Gun — optional alternative for quick pec tissue work when rolling isn’t comfortable
Tip: Choose a tool that lets you stay relaxed. If you tense up or hold your breath, reduce pressure or use a softer roller.