Scapula Push-Up (Push-Up Plus): Serratus Activation, Form, Sets & Tips
Master the Scapula Push-Up (Push-Up Plus) to strengthen the serratus anterior and improve shoulder stability. Learn proper form, step-by-step execution, sets by goal, common mistakes, FAQs, and recommended equipment.
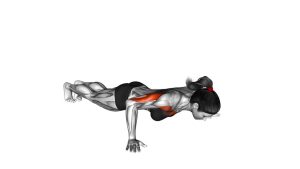
Scapula Push-Up (Scapular Push-Up / Push-Up Plus)
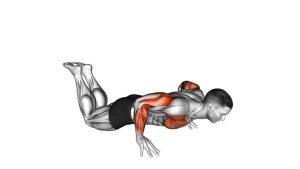
This exercise looks simple, but it’s all about precision. Your body stays in a strong plank while your shoulder blades do the work. Think: chest sinks slightly (scapulae move together), then push the floor away (scapulae spread apart). Keep the neck long, ribs stacked, and avoid bending your elbows.
Quick Overview
| Body Part | Chest |
|---|---|
| Primary Muscle | Serratus anterior (scapular protraction / upward rotation support) |
| Secondary Muscle | Pectorals (isometric), anterior deltoids, mid/low traps & rhomboids (control), core stabilizers |
| Equipment | None (optional: push-up handles/parallettes, resistance band) |
| Difficulty | Beginner (skill-based; excellent for warm-ups and shoulder health) |
Sets & Reps (By Goal)
- Warm-up / activation: 2–3 sets × 8–15 reps (slow + clean, 30–60 sec rest)
- Shoulder stability / posture: 3–4 sets × 10–20 reps (1–2 sec pause at the “plus”, 30–60 sec rest)
- Hypertrophy (serratus emphasis): 3–5 sets × 12–25 reps (add band or tempo, 45–75 sec rest)
- Rehab-style control: 2–3 sets × 6–12 reps (3–5 sec hold at top, 45–90 sec rest)
Progression rule: First increase control (pause + tempo), then add reps. Only add resistance (band/weight vest) after you can keep elbows locked and your shoulder blades move smoothly without shrugging.
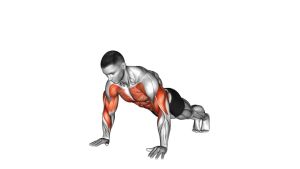
Setup / Starting Position
- Get into a high plank: Hands under shoulders, fingers spread, grip the floor lightly.
- Lock the elbows: Arms straight the entire set—do not turn it into a push-up.
- Brace the body: Glutes tight, core engaged, ribs down—make a straight line head to heels.
- Set the neck: Long neck, chin slightly tucked, eyes down a few feet in front of your hands.
- Start neutral: Shoulder blades “set” (not fully squeezed, not fully spread).
Tip: If full plank is too hard, start on knees or do it against a wall to learn clean scapular motion.
Execution (Step-by-Step)
- Stay locked: Keep elbows straight and body braced like a plank.
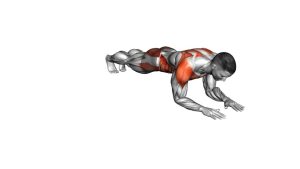
- Let the chest sink slightly: Allow the shoulder blades to move toward each other (scapular retraction). The torso dips a little, but you do not bend the arms.
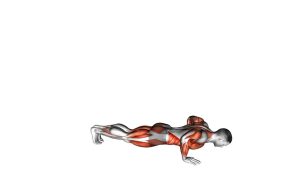
- Push the floor away: Spread the shoulder blades apart (scapular protraction). This is the “plus.”
- Pause and breathe: Hold 1–2 seconds at the top while keeping ribs stacked and shoulders away from the ears.
- Return with control: Move back to the retracted position smoothly—no bouncing.
Pro Tips & Common Mistakes
- Keep elbows straight: The most common mistake is turning this into a half push-up.
- Don’t shrug: Shoulders should not crawl toward your ears—keep them “down and wide.”
- Small range is fine: You only need enough motion to feel the shoulder blades move smoothly.
- Control the bottom: Don’t drop into retraction—lower slowly to keep shoulder joints happy.
- Pause at the “plus”: A brief hold at top dramatically improves serratus activation.
- Regress if needed: Knees or wall scapula push-ups are great for learning form.
- Pair it smart: Works perfectly before presses, push-ups, handstand work, or upper-body days.
FAQ
Where should I feel scapula push-ups?
Most people feel it along the outer ribcage under the armpit (serratus anterior), plus a “shoulder blade control” sensation across the upper back. You should not feel sharp pinching in the front of the shoulder.
Is this a chest exercise or a shoulder exercise?
It’s primarily a scapular stability exercise that supports better pressing. The serratus is the main target, while the chest contributes isometrically to keep the plank position stable.
How do I make scapula push-ups harder?
First add a pause (2–5 seconds) at the top and slow tempo. Then use a light resistance band around your upper back, elevate feet, or add a weight vest once form is perfect.
What if my shoulder blades “wing”?
Mild winging can be a sign your serratus needs strength and control. Start with wall or knee variations, keep the range smaller, and focus on a smooth “push the floor away” finish.
Should I do these every day?
Many people can do them 3–6 days per week as low-fatigue activation. Keep effort moderate and stop if you get irritation or lingering soreness.
Recommended Equipment (Optional)
- Push-Up Handles — reduces wrist strain and helps keep reps smooth and controlled
- Parallettes — stable neutral-grip option for wrist comfort and deeper protraction
- Resistance Bands Set — add light resistance around the upper back to load the “plus” phase
- Thick Exercise Mat — protects hands and knees for regressions and high-rep activation work
- Weight Vest — advanced progression once you can control scapular motion perfectly
Tip: Choose comfort tools (handles/mat) first. Only add load (bands/vest) after you can keep elbows locked and avoid shrugging.