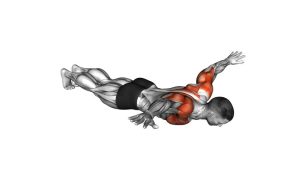
Archer Push-Up (Chest Focus): Form, Sets & Reps, Tips, and FAQs
Master the Archer Push-Up to build chest strength with a unilateral push-up variation. Learn setup, step-by-step form, sets & reps by goal, common mistakes, FAQs, and recommended gear.
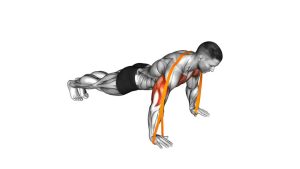
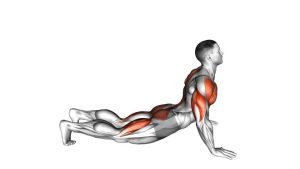
Archer Push-Up
This movement rewards control more than speed. Each rep should look smooth and deliberate: stable shoulders, tight core, and a confident press through the working side. If your hips rotate or you lose tension, reduce range of motion or widen your base.
Quick Overview
| Body Part | Chest |
|---|---|
| Primary Muscle | Pectoralis major (working side emphasis) |
| Secondary Muscle | Triceps, anterior deltoid, serratus anterior (stability), core (anti-rotation) |
| Equipment | None (optional: push-up handles/parallettes, wrist wraps, sliders) |
| Difficulty | Intermediate–Advanced (unilateral load + high stability demand) |
Sets & Reps (By Goal)
- Strength (main lift): 4–6 sets × 3–6 reps/side (2–3 min rest)
- Hypertrophy (muscle gain): 3–5 sets × 6–10 reps/side (60–120 sec rest)
- Endurance & control: 2–4 sets × 10–15 reps/side (45–90 sec rest)
- One-arm push-up progression: 4–8 sets × 2–5 reps/side (quality reps, long rest)
Progression rule: Add reps first, then add depth/range, then narrow your stance. Only progress when you can keep the hips square and the shoulder stable.
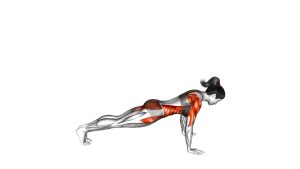
Setup / Starting Position
- Wide hand position: Place hands wider than shoulder-width. One hand will be the working side (bends), the other will stay more extended.
- Stable base: Set feet wider than a normal push-up to resist rotation.
- Brace: Squeeze glutes, tighten abs, and keep a straight line from head to heels.
- Shoulders packed: Think “push the floor away” to keep the shoulder blades stable (no collapsing).
- Wrist-friendly option: Use push-up handles/parallettes if flat palms irritate your wrists.
Tip: Start with a slightly smaller range of motion until you can keep the torso from twisting.
Execution (Step-by-Step)
- Shift to the working side: Move your chest toward the arm that will bend while keeping hips square.
- Lower with control: Bend the working elbow and descend toward that hand. The other arm stays more extended for support.
- Stay rigid: Keep your core tight so your torso doesn’t rotate or collapse.
- Reach a strong bottom: Stop just before shoulder discomfort—depth is earned, not forced.
- Press up: Drive through the working palm to return to the top, maintaining body tension.
- Switch sides: Alternate or complete all reps on one side before switching (based on your goal).
Pro Tips & Common Mistakes
Pro Tips
- Keep hips square: Imagine your belt buckle facing the floor the entire time.
- Drive through the working side: Let the extended arm assist lightly—don’t “push evenly.”
- Control the descent: A 2–3 second lowering builds strength and protects the shoulder.
- Use handles if needed: Neutral grips can reduce wrist extension stress.
- Progress smart: First add reps, then depth, then reduce base width.
Common Mistakes
- Twisting the torso: Rotation turns it into a different movement and reduces chest loading.
- Collapsing the shoulder: Keep the shoulder blade stable—don’t sink into the joint.
- Elbow flare overload: Excessive flare can irritate shoulders; aim for a strong, controlled path.
- Rushing reps: Speed hides instability. Slow down and own every position.
- Too much range too soon: Depth should never create pinching or sharp pain.
FAQ
What muscles do archer push-ups work the most?
The working-side chest does most of the pressing, with support from the triceps and front delts. Your core and serratus work hard to keep you from rotating.
Should I alternate sides each rep or do all reps per side?
Either works. For strength, many people prefer completing all reps on one side before switching. For conditioning or skill practice, alternating each rep can feel smoother.
How can I make the archer push-up easier?
Reduce depth, widen your feet more, slow the tempo, or elevate your hands on a bench/couch. You can also shift less weight onto the working side until your control improves.
How can I make it harder?
Narrow your stance, increase depth, pause at the bottom, elevate your feet, or use push-up handles for deeper range. Advanced athletes can gradually approach a one-arm push-up pattern over time.
My wrists hurt—what should I do?
Try push-up handles/parallettes to reduce wrist extension, warm up wrists, and keep your hands turned slightly out if comfortable. If pain persists, regress and address wrist mobility/strength.
Recommended Equipment (Optional)
- Push-Up Handles (Neutral Grip) — improves wrist comfort and can increase range of motion
- Parallettes — stable handles for deeper push-ups and progression work
- Wrist Wraps — added wrist support if you train push-ups frequently
- Core Sliders / Gliding Discs — useful for warm-ups and anti-rotation core drills that support push-up stability
- Resistance Bands Set — great for accessory work (band rows, pull-aparts) to balance pressing volume
Tip: If a tool changes your technique or causes discomfort, remove it and regress the movement. Strong, pain-free reps are always the priority.