Decline Wall Push-Up: Chest-Focused Form, Sets, Tips & FAQ
Learn the Decline Push-Up Against Wall to build chest strength with shoulder-friendly mechanics. Step-by-step form cues, sets & reps by goal, mistakes to avoid, FAQs, and recommended equipment.
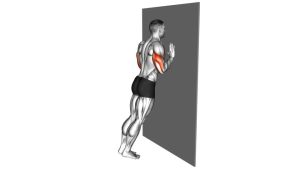
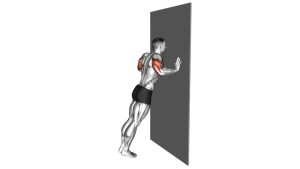
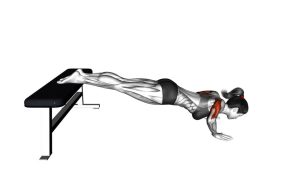
Decline Push-Up Against Wall
This variation rewards clean mechanics. The goal is to keep your body stiff like a plank and let the elbows bend smoothly as the chest moves toward the wall. Your reps should feel like chest + triceps, not shoulder pinching, wrist pain, or shrugging.
Quick Overview
| Body Part | Chest |
|---|---|
| Primary Muscle | Pectoralis major (chest) |
| Secondary Muscle | Anterior deltoids, triceps, serratus anterior (scapular control) |
| Equipment | Wall (optional: push-up handles/parallettes, bands, wrist wraps) |
| Difficulty | Beginner (progression-friendly; scalable by foot distance and tempo) |
Sets & Reps (By Goal)
- Technique / daily practice: 2–3 sets × 8–12 reps (2–3 sec down, 60 sec rest)
- Muscle & tone (hypertrophy): 3–4 sets × 8–15 reps (controlled tempo, 60–90 sec rest)
- Strength focus: 4–6 sets × 5–8 reps (slow eccentric, 90 sec rest)
- Warm-up / activation: 1–2 sets × 10–15 reps (easy effort, smooth reps)
Progression rule: First add reps or slow the lowering phase. Then step your feet farther from the wall (harder angle). Only progress if your body stays straight and shoulders feel good.
Setup / Starting Position
- Hands on wall: Place palms at chest height (slightly lower can increase chest emphasis). Hands shoulder-width or slightly wider.
- Step back: Walk your feet away until your bodyPE feels about 6–8/10 for your target rep range.
- Body line: Squeeze glutes, brace core, keep ribs “down” so your body forms a straight line from head to heels.
- Shoulders set: Keep shoulders away from ears. Neck stays neutral—don’t crane forward.
- Elbow path: Aim elbows slightly back (about 30–60° from your torso), not flared straight out.
Tip: If wrists feel cranky on the wall, use push-up handles/parallettes or place hands on a stable edge (e.g., sturdy countertop) to keep a more neutral wrist angle.
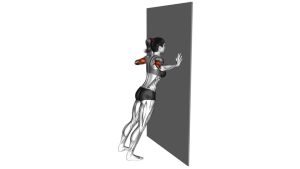
Execution (Step-by-Step)
- Inhale & lower: Bend elbows smoothly as your chest travels toward the wall. Keep the body rigid like a plank.
- Chest leads: Bring the chest close to the wall without collapsing or bouncing. Keep shoulders down and neck neutral.
- Pause lightly: Hold for ~1 second to own the bottom position (no shoulder pinch).
- Exhale & press: Drive palms into the wall and extend the elbows. Think “push the wall away.”
- Finish strong: Reach full lockout without shrugging. Reset posture and repeat with the same tempo.
Pro Tips & Common Mistakes
- Use the right angle: Stepping farther back increases load. Choose a distance where reps stay clean.
- Control the eccentric: Lower for 2–4 seconds to build strength and better chest stimulus.
- Elbows slightly back: A moderate elbow angle usually feels best for shoulders and hits the chest well.
- Don’t head-butt the wall: Keep the neck long; chest moves first.
- Avoid “banana back”: Ribs down, glutes on, core braced—keep a straight body line.
- Progress smart: Add reps/tempo first, then step farther back. Don’t rush to a harder angle.
FAQ
Where should I feel this exercise?
You should feel most of the work in the chest, with support from the triceps and front delts. If you feel sharp shoulder discomfort, adjust hand height, reduce the angle (step closer), and keep elbows slightly back.
How do I make it harder (progression)?
Step your feet farther from the wall, slow the lowering phase, add a brief pause near the wall, or use light resistance bands around your back for added tension (advanced).
What if my wrists hurt on the wall?
Use push-up handles/parallettes to keep wrists more neutral, or place hands on a stable edge (like a sturdy countertop). Warm up wrists and reduce the angle until the movement is comfortable.
How far from the wall should my feet be?
Far enough that the set feels challenging in your target rep range, but close enough to keep perfect posture. A good starting point is a distance where you can do 8–12 clean reps without hip sagging or shrugging.
Is this good for beginners?
Yes. It’s one of the most beginner-friendly pushing options because you can scale it instantly by stepping closer or farther, and it’s typically easier on the shoulders than many floor variations.
Recommended Equipment (Optional)
- Push-Up Handles (Neutral Wrist Grip) — reduce wrist extension and improve comfort on higher-rep sets
- Parallettes (Mini Dip Bars) — a sturdier neutral-grip option for push-up progressions and calisthenics
- Resistance Bands Set — add progressive tension or pair with rows/pull-aparts for posture balance
- Wrist Wraps — optional extra support if wrists feel unstable during pushing work
- Resistance Bands Best Sellers — quick way to compare popular band options before buying
Tip: Choose equipment that improves comfort and consistency—if a tool causes pain or compensation, scale back and keep the reps clean.