Lever Incline Hammer Chest Press (Incline Machine) — Form, Sets & Tips
Learn the Lever Incline Hammer Chest Press with step-by-step form, sets by goal, pro tips, common mistakes, FAQs, and recommended gear to build upper-chest strength safely.
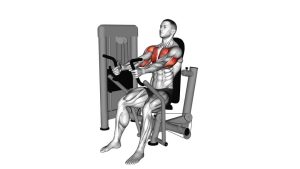
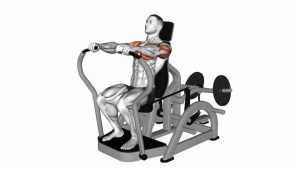
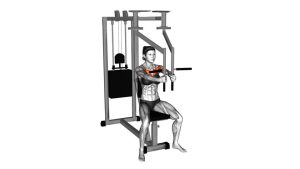
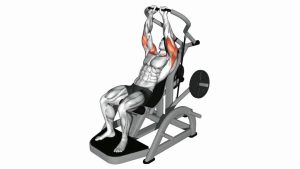
Lever Incline Hammer Chest Press
This movement is ideal if you want an upper-chest-focused press without needing as much balance as dumbbells or a barbell. Because the handles are neutral, many lifters find it easier to keep the shoulders comfortable while still loading the chest hard.
Quick Overview
| Body Part | Chest |
|---|---|
| Primary Muscle | Upper pectoralis major (clavicular head) |
| Secondary Muscle | Anterior deltoids, triceps brachii, serratus anterior (stabilization) |
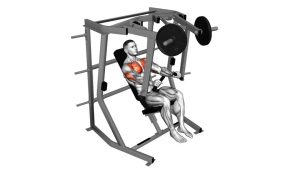
| Equipment | Lever incline chest press machine (neutral/hammer grips) |
| Difficulty | Beginner–Intermediate (stable machine path; easy to load progressively) |
Sets & Reps (By Goal)
- Strength focus: 4–6 sets × 3–6 reps (2–3 min rest, heavy but clean)
- Hypertrophy (size): 3–5 sets × 8–12 reps (60–120 sec rest, controlled tempo)
- Muscular endurance: 2–4 sets × 12–20 reps (45–75 sec rest, steady pace)
- Shoulder-friendly pressing: 2–4 sets × 10–15 reps (moderate load, smooth reps, no strain)
Progression rule: Add reps first (until you hit the top of the range). Then increase load slightly while keeping the same technique and full control on the way down.
Setup / Starting Position
- Adjust the seat: Sit so the handles start around upper-chest level (not too high into the shoulders).
- Set your back: Keep your upper back and head supported on the pad. Maintain a natural, comfortable spine.
- Plant your feet: Feet flat and slightly staggered if needed for stability.
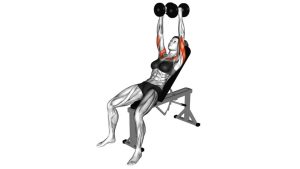
- Grip neutral: Palms facing each other. Wrists stacked (don’t bend them back).
- Brace lightly: Ribs down, core engaged—avoid excessive arching to “cheat” the press.
Tip: If the bottom position feels cramped, reduce the range slightly or adjust the seat so your elbows don’t drift too far behind the torso.
Execution (Step-by-Step)
- Start tall and packed: Keep shoulder blades gently down and back against the pad.
- Press smoothly: Drive the handles forward/up along the machine’s arc. Keep elbows slightly tucked—don’t flare aggressively.
- Stop short of harsh lockout: Finish with arms nearly straight while keeping tension on the chest.
- Control the return: Lower the handles slowly until you feel a strong chest stretch—no bouncing.
- Repeat with consistent rhythm: Maintain the same path and torso position every rep.
Pro Tips & Common Mistakes
Pro Tips
- Use a 2–3 second eccentric: The controlled lower is where a lot of chest growth happens.
- Keep wrists stacked: Neutral wrists improve pressing power and comfort.
- Drive elbows “forward,” not “out”: A mild tuck often feels better on the shoulders.
- Pause reps for quality: A 1-second pause near the bottom can improve control and reduce cheating.
Common Mistakes
- Shoulders rolling forward: Keep the upper back pinned to the pad; don’t “reach” at the top.
- Bouncing the bottom: Don’t slam into end range—control it.
- Over-arching the lower back: A small natural arch is fine; excessive arching shifts work away from the chest.
- Locking out aggressively: Hard lockout can dump tension off the pecs and irritate elbows.
FAQ
What should I feel during the lever incline hammer press?
You should feel the most tension in the upper chest, with assistance from the front delts and triceps. If the shoulders dominate, adjust the seat, keep elbows slightly tucked, and reduce the bottom range a little.
Is neutral grip better for my shoulders?
For many lifters, yes. A neutral grip can feel more joint-friendly than a wide, flared-elbow position. Still, the best setup is the one where you can press with no pinching and stable shoulder blades.
How low should I lower the handles?
Lower until you feel a strong chest stretch while keeping the shoulders stable and pain-free. Avoid “diving” too deep if you lose shoulder position or feel discomfort.
Where should this fit in a chest workout?
It works great as a primary incline press (heavy sets) or as a second movement after a free-weight press. Pair it with a fly/cable movement for a complete upper-chest session.
Can I do this if I’m a beginner?
Yes—machines are often beginner-friendly because the path is guided. Start with a light load, master control, and progress gradually.
Recommended Equipment (Optional)
- Adjustable Incline Weight Bench — helpful for incline pressing at home and incline dumbbell work
- Wrist Wraps (Bench Press / Pressing Support) — improves wrist comfort and stability during heavier pressing
- Weightlifting Gloves (Optional Grip Support) — reduces handle discomfort and helps maintain consistent grip
- Resistance Bands Set — great for warm-ups (band pull-aparts) and shoulder-prep before pressing
- High-Density Foam Roller — supports thoracic mobility work to help pressing posture and comfort
Tip: Choose gear that supports your technique (better setup, comfort, and warm-up quality). The best “equipment” is still clean reps and steady progression.