Shoulder Tap to Waist: Core Anti-Rotation, Form, Sets & Common Mistakes
Master the Shoulder Tap to Waist from a high plank to build core stability, anti-rotation strength, and shoulder control. Learn proper setup, step-by-step execution, sets by goal, mistakes to avoid, FAQs, and recommended gear.
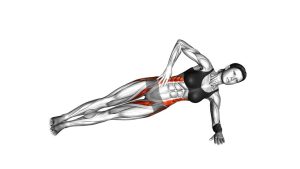
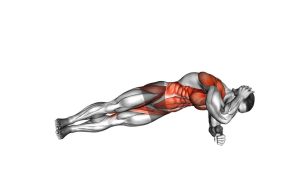
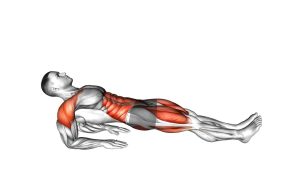
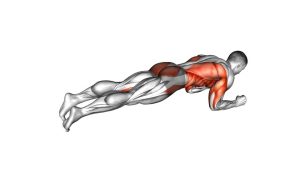
Shoulder Tap to Waist (Plank Anti-Rotation)
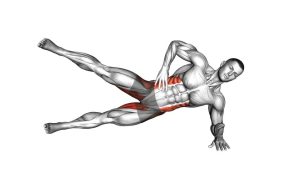
This exercise is not about speed—it’s about control. You should feel your obliques and deep core working to keep your pelvis level while the supporting shoulder stays stable. If you’re swaying side-to-side, shorten the set, widen your feet, and slow down.
Quick Overview
| Body Part | Core (Obliques) |
|---|---|
| Primary Muscle | Obliques + deep core (Transverse abdominis) |
| Secondary Muscle | Shoulders (deltoids), serratus anterior, triceps, glutes |
| Equipment | None (optional: yoga mat, push-up handles, bench for incline) |
| Difficulty | Beginner → Intermediate (depends on plank strength and control) |
Sets & Reps (By Goal)
- Core stability (technique focus): 2–4 sets × 6–10 reps/side (slow tempo, 45–75 sec rest)
- Warm-up / activation: 1–3 sets × 5–8 reps/side (easy effort, crisp control)
- Strength endurance: 3–5 sets × 10–16 reps/side (steady tempo, 60–90 sec rest)
- Conditioning circuit: 30–45 sec work (alternating taps) × 2–4 rounds
Progression rule: First reduce hip sway (control), then increase reps/time. Add difficulty last: narrow your stance, pause longer at the tap, or move to a slower 3–1–3 tempo.
Setup / Starting Position
- Hands under shoulders: Palms flat, fingers spread, press the floor away.
- Strong plank line: Head to heels in one line—no sagging low back or high hips.
- Feet for stability: Start with feet slightly wider than hips to reduce wobble.
- Brace the midsection: “Ribs down” and tighten your core like preparing for a gentle punch.
- Shoulders active: Light protraction (push the ground away) to engage serratus and keep the shoulder stable.
Tip: If wrists are sensitive, use push-up handles or perform on fists (neutral wrist) on a soft mat.
Execution (Step-by-Step)
- Lock in your plank: Inhale softly, brace your core, and keep hips level.
- Shift weight smoothly: Move your body slightly over one hand without twisting.
- Tap to the opposite waist/hip: Lift the other hand and touch the opposite side of your waist/hip area with control.
- Return the hand under the shoulder: Place it down quietly—avoid “slapping” the floor.
- Alternate sides: Repeat, keeping the same calm tempo and minimizing sway.
Pro Tips & Common Mistakes
Pro Tips
- Go slow to go hard: A slower rep exposes compensation and builds real stability.
- Widen your stance to learn: Feet wider = easier anti-rotation; narrow later as you progress.
- Quiet hands: Place the hand down gently to keep the torso steady.
- Think “hips still, ribs stacked”: This keeps the core working and prevents low-back takeover.
Common Mistakes
- Hip sway/rotation: Usually from moving too fast or stance too narrow.
- Sagging low back: Re-brace and squeeze glutes; shorten the set.
- Shrugged shoulders: Keep the neck long and shoulders “down away from ears.”
- Hand lands outside shoulder: Return the hand under the shoulder for stable mechanics.
FAQ
Where should I feel this exercise?
Mostly in your obliques and deep core as they prevent your hips from twisting. You’ll also feel the supporting shoulder and serratus working to keep you stable.
How do I make it easier?
Use a wider foot stance, slow the tempo, or elevate your hands on a bench/couch (incline plank). You can also reduce range by tapping the same-side shoulder first before progressing to the waist tap.
How do I make it harder?
Narrow your stance, add a 1–2 second pause at the tap, or perform a slower tempo (e.g., 3 seconds up, pause, 3 seconds down). Advanced options include adding a light weight vest or moving to feet-together taps.
Is this safe if my wrists hurt?
If your wrists are irritated, try push-up handles, perform on fists on a soft mat, or do an incline version. If pain persists, avoid loading that position and consider professional guidance.
Should I do reps or time?
For skill and form, reps work best (clean reps/side). For conditioning, timed sets (30–45 seconds) are great—as long as hip sway doesn’t increase.
Recommended Equipment (Optional)
- Non-Slip Yoga / Exercise Mat — improves traction and comfort for wrists and toes
- Push-Up Handles (Neutral Wrist) — reduces wrist extension and helps keep shoulders stacked
- Slider Discs — add progressions and instability-based core work
- Resistance Bands Set — ideal for pairing with posture/upper-back work (rows, pull-aparts)
- Light Weight Vest (Optional Progression) — adds load once you can keep hips perfectly still
Tip: Gear should support better form, not force harder reps. If a tool increases wrist/shoulder symptoms, remove it and regress the variation.