Pike Push-Up : Form, Sets & Reps, Tips, Mistakes + FAQ
Master the chest-focused pike push-up with step-by-step form cues, sets & reps by goal, common mistakes, FAQs, and the best optional equipment to level up your upper-chest bodyweight training.
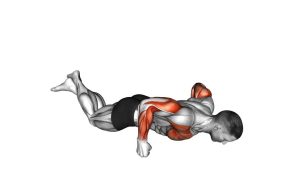
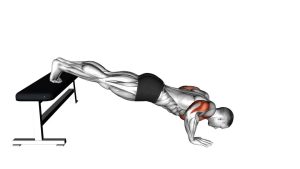
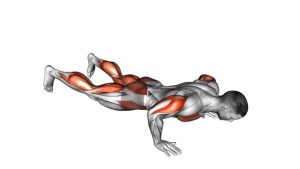
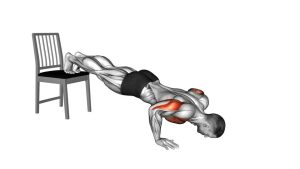
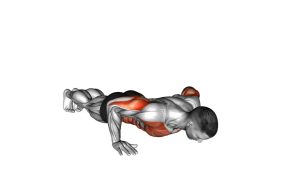
Pike Push-Up (Chest Focus)
This variation rewards clean alignment more than speed. Your goal is to keep a strong “inverted V” shape with the hips elevated, ribcage controlled, and elbows tracking smoothly. You should feel effort in the upper chest and front shoulders with stable shoulder blades—not neck strain, wrist pain, or a collapsing upper back.
Quick Overview
| Body Part | Chest |
|---|---|
| Primary Muscle | Upper chest (clavicular head of pectoralis major) |
| Secondary Muscle | Anterior deltoids, triceps, serratus anterior, core stabilizers |
| Equipment | None (optional: push-up handles, yoga mat, incline surface) |
| Difficulty | Intermediate (scale down by elevating hands or reducing range) |
Sets & Reps (By Goal)
- Strength (main lift): 3–5 sets × 4–8 reps (90–150 sec rest)
- Hypertrophy (muscle building): 3–4 sets × 8–12 reps (60–90 sec rest)
- Endurance / conditioning: 2–4 sets × 12–20 reps (30–60 sec rest)
- Skill & control (form focus): 3–5 sets × 3–6 reps with a 3-sec lower + 1-sec pause
Progression rule: Add reps first (clean form), then slow the tempo, then increase range. Only progress to harder angles when your shoulders stay stable and your reps stay smooth.
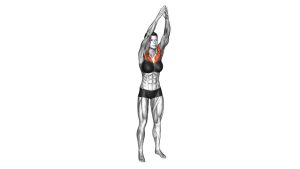
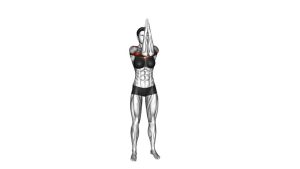
Setup / Starting Position
- Hands down: Place hands slightly wider than shoulders with fingers spread for stability.
- Feet back: Walk feet in and lift hips high to form an inverted “V” (pike).
- Stack the shoulders: Push the floor away lightly (active shoulders). Avoid collapsing between the shoulder blades.
- Brace the trunk: Ribs tucked, core tight, glutes lightly engaged—no lower-back arching.
- Find your angle: For more chest emphasis, allow a small forward lean so the torso shifts slightly toward the hands.
Execution (Step-by-Step)
- Inhale and brace: Lock in the pike shape—hips up, core firm, shoulders active.
- Lower with control: Bend the elbows and bring the head/upper chest down toward the floor in a smooth path.
- Elbow angle: Keep elbows at a moderate angle (not straight out to the sides, not pinned tight).
- Bottom position: Pause briefly when you reach your deepest controlled range—no collapsing.
- Press up: Exhale as you drive through the palms to return to the top with elbows extended and hips still high.
Pro Tips & Common Mistakes
Pro Tips
- Use a slow lower: 2–4 seconds down builds control and chest tension.
- Grip the floor: Spread fingers and “screw” hands gently into the ground for shoulder stability.
- Micro-lean for chest: A small forward shift increases upper-chest involvement (without losing pike).
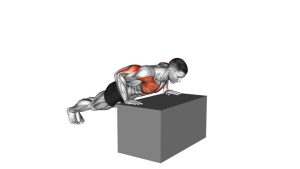
- Elevate hands to scale: Use a bench/box/countertop to make reps cleaner before going to the floor.
- Match range to quality: Depth matters only if you can keep shoulders stable and elbows tracking well.
Common Mistakes
- Turning it into a regular push-up: Hips drop and chest moves forward too far—loses the pike mechanics.
- Excessive elbow flare: Can irritate shoulders and reduces control.
- Collapsing between shoulders: Shoulder blades dump together—keep the upper back active.
- Bouncing at the bottom: Momentum replaces strength and increases joint stress.
- Neck strain: Craning the head forward—keep the neck neutral and movement controlled.
FAQ
Where should I feel a chest-focused pike push-up?
You should feel the most work in the upper chest and front shoulders, with the triceps assisting. If it’s all wrists or neck, elevate your hands and reduce range until your form is stable.
How do I make it more chest-focused (not just shoulders)?
Use a small forward lean, keep elbows at a moderate angle, and slow the descent. Don’t over-lean or drop the hips—keep the pike shape while shifting slightly toward your hands.
What’s the best regression for beginners?
Elevate your hands on a sturdy surface (bench/box/countertop), reduce depth, and use a slow tempo. Aim for clean reps before lowering the incline.
What’s the best progression when this becomes easy?
Increase reps first, then slow tempo, then deepen range. After that, increase the challenge by elevating feet, narrowing base slightly, or using push-up handles for extra range (only if shoulders feel good).
Is this safe for shoulders?
It can be shoulder-friendly when controlled, but if you feel pinching or pain, regress the angle, reduce flare, and keep the shoulder blades active. If symptoms persist, consult a qualified professional.
Recommended Equipment (Optional)
- Push-Up Handles / Parallettes — improves wrist comfort and can increase range (only if shoulders stay stable)
- Non-Slip Thick Yoga Mat — better grip and cushioning for hands/feet on hard floors
- Resistance Bands Set — great for pairing with upper-back work (rows/pull-aparts) to balance pressing
- Push-Up Board (Hand Position Guide) — helps standardize hand placement and training variety
- Foam Roller — useful for thoracic mobility to improve overhead/pike comfort
Tip: Optional tools should make reps cleaner, not harsher. If any item increases discomfort, skip it and scale the movement instead.