Band Low Chest Fly (Low-to-High Band Fly): Form, Sets & Tips for Upper Chest
Learn the Band Low Chest Fly (low-to-high band fly) to target the upper chest at home. Step-by-step form cues, sets & reps by goal, common mistakes, FAQs, and recommended gear.
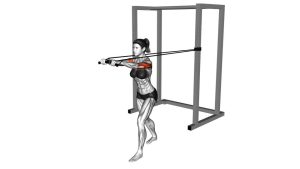
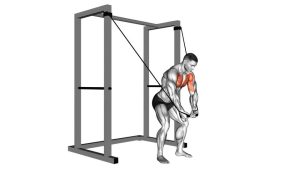
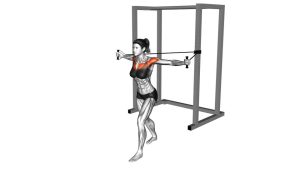
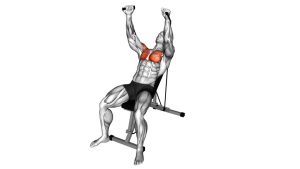
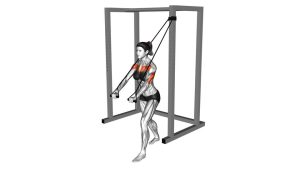
Band Low Chest Fly (Low-to-High Band Fly)
This exercise is all about tension and control, not max load. Keep your shoulders down and back, maintain a gentle elbow bend, and use a stable stance so your chest does the work—not momentum. The band’s resistance increases as you bring your hands together, making it great for a strong top-end squeeze.
Quick Overview
| Body Part | Chest |
|---|---|
| Primary Muscle | Pectoralis major (upper/clavicular fibers emphasis) |
| Secondary Muscle | Anterior deltoids, serratus anterior, biceps (stabilization), core |
| Equipment | Resistance bands + low anchor point (door anchor / squat rack / sturdy post) |
| Difficulty | Beginner–Intermediate (easier to learn than cables, but requires control) |
Sets & Reps (By Goal)
- Hypertrophy (muscle growth): 3–5 sets × 8–15 reps (60–90 sec rest)
- Upper-chest pump / finisher: 2–4 sets × 12–25 reps (30–60 sec rest)
- Strength-focused (bands): 4–6 sets × 6–10 reps (90–120 sec rest, heavier band)
- Warm-up / activation: 1–3 sets × 12–20 reps (easy tension, smooth tempo)
Progression rule: Add reps first, then add band tension (or step farther from the anchor). Keep your top squeeze strong and your shoulder position stable before increasing load.
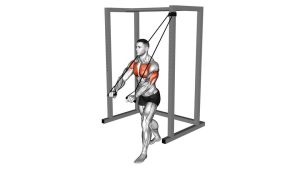
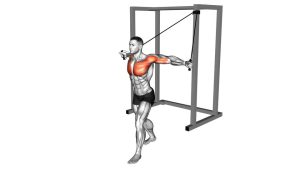
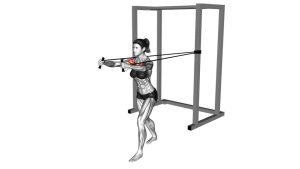
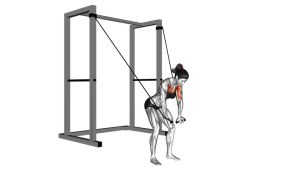
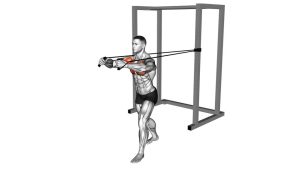
Setup / Starting Position
- Anchor low: Attach bands at a low point behind you (around shin/knee height).
- Grab handles and step forward: Walk out until you feel steady tension with arms slightly behind the torso line.
- Stagger your stance: One foot forward, soft knees, ribs stacked over hips for stability.
- Set shoulders: Shoulders down and slightly back (avoid shrugging).
- Soft elbow bend: Keep elbows unlocked—think “hugging a big tree.”
Tip: If the bands pull you backward, shorten the stance, reduce tension, or widen your base slightly.
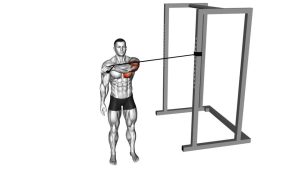
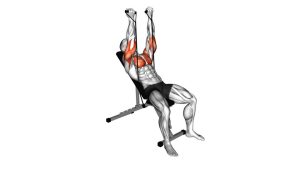
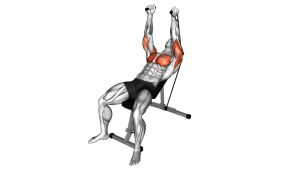
Execution (Step-by-Step)
- Start low and open: Hands low and slightly out to the sides, chest tall, core braced.
- Sweep up and in: Bring your hands upward and inward in a diagonal arc (low-to-high).
- Keep the elbows consistent: Maintain the same elbow bend—don’t turn it into a press.
- Squeeze at the top: Finish around mid-to-upper chest level and pause 1 second.
- Return with control: Let the arms open back along the same arc; don’t let the band snap you back.
Pro Tips & Common Mistakes
Pro Tips
- Match the angle to the goal: Low-to-high = more upper-chest bias. Keep the finish near upper chest height.
- Own the top: Pause and squeeze for 1–2 seconds to maximize band tension where it’s hardest.
- Keep shoulders quiet: “Shoulders down, chest proud” prevents shrugging and front-shoulder dominance.
- Use a stable stance: Stagger stance + braced core helps you isolate the chest.
Common Mistakes
- Turning it into a press: Bending elbows more as you lift shifts work away from the chest.
- Shrugging at the top: Elevating shoulders steals tension and can irritate the shoulder.
- Too much stretch: Over-opening the arms can stress the front shoulder—keep a comfortable range.
- Using momentum: Rocking the torso reduces tension; slow the tempo and reduce band load.
Tempo suggestion: 2 seconds up → 1 second squeeze → 2–3 seconds down.
FAQ
Where should I feel the Band Low Chest Fly?
Mostly in the chest, with a noticeable squeeze near the top. You may feel the front shoulders a little, but they shouldn’t dominate. If shoulders take over, reduce tension, keep shoulders down, and maintain a steady elbow bend.
Is low-to-high better for upper chest?
It can help bias the upper-chest fibers because the resistance line travels upward. It won’t “isolate” only upper chest, but it’s a great angle to include alongside presses and other fly directions.
What anchor height is best?
Start with a low anchor around shin-to-knee height. If it feels too shoulder-heavy, raise the anchor slightly or reduce range until the chest squeeze feels strongest.
How do I progress without heavier bands?
Step farther from the anchor, add a 1–2 second squeeze, increase reps, slow the eccentric (lowering), or perform 1.5 reps (halfway down → back up → full down = 1 rep).
Can I do this with one band or two?
Both work. Two separate bands/handles often feel smoother and more balanced. One long band can work if it’s centered and the tension feels even on both sides.
Recommended Equipment (Optional)
- Resistance Bands Set (with Handles) — versatile tensions for flys, presses, rows, and warm-ups
- Door Anchor for Resistance Bands — creates a secure low anchor point for home training
- Heavy-Duty Band Handles — more comfortable grip and better control under tension
- Loop Resistance Bands (Heavy) — great for stronger band setups and pairing with other movements
- Band Anchor Strap / Mount — useful for rack/pole anchoring when a door anchor isn’t available
Tip: Keep anchors stable and check wear on bands regularly. Replace any band that shows cracks, thinning, or tearing.