Band Low-to-High Chest Fly: Form, Sets & Reps, Tips (Resistance Band Upper Chest Fly)
Learn the Band Low-to-High Chest Fly to target the upper chest with constant tension. Step-by-step form cues, sets & reps by goal, common mistakes, FAQs, and recommended band gear.
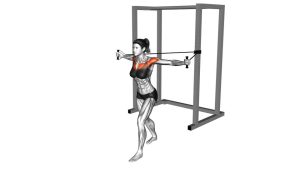
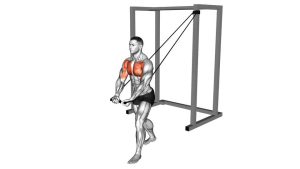
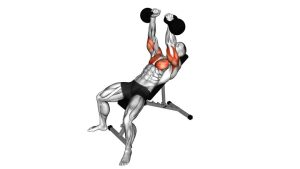
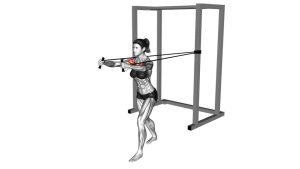
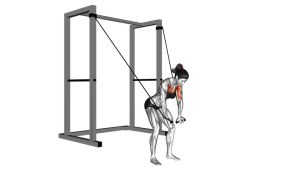
Band Low-to-High Chest Fly
Bands reward control. Your goal is to keep your torso steady while the arms move through a low-to-high arc. You should feel the chest doing the work—not the neck, traps, or biceps. Choose a band tension that allows clean reps and a strong squeeze without snapping back on the return.
Quick Overview
| Body Part | Chest |
|---|---|
| Primary Muscle | Pectoralis major (upper/clavicular emphasis) |
| Secondary Muscle | Anterior deltoid; serratus anterior (stability); core (anti-lean) |
| Equipment | Resistance band + low anchor (door anchor, rack, heavy object) |
| Difficulty | Beginner–Intermediate (easy to learn, harder to master tension control) |
Sets & Reps (By Goal)
- Muscle gain (hypertrophy): 3–5 sets × 8–15 reps (60–90 sec rest)
- Upper-chest focus (quality reps): 3–4 sets × 10–20 reps (45–75 sec rest)
- Warm-up / activation before presses: 2–3 sets × 12–20 reps (30–60 sec rest)
- Home finisher / pump: 2–4 sets × 15–30 reps (short rests, strict form)
Progression rule: Add reps first, then slightly increase band tension or step farther forward. Keep the same smooth tempo and avoid turning it into a whole-body swing.
Setup / Starting Position
- Anchor low behind you: Secure the band at ankle-to-shin height behind your body.
- Grab handles and step out: Walk forward until you feel light-to-moderate tension with arms slightly behind your torso.
- Set your stance: Use a staggered stance (one foot forward) for stability; knees soft.
- Brace and stack: Ribs down, core tight, glutes lightly engaged—no lower-back arching.
- Arm position: Soft bend at the elbows; wrists neutral; shoulders down and back (no shrug).
Tip: If the band pulls you backward, shorten the range or reduce tension—your torso should stay quiet.
Execution (Step-by-Step)
- Start low and wide: Hands slightly outside your hips with elbows softly bent, chest lifted.
- Sweep up and in: Move your hands forward and upward in an arc toward upper-chest level.
- Keep elbows “locked” in shape: Maintain the same elbow bend—don’t turn it into a press.
- Squeeze the chest: Bring hands close together (don’t smash), pause 1–2 seconds.
- Control the return: Lower back down and out slowly (2–3 seconds), resisting band recoil.
Pro Tips & Common Mistakes
- Think “hug upward”: Low-to-high arc toward the upper chest helps keep the upper chest involved.
- Shoulders down: Avoid shrugging at the top—keep neck long and traps quiet.
- Don’t overreach behind you: Too much stretch can irritate the front shoulder. Keep it comfortable.
- No torso swing: If you’re rocking, reduce tension or use a wider staggered stance.
- Keep the wrists neutral: Bending wrists often shifts tension away from the chest and feels unstable.
- Use a controlled tempo: Smooth up, pause, slow down—bands punish sloppy eccentrics.
FAQ
Where should I feel the band low-to-high chest fly?
You should feel it primarily in the chest, often with a noticeable squeeze near the top. Mild front-shoulder involvement is normal, but if you feel sharp pinching, reduce range and keep shoulders down and back.
Is low-to-high better for the “upper chest”?
The line of pull can bias the upper chest for many lifters, especially when you keep the elbows slightly forward and finish around upper-chest height. It’s not magic—good control and consistent tension matter most.
How do I make it harder without heavier bands?
Step farther forward to increase tension, slow the eccentric to 3–4 seconds, add a 2-second squeeze at the top, or use 1.5 reps (halfway down, back up, then full down = 1 rep).
What if I feel it mostly in my shoulders?
Reduce the range behind the body, keep the chest lifted, and think “shoulders down.” Also keep the elbow bend constant—if you turn it into a press, the front delts may take over.
Recommended Equipment
- Resistance Bands Set (with Handles) — multiple tensions for progressive overload and fly-friendly grip
- Door Anchor for Resistance Bands — creates a stable low anchor point at home without drilling
- Band Handles / Grips — improves comfort and control (especially on higher-rep sets)
- Heavy-Duty Loop Bands — versatile bands that can be anchored low and used for many upper-body movements
- Non-Slip Exercise Mat — improves footing for staggered-stance flys and keeps setup consistent
Tip: Prioritize a secure anchor. Most form issues come from instability or too much band tension too soon.