Band Cross-Body One-Arm Chest Press: Form, Muscles Worked, Sets & Tips
Master the band cross-body one-arm chest press for chest strength and shoulder-friendly pressing. Learn setup, step-by-step form, sets & reps by goal, common mistakes, FAQs, and recommended gear.
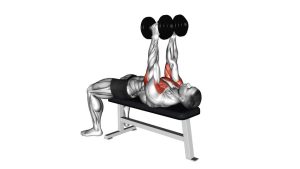
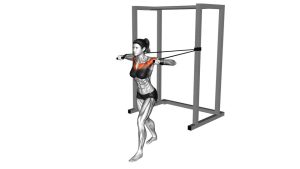
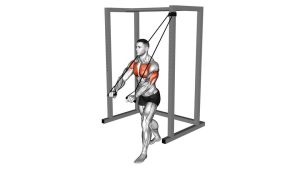
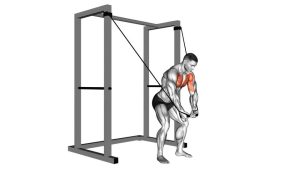
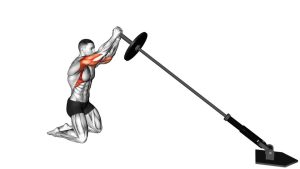
Band Cross-Body One-Arm Chest Press
You’ll get the best results when the movement stays smooth and controlled. Use a band tension that lets you keep your shoulder down and back (no shrugging), and avoid twisting your torso as you press. If you feel discomfort in the front of the shoulder, reduce the range, lower the anchor point slightly, and keep your elbow closer to a 30–45° “tucked” path.
Quick Overview
| Body Part | Chest |
|---|---|
| Primary Muscle | Pectoralis major (sternal fibers emphasized with the cross-body finish) |
| Secondary Muscle | Anterior deltoid, triceps, serratus anterior; core/obliques (anti-rotation) |
| Equipment | Resistance band with handle + door/wall anchor (or sturdy rack post) |
| Difficulty | Beginner–Intermediate (easier to load precisely than free weights; demands core control) |
Sets & Reps (By Goal)
- Hypertrophy (muscle gain): 3–5 sets × 8–15 reps/side (60–90 sec rest)
- Strength focus: 4–6 sets × 5–8 reps/side (90–150 sec rest, heavier band)
- Endurance / conditioning: 2–4 sets × 15–25 reps/side (30–60 sec rest)
- Shoulder-friendly control / rehab style: 2–3 sets × 8–12 reps/side (2–3 sec pause, 60 sec rest)
Progression rule: Add reps first, then add band tension (or step farther from the anchor). Keep your torso stable—if you start rotating, the band is too heavy or your stance is too narrow.
Setup / Starting Position
- Anchor height: Set the band behind you around mid-chest height. Slightly lower can feel more shoulder-friendly.
- Stance: Use a split stance (one foot forward) with soft knees. This helps balance and reduces torso twisting.
- Grip & alignment: Hold the handle in one hand with a neutral wrist. Start with the elbow bent and the hand near the side of your chest.
- Shoulder position: “Pack” the shoulder—down and slightly back. Keep the ribcage stacked (no big arch).
- Pre-tension: Step forward until you feel light tension at the start position—enough to control the return.
Tip: If your shoulder feels cranky, start with a shorter range and press slightly “down-forward” rather than high and flared.
Execution (Step-by-Step)
- Brace: Inhale softly and tighten your core as if someone might bump your shoulder.
- Press diagonally: Drive the handle forward and slightly across your body (toward your midline). Keep the shoulder down.
- Finish strong: Stop just before locking the elbow hard. Squeeze the chest for 1 second without shrugging.
- Return with control: Let the arm come back along the same diagonal path—slow and smooth. Don’t let the band snap you back.
- Repeat clean reps: Same stance, same path, same torso angle every rep. Switch sides and match the quality.
Pro Tips & Common Mistakes
- Pro tip — slight “reach” at the top: A tiny reach can engage serratus and improve shoulder mechanics (don’t shrug).
- Pro tip — pause reps: Add a 1–2 second pause at full press to build control and chest squeeze.
- Mistake — flaring the elbow: Too wide can stress the shoulder. Keep a 30–45° elbow angle from the torso.
- Mistake — rotating to “cheat”: Rotation reduces chest work. Use anti-rotation: stay square.
- Mistake — bent wrist: Keep the wrist stacked over the forearm for better force transfer.
- Mistake — letting the band snap back: Own the eccentric; that’s where a lot of growth happens.
FAQ
Where should I feel this exercise?
Mostly in the chest (pec major) with support from the triceps. You’ll also feel your core working to stop your torso from rotating. If you feel sharp front-shoulder discomfort, reduce range and tuck the elbow slightly.
Why “cross-body” instead of straight forward?
The cross-body finish adds horizontal adduction, which often increases chest contraction. It’s similar to the “squeeze” you get in cable fly/press patterns, but with a band.
What anchor height is best?
Start around mid-chest height. If the shoulder feels irritated, try a slightly lower anchor. If you want more upper-chest emphasis, raise it a bit—but keep the shoulder packed and ribs down.
How do I make it harder without heavier bands?
Step farther from the anchor, slow the eccentric to 3–4 seconds, add a pause at the top, or perform 1.5 reps (top half → full rep = 1).
Is this a good alternative to dumbbell or bench pressing?
Yes—especially for home workouts or when you want a more joint-friendly resistance curve. Bands load hardest near lockout, which can feel smoother for many shoulders.
Recommended Equipment (Amazon)
- Bodylastics Resistance Bands Set (with Door Anchor) — solid all-in-one kit for pressing, rows, and fly variations
- INTEY Resistance Bands Set (Handles + Door Anchor) — budget-friendly option for a full-body band setup
- TRIBE Resistance Bands Set (Handles + Ankle Straps + Door Anchor) — good accessory bundle for unilateral pressing and lower-body work
- Extra-Large Heavy-Duty Door Anchor — improves safety and reduces band wear at the door
- Multi-Loop Door Anchor Strap (Multiple Heights) — lets you change pressing angles quickly (low/mid/high anchors)
Tip: Anchor the band on the hinge side of a solid door when possible, and test the setup with light tension first.