Band Standing Alternate Chest Press: Form, Sets & Reps, Tips, FAQ + Best Bands
Master the Band Standing Alternate Chest Press to build chest strength with core anti-rotation control. Step-by-step form cues, sets & reps by goal, common mistakes, FAQs, and recommended resistance band gear.
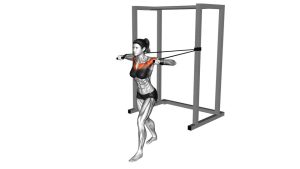
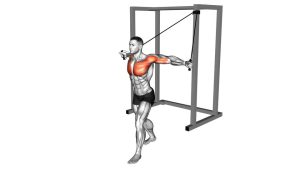
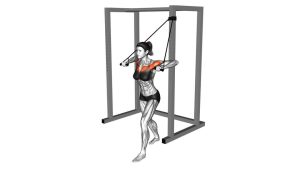
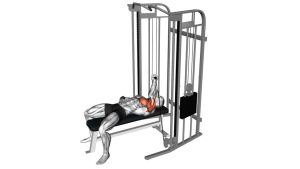
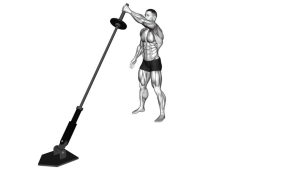
Band Standing Alternate Chest Press
This exercise rewards control more than force. Aim for a stable torso and a clean press path (hands move straight forward at chest height). You should feel strong work in the pecs and triceps, plus steady engagement through the abs/obliques to prevent twisting. If your shoulders rise, ribs flare, or the band snaps you back—reduce resistance and slow down.
Quick Overview
| Body Part | Chest |
|---|---|
| Primary Muscle | Pectoralis major (chest) |
| Secondary Muscle | Triceps, anterior deltoid; core stabilizers (obliques/TVA) as anti-rotation |
| Equipment | Resistance band + anchor point (door anchor, rack post, or sturdy fixed object) |
| Difficulty | Beginner–Intermediate (scales easily with band tension and stance) |
Sets & Reps (By Goal)
- Strength focus: 3–5 sets × 6–10 reps/side (60–90 sec rest, slower return)
- Hypertrophy (muscle gain): 3–4 sets × 10–15 reps/side (45–75 sec rest, constant tension)
- Endurance/conditioning: 2–4 sets × 15–25 reps/side (30–60 sec rest, steady rhythm)
- Shoulder-friendly pump: 2–3 sets × 12–20 reps/side (light band, smooth control)
Progression rule: Add reps first, then slow the eccentric (return) to 2–3 seconds. Increase band tension only if you can keep your torso square and shoulders down.
Setup / Starting Position
- Anchor the band behind you: Set it around mid-chest height (roughly sternum level).
- Step forward into tension: Walk out until the band already has light pull in the start position.
- Choose a stance: Use a split stance (one foot forward) for stability, knees soft.
- Stack your posture: Ribs down, glutes lightly on, spine neutral, head tall.
- Hand position: Hold handles at chest level with elbows bent ~75–90°, wrists neutral, shoulders “packed.”
Tip: If you feel shoulder strain, lower the anchor slightly and keep elbows closer to a comfortable pressing angle (not flared aggressively).
Execution (Step-by-Step)
- Brace and square up: Tighten your core as if someone is about to tap your side. Keep hips and shoulders facing forward.
- Press with one arm: Drive the hand forward at chest height until the elbow is nearly straight (don’t hard-lock).
- Stay stable: Don’t rotate toward the pressing arm. Keep the non-pressing hand near the chest with tension.
- Controlled return: Bring the pressing hand back slowly (2–3 seconds) to the start position.
- Alternate sides: Repeat on the other arm with the same path and torso control.
Pro Tips & Common Mistakes
Pro Tips
- Press “through the chest”: Think about bringing the biceps toward the midline as you reach, without shrugging.
- Own the return: The eccentric is where the band tries to pull you back—control it for better chest stimulus.
- Use split stance smart: Keep the forward foot planted and stable; switch lead legs each set for balance.
- Exhale on the press: A long exhale helps keep ribs down and improves anti-rotation control.
Common Mistakes
- Twisting the torso: Turning into the press reduces core work and can irritate the shoulder.
- Shrugging at lockout: Keep shoulders down—don’t let traps take over.
- Ribs flared / back arched: Stay stacked to keep tension on chest instead of the low back.
- Band snapping back: If the return is uncontrolled, tension shifts away from the chest.
- Pressing too high: Keep the hand path aligned with mid-chest unless you’re intentionally changing the angle.
FAQ
Where should I feel this exercise?
Mostly in the chest (pecs) and triceps. You should also feel your abs/obliques working to keep your torso from twisting during each press.
Is alternating better than pressing both arms together?
Alternating is excellent for core anti-rotation and shoulder stability. Bilateral presses can allow heavier tension, but unilateral alternating often feels cleaner and more “athletic,” especially for home training.
What stance should I use?
A split stance is the easiest to control. If you want more challenge, try a narrow stance or parallel feet—only if you can stay square.
How do I make it harder without heavier bands?
Step farther from the anchor, slow the return to 3–4 seconds, add a 1–2 second pause at full extension, or increase reps while keeping clean form.
What if my shoulder feels pinchy?
Reduce band tension, keep the elbow slightly closer to the body, and avoid shrugging. You can also lower the anchor a bit and shorten range. If pain persists, stop and choose a shoulder-friendly press angle.
Recommended Equipment
- Resistance Bands Set with Handles — multiple tension levels for strength or hypertrophy progressions
- Door Anchor for Resistance Bands — secure anchor point at chest height for safe pressing
- Heavy-Duty Band Handles (Replacement/Upgrade) — improves grip comfort and control during high-rep sets
- Heavy Loop Bands — great for band anchoring variations and added tension options
- Non-Slip Exercise Mat — better footing and stability, especially on smooth floors
Tip: If you anchor to a door, ensure it closes away from you and is fully latched. Never use a weak hinge-side anchor for heavy tension.