Lever Single-Arm Chest Press (Plate-Loaded): Form, Sets & Tips for Chest Growth
Train your chest one side at a time with the Lever Single-Arm Chest Press (Plate-Loaded). Learn proper setup, step-by-step form, sets by goal, common mistakes, FAQs, and recommended equipment.
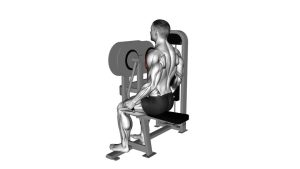
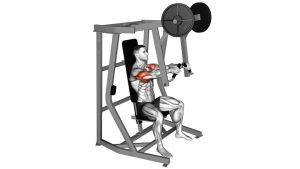
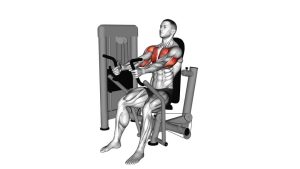
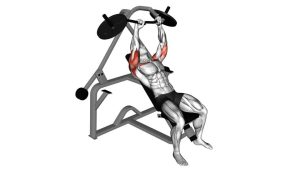
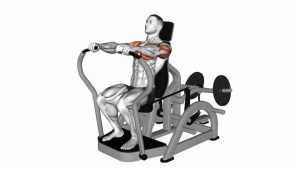
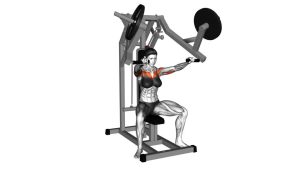
Lever Single-Arm Chest Press (Plate-Loaded)
This machine press is ideal when you want a stable pressing path with a strong mind-muscle connection. Because the load is unilateral, your trunk must resist rotation—so you’ll often feel your obliques working while your chest does the main job. Use a range of motion that keeps your shoulder comfortable and avoid drifting into a forward-rolled position at the bottom.
Quick Overview
| Body Part | Chest |
|---|---|
| Primary Muscle | Pectoralis major (mid-to-lower fibers depending on seat angle) |
| Secondary Muscle | Triceps brachii, anterior deltoid, serratus anterior, core (anti-rotation) |
| Equipment | Plate-loaded chest press machine (iso-lateral / lever-style) |
| Difficulty | Intermediate (beginner-friendly with light load and controlled range) |
Sets & Reps (By Goal)
- Muscle growth (hypertrophy): 3–5 sets × 8–12 reps/side (60–90 sec rest)
- Strength focus: 4–6 sets × 4–8 reps/side (90–150 sec rest)
- Endurance / pump: 2–4 sets × 12–20 reps/side (45–75 sec rest)
- Imbalance correction: 3–4 sets × 8–12 reps/side (match reps exactly; start with weaker side)
Progression rule: Add reps first (top of the range), then add a small amount of weight. Keep every rep smooth—if your torso twists or your shoulder rolls forward, reduce load.
Setup / Starting Position
- Adjust the seat: Set the handle so it lines up around mid-chest at the start.
- Foot placement: Feet flat and slightly staggered if needed for stability (helps reduce twisting).
- Back and ribs: Keep your upper back against the pad with ribs “stacked” (avoid over-arching).
- Shoulder position: Lightly retract and depress the working-side shoulder blade—no shrugging.
- Grip and wrist: Grip firmly; keep the wrist neutral (stacked over the forearm).
- Start tension: Begin with the elbow bent and forearm aligned with the handle path—no relaxed “hang” at the bottom.
Tip: If the machine allows, use a handle position that keeps your elbow at a comfortable angle (often 30–60° from the torso).
Execution (Step-by-Step)
- Brace and square up: Grip the handle, tighten your core, and keep shoulders level.
- Press forward smoothly: Drive the handle forward and slightly inward (machine path) while keeping the shoulder down.
- Stay stacked: Avoid rotating your torso toward the pressing arm—keep your chest facing forward.
- Finish controlled: Reach near full extension without hard elbow lockout; squeeze the chest briefly.
- Lower under control: Return slowly until you feel a comfortable chest stretch—don’t let the shoulder roll forward.
Pro Tips & Common Mistakes
Pro Tips
- Start with the weaker side: Match reps and tempo exactly on the stronger side.
- Use a slight staggered stance: Helps resist rotation and keeps the torso square.
- Think “chest drives the handle”: Keep the shoulder quiet; press with pecs, not shrugging.
- Controlled eccentrics: 2–3 seconds down is gold for hypertrophy and shoulder-friendly mechanics.
- Stop 1–2 reps shy of breakdown: Technique beats load—especially for unilateral work.
Common Mistakes
- Twisting the torso: Rotation steals tension from the chest and stresses the spine.
- Shoulder rolls forward at the bottom: Keep the shoulder blade stable; don’t “reach” forward.
- Elbow flared too wide: Often increases shoulder irritation—adjust angle and handle height.
- Bouncing out of the bottom: Use a clean pause or controlled reversal.
- Locking out hard: Keep tension in the chest; lockout is controlled, not slammed.
FAQ
Should I do all reps on one arm, then switch?
Yes—this is usually best for focus and stability. Complete the full set on one side, then switch. If you notice fatigue causing twisting, alternate sides more frequently (e.g., 6 reps each, back and forth).
Where should I feel it?
Mainly in the chest with support from the triceps. You may also feel your core working to keep you from rotating. If you feel mostly shoulder discomfort, reduce range, lower the load, and re-check seat height and elbow angle.
Is this better than a regular two-arm chest press?
It’s not “better,” but it’s excellent for symmetry and imbalance correction. Two-arm pressing usually allows heavier total load; one-arm pressing improves control and equal development.
How deep should I go on the eccentric?
Go as deep as you can while keeping the shoulder comfortable and stable (no forward roll). The best range is the one you can control smoothly without joint irritation.
How do I program it for chest growth?
Use it as a main or secondary press: 3–5 sets of 8–12 reps/side, controlled eccentric, and pair it with a fly/cable movement for full-chest stimulation.
Recommended Equipment (Optional)
- Weight Lifting Belt — helps brace the core and reduce torso rotation during unilateral pressing
- Lifting Straps — optional if grip limits your pressing focus on plate-loaded handles
- Fractional Plates (Micro-Loading) — make small, steady progress on plate-loaded machines
- Resistance Bands Set — perfect for warm-ups (band pull-aparts) and chest/shoulder prep
- Gym Chalk (Block or Liquid) — improves grip so you can focus on the chest instead of hand fatigue
Tip: If any accessory changes your form for the worse, skip it. The priority is always a stable shoulder and a controlled press.