Kneeling Finger Push-Up: Chest Strength + Finger & Wrist Power (Form, Sets, Tips, FAQ)
Master the Kneeling Finger Push-Up to build chest and triceps strength while improving finger, hand, and wrist stability. Step-by-step form, sets by goal, common mistakes, FAQs, and recommended gear.
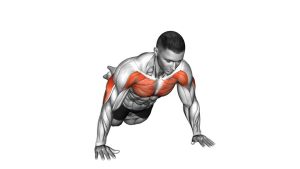
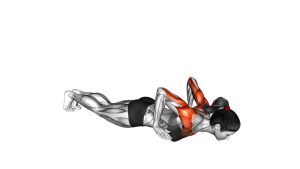
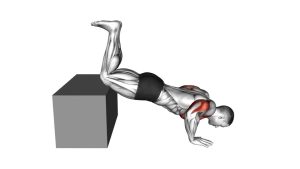
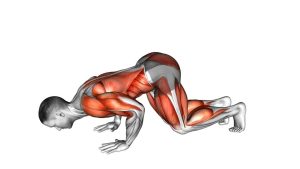
Kneeling Finger Push-Up
This exercise rewards control more than speed. The goal is a smooth push-up pattern while your fingers stay active, spread, and stable. You should feel your chest and triceps working, plus a strong but manageable demand in the forearms and fingers. If your wrists collapse, fingers slip, or pain spikes, regress immediately (smaller range, knees closer, or switch to palms).
Quick Overview
| Body Part | Chest |
|---|---|
| Primary Muscle | Pectoralis major (chest) |
| Secondary Muscle | Triceps, anterior deltoids; forearms/finger flexors as stabilizers |
| Equipment | None (optional: exercise mat, wrist-friendly surface) |
| Difficulty | Intermediate (finger load raises difficulty even with knees down) |
Sets & Reps (By Goal)
- Strength (controlled reps): 3–5 sets × 3–6 reps (60–120 sec rest)
- Muscle / hypertrophy: 3–4 sets × 6–12 reps (60–90 sec rest)
- Endurance / conditioning: 2–4 sets × 10–20 reps (45–75 sec rest)
- Skill + finger tolerance: 4–6 sets × 2–5 reps (perfect form, longer rest)
Progression rule: Add reps first, then slow tempo (2–3 sec down), then increase range. Only progress when fingers/wrists stay stable and you can keep your chest-driven push-up pattern.
Setup / Starting Position
- Choose a safe surface: Use a non-slip floor or mat. Avoid slick tiles where fingers can slide.
- Kneeling plank line: Knees on the floor, hips extended so the body is straight from knees to shoulders.
- Hand position: Hands slightly wider than shoulder-width. Spread fingers and “grip” the floor with fingertips.
- Wrist alignment: Keep wrists stacked under shoulders and avoid collapsing inward.
- Brace: Tight core and glutes. Shoulders down and slightly back—no shrugging.
Tip: Start with a shorter range (only lower halfway) until your fingers adapt. You can also place a folded towel under the knees for comfort.
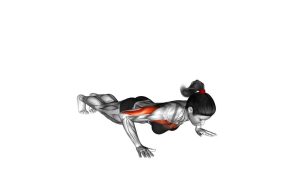
Execution (Step-by-Step)
- Set tension: Fingers spread, fingertips pressing into the floor. Brace core and keep a straight line from knees to shoulders.
- Lower with control: Bend elbows and lower the chest toward the floor. Keep elbows at about a 30–60° angle from the torso.
- Stay stacked: Keep shoulders stable—no collapsing into the wrists. Maintain a neutral head and neck.
- Pause lightly: Stop just above the bottom position (or at your safe range) and hold for 0.5–2 seconds.
- Press up: Drive through the fingertips, push the floor away, and return to the top without losing finger tension.
Pro Tips & Common Mistakes
- Warm up hands first: wrist circles, finger pulses, light wall push-ups on fingers.
- Use a stable finger spread: “Tripod” pressure through index/middle/ring finger pads.
- Keep the chest doing the work: Don’t turn it into a wrist-only balancing act.
- Don’t let hips sag: A loose midsection shifts load into wrists and shoulders.
- Avoid extreme bottom depth early: Depth increases finger/wrist stress fast—earn it gradually.
- Common mistake: Fingertips sliding outward. Use a grippy surface and reduce speed/range.
FAQ
Where should I feel the kneeling finger push-up?
Primarily in the chest and triceps, with strong stabilization in the forearms and fingers. If you feel sharp finger joint pain or wrist pinching, regress and reduce range.
Is this safe for beginners?
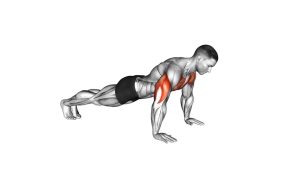
It’s usually not a first push-up. Beginners should master kneeling push-ups on palms first. Then introduce finger loading gradually (short range, low reps, longer rest).
How do I make it easier?
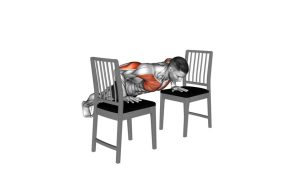
Reduce range (half reps), keep knees closer to hands, slow the tempo, and do fewer reps. You can also start with incline finger push-ups (hands elevated on a sturdy bench).
How do I progress it?
Add reps, increase time-under-tension (3 seconds down), increase range, then move to full finger push-ups or an incline-to-floor progression.
Should I train this often?
Because fingers and wrists adapt slower than bigger muscles, start with 2–3 sessions per week. If soreness lingers in finger joints, reduce volume and keep reps crisp.
Recommended Equipment (Optional)
- Finger Strength Trainer / Finger Exerciser — builds finger endurance and supports safer progressions
- Hand Therapy Putty — great for warm-ups and gradual finger conditioning
- Adjustable Grip Strengthener — strengthens forearms to stabilize wrists during finger loading
- Non-Slip Exercise Mat — improves traction so fingertips don’t slide on the floor
- Wrist Wraps (Light Support) — optional support if wrists fatigue early (not a substitute for strength)
Tip: Choose grippy surfaces and progress slowly—fingers adapt best with low volume, high quality reps. If any tool increases symptoms, stop using it and reassess.