Cable Rear Pulldown (Behind-the-Neck Lat Pulldown): Form, Muscles Worked, Sets & Tips
Learn how to do the Cable Rear Pulldown (Behind-the-Neck Lat Pulldown) with proper form. Discover muscles worked, setup, execution, sets and reps by goal, common mistakes, FAQs, and recommended equipment.
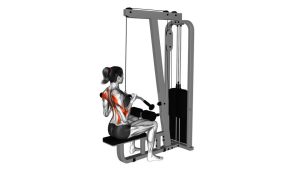
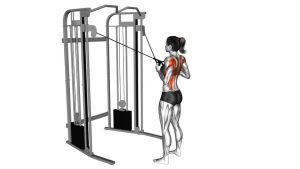
Cable Rear Pulldown (Behind-the-Neck Lat Pulldown)
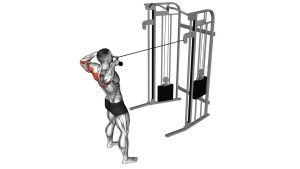
This variation places the shoulders in a more demanding position than a front lat pulldown, so technique matters. The goal is to pull with the back, not to yank the bar down with momentum. Keep the torso tall, the chest lifted, and the elbows driving down and slightly back. If you have limited shoulder mobility, neck discomfort, or pain when the bar moves behind the head, a standard front lat pulldown is usually the better choice.
Quick Overview
| Body Part | Back |
|---|---|
| Primary Muscle | Latissimus dorsi |
| Secondary Muscle | Teres major, rhomboids, middle trapezius, lower trapezius, posterior deltoids, biceps, brachialis |
| Equipment | Cable lat pulldown machine with wide bar attachment |
| Difficulty | Intermediate (requires good shoulder mobility and controlled technique) |
Sets & Reps (By Goal)
- Muscle growth: 3–4 sets × 8–12 reps with controlled tempo and 60–90 seconds rest
- Strength-focused back work: 4–5 sets × 5–8 reps with a moderate-heavy load and 90–120 seconds rest
- Technique practice: 2–3 sets × 10–15 reps using a light load and perfect form
- Upper-back pump / accessory work: 2–4 sets × 12–15 reps with smooth reps and shorter rest periods
Progression rule: Add load only when you can keep the torso stable, pull evenly, and lower the bar under control without neck or shoulder discomfort.
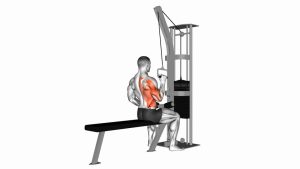
Setup / Starting Position
- Adjust the machine: Set the thigh pad so your legs are secured firmly but comfortably.
- Choose your grip: Take a wide overhand grip on the lat bar, usually slightly wider than shoulder width.
- Sit tall: Keep your chest up, core lightly braced, and spine neutral.
- Position your head: Keep the neck neutral and slightly forward only as needed for the bar path behind the head.
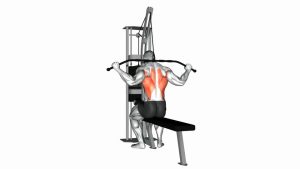
- Start overhead: Arms fully extended, shoulders elevated naturally, and lats lengthened at the top.
Tip: If you need to excessively jut the head forward or round the upper back to clear the bar, the weight is too heavy or your mobility is not suited to this variation.
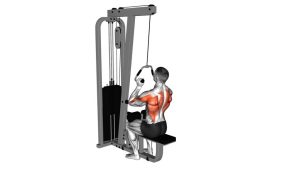
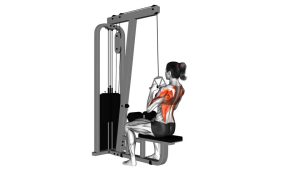
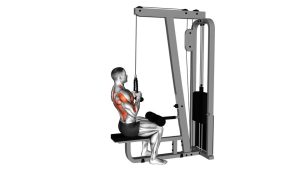
Execution (Step-by-Step)
- Brace and lift the chest: Sit firmly into the seat and keep the torso upright with only a slight natural lean if needed.
- Initiate with the shoulder blades: Depress the scapulae first by thinking about pulling the shoulders down.
- Drive the elbows down: Pull the bar behind the head by driving your elbows downward and slightly backward.
- Bring the bar to upper-trap level: Lower it only as far as you can while maintaining a strong, pain-free position.
- Squeeze the back: Pause briefly at the bottom and feel the lats and upper back contract.
- Control the return: Let the bar rise slowly back overhead until the arms are fully extended again.
Pro Tips & Common Mistakes
- Lead with the elbows: Think elbows down instead of hands down to recruit the back more effectively.
- Keep the chest proud: A lifted chest helps maintain better shoulder positioning.
- Use a moderate load: This exercise rewards control more than maximum weight.
- Avoid pulling too low: Stopping around upper-trap level is usually enough for a strong contraction.
- Do not force mobility: If the behind-the-neck path feels awkward or painful, switch to a front pulldown.
- Control the eccentric: The lowering phase is valuable for lat development and shoulder control.
Common Mistakes
- Using too much weight: This often turns the movement into a jerky partial rep.
- Cranking the neck forward: The head should not be aggressively pushed out of position just to clear the bar.
- Rounding the upper back: Losing posture reduces lat involvement and stresses the shoulders.
- Bouncing at the bottom: Touching the bar to the traps with momentum is not the goal.
- Cutting the range short at the top: Let the lats lengthen fully between reps unless pain is present.
FAQ
What muscles does the Cable Rear Pulldown work?
The main target is the latissimus dorsi. It also trains the teres major, rhomboids, middle and lower traps, rear delts, and the elbow flexors such as the biceps and brachialis.
Is the behind-the-neck pulldown better than the front pulldown?
Not for most lifters. It can be useful for some people, but the front lat pulldown is generally more joint-friendly and easier to perform safely with consistent technique.
Who should avoid this exercise?
Anyone with limited shoulder mobility, a history of shoulder impingement, neck irritation, or discomfort in the behind-the-neck position should avoid this variation or use a front pulldown instead.
How wide should my grip be?
A wide overhand grip is typical, usually slightly wider than shoulder width. Going excessively wide often reduces control and range of motion without adding much benefit.
Should I pull the bar all the way down to my shoulders?
No. Pull only as low as you can while maintaining a tall chest, controlled shoulders, and a pain-free position. For many people, upper-trap or base-of-neck level is sufficient.
Recommended Equipment
- Wide Grip Lat Pulldown Bar — ideal for recreating the classic rear pulldown setup on cable systems
- Lat Bar Cable Attachment — useful for home gym pulley systems and back-focused cable work
- Rope Cable Attachment — great for adding variety to cable back, arm, and shoulder training
- Lifting Wrist Straps — helps reduce grip fatigue during heavy pulldowns and rows
- Resistance Bands — useful for warm-ups, shoulder prep, and extra lat activation work
Tip: If this movement feels uncomfortable, use the same equipment for a standard front lat pulldown instead. It is usually the safer long-term option.