Lever Single-Arm Neutral-Grip Seated Row: Form, Muscles Worked, Sets, Tips & FAQ
Learn the Lever Single-Arm Neutral-Grip Seated Row with proper form, muscles worked, setup, step-by-step execution, sets by goal, common mistakes, FAQs, and recommended equipment for stronger lats and upper back development.
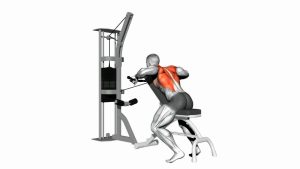
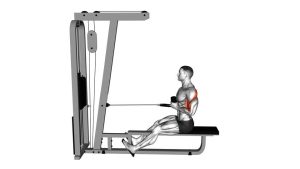
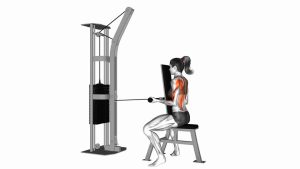
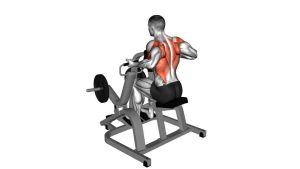
Lever Single-Arm Neutral-Grip Seated Row
This exercise works best when you keep the chest tall, the spine neutral, and the pull driven by the elbow moving back toward the hip. At the start, let the working arm reach forward enough to feel a stretch through the lat without rounding aggressively. Then row smoothly, pause briefly at peak contraction, and return under control. Because the machine guides the path, this variation is excellent for building back strength with consistent technique.
Quick Overview
| Body Part | Upper Back |
|---|---|
| Primary Muscle | Latissimus dorsi |
| Secondary Muscle | Rhomboids, middle trapezius, rear deltoid, biceps, brachialis, brachioradialis |
| Equipment | Plate-loaded single-arm seated row machine with neutral handle |
| Difficulty | Beginner to Intermediate |
Sets & Reps (By Goal)
- Muscle growth: 3–4 sets × 8–12 reps per side with 60–90 seconds rest
- Strength focus: 4–5 sets × 5–8 reps per side with 90–120 seconds rest
- Technique and control: 2–3 sets × 10–15 reps per side with smooth tempo and lighter loading
- Balanced unilateral development: 3–4 sets × 8–10 reps per side, starting with the weaker arm first
Progression tip: Add weight only when you can keep the torso stable, reach into a controlled stretch, and finish each rep with a clean squeeze instead of twisting or jerking the handle back.
Setup / Starting Position
- Adjust the machine: Set the seat so the handle lines up comfortably with your mid-torso when you row.
- Plant your base: Sit tall with feet firmly on the platform and hips stable against the seat.
- Grip one handle: Use the neutral handle with your working arm and keep the wrist straight.
- Set posture: Lift the chest, brace the core lightly, and keep the spine neutral.
- Reach forward naturally: Allow the shoulder blade to protract slightly so you start from a full but controlled stretch.
Tip: Keep the non-working hand on the machine or support frame if needed for balance, but do not use it to rotate or pull your body into the rep.
Execution (Step-by-Step)
- Initiate with the back: Start by drawing the shoulder blade back and down rather than curling the arm first.
- Drive the elbow back: Pull the handle toward the side of your torso, keeping the elbow close to the body.
- Keep the chest proud: Stay upright and avoid rounding or leaning excessively to create momentum.
- Squeeze at the finish: Pause briefly when the elbow passes slightly behind the torso and the back is fully engaged.
- Lower with control: Extend the arm gradually and let the shoulder blade move forward naturally into the next rep.
Pro Tips & Common Mistakes
- Use the full reach: A controlled stretch at the front helps load the lats better, but do not collapse your chest.
- Pull with the elbow, not the hand: This improves lat and mid-back engagement.
- Do not twist to finish reps: Rotation makes the weight feel lighter but shifts tension away from the target muscles.
- Avoid shrugging: Keep the shoulder depressed so the upper traps do not dominate the movement.
- Control the eccentric: The lowering phase is where a lot of quality back stimulus comes from.
- Match both sides honestly: Let the weaker arm set the rep target if strength is uneven.
- Do not overgrip: Crushing the handle can make the forearms fatigue before the back.
FAQ
What muscles does the Lever Single-Arm Neutral-Grip Seated Row work?
It mainly targets the lats and upper-to-mid back, especially the rhomboids and middle traps. The rear delts, biceps, brachialis, and forearms assist throughout the pull.
Is the neutral grip better for the shoulders?
For many lifters, yes. A neutral grip often feels more natural on the shoulder joint and can make it easier to keep the elbow in a strong pulling path close to the body.
Should I let my shoulder blade move forward at the bottom?
Yes, in most cases a controlled protraction at the start helps create a better stretch through the lats and mid-back. Just avoid collapsing your posture or rounding aggressively through the entire spine.
Can this exercise help fix left-to-right imbalances?
It can help a lot because each side works independently. Start with the weaker side first and match the same rep quality on the stronger side.
Where should the handle finish?
In most setups, the handle should finish near the side of your lower ribs or torso. The exact end point depends on machine design, but the key is finishing with the elbow back and the shoulder blade fully engaged without twisting.
Recommended Equipment
- Weightlifting Lifting Straps — helpful when grip fatigue limits back training on heavy row sets
- Liquid Chalk — improves grip security on machine handles with less slipping
- Gym Grip Pads — a simple alternative to straps for reducing hand fatigue during rows
- Weightlifting Wrist Wraps — useful for lifters who want more wrist support during heavy pulling work
- Workout Log Book — useful for tracking unilateral strength, rep quality, and side-to-side progress
Tip: Accessories should improve stability, grip, and consistency, not cover up poor rowing mechanics. Keep form quality first.