Lever Bent-Over Row (Plate-Loaded): Form, Muscles Worked, Sets & FAQ
Learn how to perform the Lever Bent-Over Row (Plate-Loaded Back Row) with proper form. Discover muscles worked, setup, step-by-step execution, sets and reps by goal, common mistakes, FAQs, and recommended equipment.
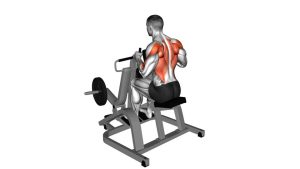
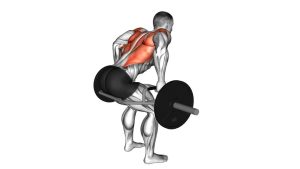
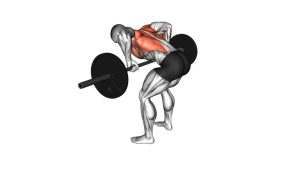
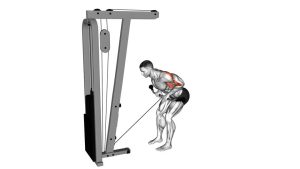
Lever Bent-Over Row (Plate-Loaded Back Row)
This row variation is excellent for lifters who want to build overall back thickness without the same balance demands as a fully free barbell row. Because the bar travels in a fixed lever arc, many lifters find it easier to load progressively while keeping tension on the upper and mid-back. When performed well, each rep starts from a stable bent-over position, moves the bar toward the lower chest or upper abdomen, and finishes with a controlled squeeze between the shoulder blades.
Quick Overview
| Body Part | Back |
|---|---|
| Primary Muscle | Latissimus dorsi, rhomboids, middle trapezius |
| Secondary Muscle | Rear delts, biceps, brachialis, brachioradialis, lower traps, spinal erectors |
| Equipment | Lever bar or landmine setup, weight plates, optional row handle or lifting straps |
| Difficulty | Beginner to intermediate |
Sets & Reps (By Goal)
- Muscle building: 3–4 sets × 8–12 reps, 60–90 seconds rest
- Strength focus: 4–5 sets × 5–8 reps, 90–150 seconds rest
- Technique and control: 2–4 sets × 10–15 reps, moderate weight, smooth tempo
- Back finisher: 2–3 sets × 12–15 reps with strict form and full squeeze
Progression tip: Add load only when you can keep the hinge position stable, fully control the eccentric, and avoid using body English to finish the rep.
Setup / Starting Position
- Load the lever: Place the desired plates on the free end of the lever bar or landmine setup.
- Take your stance: Stand over the bar with feet around hip- to shoulder-width apart.
- Hinge at the hips: Push the hips back and bend the knees slightly until your torso is leaned forward.
- Brace the core: Keep your chest open, ribs stacked, and spine neutral from head to hips.
- Grip the bar firmly: Hold the bar close to the sleeve or use a row handle attachment if available.
- Let the arms hang: Start with elbows extended and shoulders set naturally, without shrugging up.
Tip: Think of the setup like a loaded hinge first and a row second. If the hinge is weak, the row will usually become sloppy.
Execution (Step-by-Step)
- Lock in your torso: Before the rep starts, brace your core and keep your torso angle fixed.
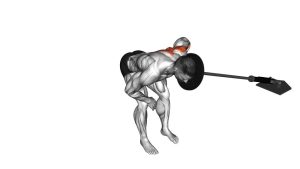
- Initiate with the back: Pull the bar upward by driving your elbows back, not by shrugging the shoulders.
- Guide the bar toward the torso: Bring the loaded end toward the lower chest or upper abdomen.
- Squeeze at the top: Briefly retract the shoulder blades and feel the mid-back contract.
- Lower with control: Extend the arms under control until you reach the bottom without losing posture.
- Repeat smoothly: Perform each rep with the same range, same torso angle, and same bar path.
Pro Tips & Common Mistakes
- Keep the bar path consistent: Pull toward the same point on your torso every rep.
- Drive elbows back: This helps emphasize the lats and mid-back instead of turning the lift into a shrug.
- Do not round the lower back: Stay hinged with a proud chest and neutral spine.
- Avoid excessive momentum: Swinging the torso reduces tension where you want it most.
- Control the eccentric: Lowering too fast wastes a major muscle-building portion of the lift.
- Use straps if grip is the limiter: If your hands fail before your back, straps can help keep tension on the target muscles.
- Do not overextend at the top: Finish with a squeeze, not a dramatic torso rise.
FAQ
What muscles does the Lever Bent-Over Row work most?
It mainly targets the lats, rhomboids, and middle traps, while also training the rear delts, biceps, forearms, and spinal erectors for support and control.
Is this better than a regular barbell row?
Not necessarily better for everyone, but many lifters find the lever path easier to control. It can feel more stable, more back-focused, and easier to load progressively without as much balance demand.
Where should I pull the bar?
In most cases, pull the bar toward the lower chest or upper abdomen. The exact touch point can vary slightly based on torso angle and individual limb length, but the elbows should travel back with control.
Should I use a wide or close grip?
A closer grip often feels natural on lever and landmine rows and usually allows strong elbow drive. Handle attachments can slightly change emphasis, but strict execution matters more than tiny grip changes.
Can beginners do this exercise?
Yes. It is a very good option for beginners as long as they learn the hip hinge first, keep the load manageable, and avoid using momentum to complete the rep.
Recommended Equipment (Optional)
- Barbell Landmine Attachment — useful for creating a stable lever setup for rows, presses, and rotational landmine work
- T-Bar Row Handle Attachment — improves grip comfort and can help you row more naturally from a stronger hand position
- Olympic Bumper Plates — ideal for progressive loading with a standard 2-inch Olympic lever or landmine bar setup
- Weight Lifting Straps — helpful when grip fatigue limits your back work before the target muscles are fully challenged
- Olympic Barbell — the foundation of the movement if you are building a home setup around lever and landmine exercises
Tip: Prioritize a secure setup, enough plate clearance, and a grip that lets you focus on your back rather than fighting instability.