Lever High Row (Plate-Loaded): Form, Muscles Worked, Sets, Tips & FAQ
Learn how to perform the Lever High Row with proper form to build upper-back thickness and lat strength. Includes muscles worked, setup, execution, sets and reps, mistakes, FAQs, and recommended equipment.
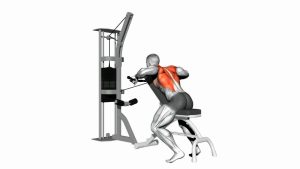
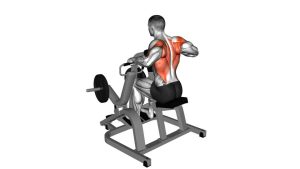
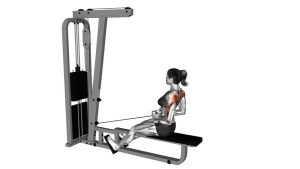
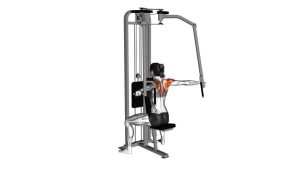
Lever High Row
This machine row is excellent for lifters who want more upper-back density without relying on momentum. The chest support reduces unnecessary lower-back involvement, which makes it easier to focus on clean scapular retraction and a strong elbow path. When performed well, the movement feels smooth and stable, with tension concentrated across the mid and upper back rather than in the wrists, neck, or lower spine.
Quick Overview
| Body Part | Upper Back |
|---|---|
| Primary Muscle | Rhomboids, middle trapezius, upper latissimus dorsi |
| Secondary Muscle | Rear deltoids, teres major, lower trapezius, biceps, brachialis |
| Equipment | Plate-loaded high row machine |
| Difficulty | Beginner to intermediate |
Sets & Reps (By Goal)
- Muscle growth: 3-4 sets × 8-12 reps, 60-90 sec rest
- Strength-focused machine work: 4-5 sets × 5-8 reps, 90-150 sec rest
- Upper-back control / technique: 2-4 sets × 10-15 reps, 45-75 sec rest
- Finisher after big back work: 2-3 sets × 12-15 reps with controlled tempo
Progression rule: Add reps before adding load. Once you can hit the top of your rep range with full chest support, a clear squeeze, and no torso rocking, increase the weight gradually.
Setup / Starting Position
- Load the machine: Add an appropriate amount of weight plates so you can row with full control.
- Adjust your position: Sit so your chest rests comfortably but firmly against the support pad.
- Set your feet: Plant them flat and stable to create a solid base.
- Take the handles: Grip the machine handles evenly with a firm but not over-tense grip.
- Start long: Let the arms extend forward while keeping the shoulders controlled, not collapsed.
- Brace lightly: Keep the core engaged, chest tall on the pad, and neck neutral before each rep.
Tip: Set your seat and torso so the handle path lines up naturally with your upper torso. If you feel jammed in the shoulders, your setup may be too high or too low.
Execution (Step-by-Step)
- Begin from a stretched position: Arms extended, chest supported, shoulders under control.
- Pull with the elbows: Drive your elbows down and back rather than yanking with your hands.
- Keep the chest planted: Do not lift off the pad or swing the torso to move the weight.
- Row through the upper back: Pull until the handles come in close and your shoulder blades retract firmly.
- Pause briefly: Squeeze the upper back for a moment at peak contraction.
- Lower with control: Return the handles smoothly until the arms are extended and the back is fully lengthened again.
Pro Tips & Common Mistakes
- Lead with the elbows: This helps shift the focus to the back instead of the arms.
- Do not bounce off the stretch: Control the bottom to keep tension where it belongs.
- Avoid shrugging up: Keep the shoulders from creeping toward the ears during the pull.
- Keep the neck neutral: Do not poke the chin forward to chase extra range.
- Use full but pain-free range: Extend enough to feel the stretch, then finish with a strong squeeze.
- Do not overload too early: Excessive weight often turns this into a short, sloppy arm pull.
- Match both sides: If the machine has independent arms, make sure both handles move evenly.
FAQ
What muscles does the Lever High Row work most?
It mainly targets the upper back, especially the rhomboids, middle traps, and upper lats. The rear delts and arm flexors also assist.
Is the Lever High Row more for lats or upper back?
It usually biases the upper back more than a low row, but it still trains the lats well. Your exact machine design and elbow path will influence which area you feel most.
Should I use a full stretch at the bottom?
Yes, but keep it controlled. Reach into a comfortable stretch without collapsing your chest or losing shoulder control.
Can beginners use this exercise?
Yes. The chest support makes it beginner-friendly because it helps stabilize the torso and teaches a cleaner rowing pattern.
How is this different from a seated cable row?
The Lever High Row usually has a more fixed pulling path and chest support, which can make it easier to focus on the target muscles and reduce momentum.
Recommended Equipment
- Weight Lifting Straps — useful for reducing grip fatigue so you can focus more on upper-back work
- Olympic Weight Plates — needed for loading most plate-loaded row machines
- Weight Lifting Belt — optional support for lifters who want extra bracing awareness during heavy back training
- Liquid Chalk — helps improve hand grip on handles when palms get sweaty
- Cable / Row Handle Attachments — helpful for accessory pulling work that complements the high row pattern
Tip: Accessories should support better execution, not replace proper technique. Prioritize controlled reps, stable chest support, and a clean elbow path first.