Suspender Row : Form, Muscles Worked, Sets, Tips & FAQ
Learn how to perform the Suspender Row with proper form to build upper-back strength, posture, and pulling control. Includes muscles worked, setup, execution, sets by goal, common mistakes, FAQ, and recommended equipment
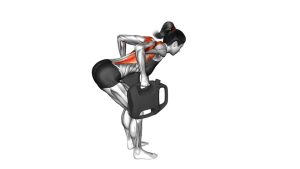
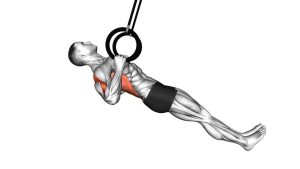
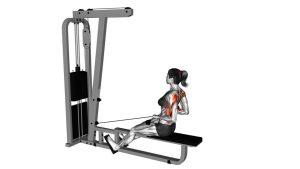
Suspender Row
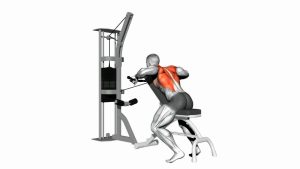
This row variation trains your back through a natural arc while forcing your core and hips to stay braced. It is especially useful for improving posture, learning how to retract the shoulder blades properly, and developing pulling strength without needing heavy machines or barbells. The key is to keep the body rigid and let the elbows drive back while the chest rises toward the handles.
Quick Overview
| Body Part | Upper Back |
|---|---|
| Primary Muscle | Rhomboids, middle trapezius, posterior deltoids |
| Secondary Muscle | Latissimus dorsi, biceps, brachialis, forearms, core stabilizers |
| Equipment | Suspension trainer / suspender straps with secure anchor point |
| Difficulty | Beginner to Intermediate (easily adjusted by changing body angle) |
Sets & Reps (By Goal)
- Technique practice / posture work: 2–3 sets × 10–15 reps, controlled tempo, 45–60 sec rest
- Muscle building: 3–4 sets × 8–12 reps, 60–90 sec rest
- Strength-focused bodyweight pulling: 4–5 sets × 5–8 reps, 90–120 sec rest
- Warm-up activation: 1–2 sets × 10–12 reps, light angle, smooth reps
Progression rule: First increase control and range of motion, then make the body more horizontal to increase difficulty. You can also add a brief pause at the top once your form stays clean.
Setup / Starting Position
- Set the straps: Adjust the suspension straps to a length that lets you lean back comfortably while maintaining tension.
- Face the anchor: Stand facing the anchor point and grab both handles with a neutral grip.
- Walk your feet forward: Lean back until your arms are straight and your body is at the desired angle.
- Brace your body: Keep your head, ribs, hips, and ankles aligned in one straight line.
- Start with tension: Shoulders stay down, chest open, and core engaged before the first pull.
Tip: A more upright position is easier. A more horizontal torso increases resistance and makes the row significantly harder.
Execution (Step-by-Step)
- Set your position: Begin with straight arms, neutral wrists, and a rigid plank-like body line.
- Initiate with the upper back: Start by pulling the shoulder blades back and slightly down.
- Drive the elbows back: Bend your elbows and pull your chest toward the handles.
- Reach the top smoothly: Finish when your hands arrive near the ribcage and your chest is lifted without flaring the ribs excessively.
- Pause briefly: Hold the top position for a moment while keeping tension through the upper back.
- Lower under control: Extend the arms slowly and return to the starting position without losing body alignment.
Pro Tips & Common Mistakes
- Keep the body straight: Do not let the hips sag or pike during the row.
- Pull with the back first: Think shoulder blades, then elbows. Do not rely only on the arms.
- Chest to handles: Aim to bring the chest up instead of craning the neck forward.
- Control the lowering phase: The eccentric portion builds strength and improves shoulder stability.
- Do not shrug: Keep traps from taking over by maintaining space between the shoulders and ears.
- Adjust angle instead of cheating: If reps get sloppy, stand more upright rather than using momentum.
- Use full but clean range: Reach long at the bottom and squeeze the shoulder blades at the top.
FAQ
What muscles does the Suspender Row work the most?
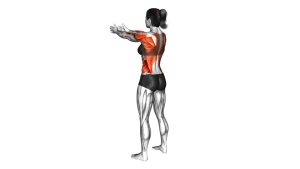
The exercise primarily targets the rhomboids, middle traps, and rear delts. It also involves the lats, biceps, forearms, and core as supporting muscles.
Is the Suspender Row good for beginners?
Yes. It is beginner-friendly because resistance is easy to scale. Standing more upright reduces the load, making it a great first pulling exercise for learning scapular control and posture.
How do I make the exercise harder?
Walk your feet farther forward so your body becomes more horizontal, slow the tempo, or add a pause at the top. You can also use single-arm progressions later on.
Where should I feel this exercise?
You should mainly feel it in the upper and mid-back, with assistance from the arms. If you mostly feel your neck or lower back, improve your alignment and reduce difficulty.
Can this help posture?
Yes. Rows like this can help strengthen the muscles that support better shoulder positioning and upper-back control, especially when paired with mobility work and good desk posture habits.
Recommended Equipment
- Suspension Trainer Straps — the main tool for performing suspender rows and other bodyweight pulling exercises
- Heavy-Duty Door Anchor — useful when you need a secure indoor anchor point for suspension straps
- Non-Slip Exercise Mat — improves foot traction and adds comfort during setup and accessory work
- Suspension Trainer Extension Strap — helps mount your straps to higher or thicker anchor points more safely
- Workout Grip Gloves — optional for comfort if your hands fatigue before your back does
Tip: Prioritize a quality suspension trainer and a secure anchor setup first. For this exercise, setup safety matters more than buying extra accessories.