Suspender Self-Assisted Pull-Up: Form, Muscles Worked, Sets, Tips & FAQ
Learn how to perform the Suspender Self-Assisted Pull-Up with proper form. Discover muscles worked, setup, step-by-step execution, sets and reps by goal, common mistakes, FAQs, and recommended equipment.
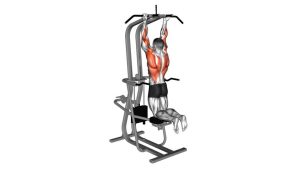
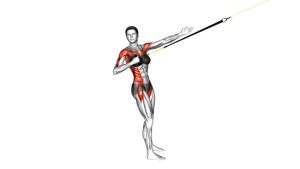
Suspender Self-Assisted Pull-Up
This variation is ideal for beginners, anyone working toward their first strict pull-up, or lifters who want a joint-friendly back exercise with a more natural grip. The suspension handles allow the wrists and shoulders to move freely, while the self-assisted setup lets you control the challenge rep by rep. The goal is to pull mostly with the back and arms, not to turn the movement into a jump or leg-driven cheat.
Quick Overview
| Body Part | Back |
|---|---|
| Primary Muscle | Latissimus dorsi |
| Secondary Muscle | Rhomboids, middle trapezius, biceps, brachialis, rear delts, forearms, core stabilizers |
| Equipment | Suspension trainer / suspension straps |
| Difficulty | Beginner to intermediate |
Sets & Reps (By Goal)
- Technique practice / first pull-up progression: 3–4 sets × 5–8 reps, 60–90 sec rest
- Muscle building: 3–4 sets × 8–12 reps, 60–90 sec rest
- Strength emphasis: 4–5 sets × 4–6 reps, 90–120 sec rest with minimal leg help
- Warm-up activation: 2–3 sets × 6–10 controlled reps, light assistance
Progression rule: Reduce leg assistance before adding extra reps. Once you can control every rep with strong scapular movement and no swinging, make the exercise harder by relying less on the feet.
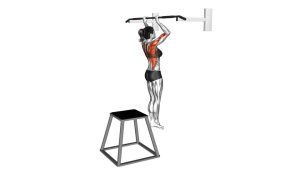
Setup / Starting Position
- Adjust the straps: Set the suspension handles high enough to allow a full overhead reach and a smooth pull.
- Take a neutral grip: Hold the handles with palms facing each other.
- Position the body underneath: Bend the knees and keep the feet lightly in contact with the floor so they can provide assistance as needed.
- Start long: Arms fully extended overhead, torso upright or slightly leaned back, chest lifted, core braced.
- Set the shoulders: Avoid shrugging hard into the ears before the first rep.
Tip: The more you press through the feet, the easier the movement becomes. Use only enough assistance to keep the rep clean.
Execution (Step-by-Step)
- Initiate with the shoulder blades: Start each rep by pulling the shoulders down and slightly back.
- Drive the elbows down: Bend the elbows and pull your body upward toward the handles.
- Keep the chest proud: Maintain a tall torso and avoid collapsing through the upper back.
- Use controlled leg help: Push lightly through the feet only as much as needed to complete the rep smoothly.
- Reach the top with control: Bring the chest closer to the handles while squeezing the upper back.
- Lower slowly: Extend the elbows under control until the arms are straight again.
- Reset and repeat: Return to the stretched starting position without swinging or rushing the next rep.
Pro Tips & Common Mistakes
- Lead with the elbows: Driving the elbows down helps shift the focus to the lats.
- Don’t overuse the legs: Your feet should assist, not do most of the work.
- Avoid shrugging: Keep the shoulders from rising excessively toward the ears.
- Control the lowering phase: The eccentric portion is valuable for strength development.
- Stay stable: Minimize swinging, twisting, or kicking the legs.
- Keep the grip neutral: Let the handles rotate naturally for a more shoulder-friendly pull.
- Progress gradually: Decrease foot pressure over time as you get stronger.
FAQ
What muscles does the Suspender Self-Assisted Pull-Up work?
It mainly targets the lats, while also training the rhomboids, middle traps, biceps, brachialis, rear delts, forearms, and core stabilizers.
Is this a good exercise for beginners?
Yes. It is one of the best beginner-friendly pull-up progressions because you can adjust difficulty instantly by changing how much help the legs provide.
How is this different from a regular pull-up?
A regular pull-up requires you to lift your full bodyweight from a fixed bar. This version uses suspension handles and self-assistance from the legs, making it more scalable and often easier on the shoulders and wrists.
Should I try to use no leg assistance at all?
Eventually, yes, if your goal is progressing toward full pull-ups. But early on, use enough assistance to maintain proper form and full control.
Can I use this exercise for back hypertrophy?
Absolutely. If you keep tension on the upper back and lats, use controlled tempo, and work in moderate rep ranges, it can be an effective hypertrophy exercise.
Recommended Equipment
- Suspension Trainer System — the main tool for performing this exercise at home, outdoors, or in a gym.
- Pull-Up Assistance Bands Set — useful for extra vertical pulling assistance and complementary pull-up progression work.
- Door Anchor for Training Straps or Bands — helpful if you need a secure indoor anchor point for home workouts.
- Workout Grips / Grip Pads — can improve comfort and reduce grip fatigue during higher-volume pulling sessions.
- Thick Exercise Mat — adds comfort and traction under the feet or knees during setup and accessory work.
Tip: Prioritize a sturdy suspension trainer first. That gives you the most direct carryover for this exercise and many other upper-body, lower-body, and core movements.