Cable Standing Lat Pushdown (Rope): Proper Form, Muscles Worked, Sets & FAQ
Learn how to do the Cable Standing Lat Pushdown with a rope attachment using proper form. Discover muscles worked, setup, execution steps, sets by goal, common mistakes, FAQs, and recommended equipment.
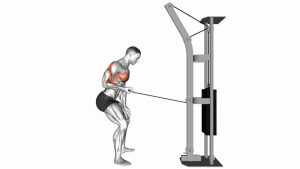
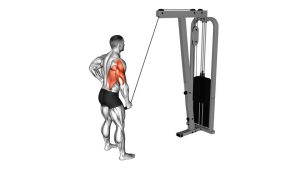
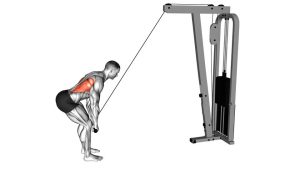
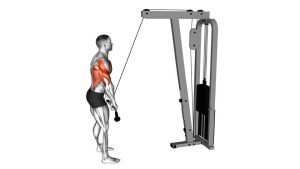
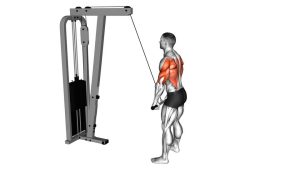
Cable Standing Lat Pushdown (Rope Attachment)
This exercise works best when you focus on a long controlled range of motion. At the top, your lats should feel stretched; at the bottom, you should feel a strong contraction along the sides of the back near the armpits and ribcage. The movement should stay smooth and deliberate with minimal swinging, shrugging, or elbow bending. A moderate load often produces better lat activation than going too heavy.
Quick Overview
| Body Part | Back |
|---|---|
| Primary Muscle | Latissimus dorsi |
| Secondary Muscle | Teres major, posterior deltoids, rhomboids, middle/lower traps, long head of triceps (stabilizing role), core stabilizers |
| Equipment | Cable machine with high pulley and rope attachment |
| Difficulty | Beginner to Intermediate |
Sets & Reps (By Goal)
- Muscle growth: 3–4 sets × 10–15 reps with controlled tempo and 45–75 sec rest
- Lat activation before pull day: 2–3 sets × 12–20 reps using lighter weight and perfect form
- Strength-focused accessory work: 3–4 sets × 8–12 reps with strict execution and 60–90 sec rest
- Finisher / pump work: 2–3 sets × 15–20 reps with constant tension and short rest
Progression rule: Add reps before adding load. Only increase the weight when you can keep the elbows nearly fixed, maintain a stable torso, and feel the lats working throughout the full range.
Setup / Starting Position
- Attach the rope: Secure a rope attachment to the high pulley of a cable machine.
- Take your grip: Hold the rope with a neutral grip and step back enough to create tension at the top.
- Set your stance: Place your feet about shoulder-width apart with a soft knee bend for balance.
- Hinge slightly forward: Lean the torso forward roughly 20–45 degrees while keeping the spine neutral and the core braced.
- Start long: Let the arms travel upward and forward so the lats begin in a stretched position. Keep only a slight bend in the elbows.
Tip: Think of your arms as hooks. The shoulder joint drives the motion; the elbows should not repeatedly bend and straighten like a pressdown.
Execution (Step-by-Step)
- Brace and lock in: Keep the chest proud, ribs controlled, and neck neutral before starting the pull.
- Initiate from the lats: Pull the rope down by driving the upper arms toward your sides rather than bending the elbows.
- Follow a smooth arc: Bring the rope down toward the upper thighs or hips while keeping the elbows softly bent and mostly fixed.
- Squeeze at the bottom: Pause briefly when the hands reach the thighs and let the rope ends separate naturally for a fuller contraction.
- Return under control: Slowly guide the rope back to the starting position and allow the lats to stretch without losing posture.
Pro Tips & Common Mistakes
- Use a slight elbow bend only: Keep it constant from start to finish.
- Pull through the shoulders: Focus on shoulder extension instead of pressing with the arms.
- Let the lats stretch at the top: Don’t rush the eccentric or cut the range short.
- Keep the shoulders down: Avoid shrugging into the upper traps as the rope rises.
- Don’t swing the torso: Momentum reduces lat tension and shifts stress away from the target muscle.
- Separate the rope slightly at the bottom: This can help finish the contraction without changing the movement pattern.
- Choose load carefully: Too much weight often turns the exercise into a sloppy pressdown or partial rep.
FAQ
What muscles does the cable standing lat pushdown work most?
The main target is the latissimus dorsi. Supporting muscles include the teres major, posterior deltoids, scapular stabilizers, and the core for posture and control.
Is this the same as a straight-arm pulldown?
It is very similar. This variation uses a rope attachment and is often performed with a slightly more natural arm path and a better squeeze at the bottom because the rope ends can separate.
Should I keep my arms completely straight?
Not fully locked. Keep a soft bend in the elbows and hold that bend consistently. This protects the joints while keeping the emphasis on the lats.
Where should I feel this exercise?
You should feel it mainly along the sides of the back, especially near the outer upper torso and underarm area. If you mostly feel triceps or shoulders, check your elbow position and reduce the weight.
Is the cable standing lat pushdown good before pull-ups or rows?
Yes. It works very well as a lat activation drill before heavier back exercises because it teaches clean shoulder extension and helps you connect with the lats before compound pulling.
Recommended Equipment
- Rope Cable Attachment — the key attachment for this exercise and useful for many other cable movements
- Cable Attachment Set — convenient if you want multiple handle options for back, arms, and shoulder work
- Resistance Bands Set — useful for lat activation, warm-ups, and home alternatives when a cable machine is unavailable
- Lifting Straps — helpful if grip fatigue limits your back training on heavier pulling days
- Exercise Mat — optional for stretching, kneeling cable work, and general gym comfort
Choose durable cable accessories with solid end caps, comfortable grip texture, and compatibility with your carabiner or pulley setup.