Smith Bent-Over Pronated-Grip Row: Proper Form, Muscles Worked, Sets & FAQ
Learn how to perform the Smith Bent-Over Pronated-Grip Row with proper form to build back thickness, upper-back strength, and pulling control. Includes setup, execution, sets by goal, mistakes, FAQs, and recommended equipment.
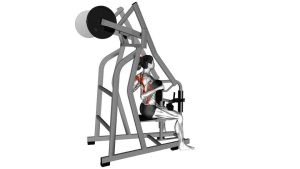
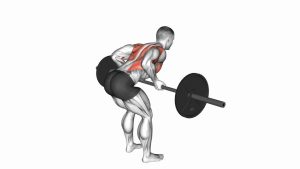
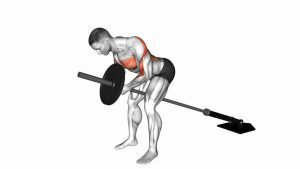
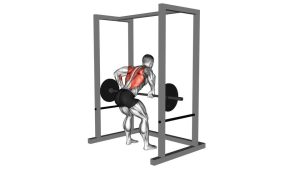
Smith Bent-Over Pronated-Grip Row
This row is best used when you want a strong back-building movement without the balance demands of a free barbell row. Because the bar travels on rails, you can spend more attention on scapular retraction, elbow path, and muscular tension through the lats and upper back. Done correctly, it is excellent for building back thickness, reinforcing a strong hip hinge, and improving pulling mechanics.
Quick Overview
| Body Part | Back |
|---|---|
| Primary Muscle | Latissimus dorsi, rhomboids, middle trapezius |
| Secondary Muscle | Rear deltoids, teres major, biceps, brachialis, erector spinae, forearms |
| Equipment | Smith machine |
| Difficulty | Intermediate |
Sets & Reps (By Goal)
- Muscle growth: 3-4 sets × 8-12 reps with controlled tempo and full contractions
- Strength emphasis: 4-5 sets × 5-8 reps with heavier load and strict torso position
- Technique / back activation: 2-3 sets × 10-15 reps using lighter weight and slower eccentrics
- Accessory pull day work: 3 sets × 8-10 reps after heavier vertical or horizontal pulls
Progression rule: Add reps first while keeping the torso fixed and the bar path clean. Increase load only when you can row without bouncing, shrugging, or losing spinal position.
Setup / Starting Position
- Set the bar height: Position the Smith bar around lower-thigh level so you can unrack it comfortably before hinging.
- Take your grip: Use a pronated grip about shoulder-width to slightly wider than shoulder-width.
- Stand strong: Place your feet about hip-width apart with knees softly bent.
- Hinge at the hips: Push your hips back and lean your torso forward until you reach roughly a 45- to 70-degree torso angle.
- Brace your trunk: Keep your chest open, spine neutral, core tight, and neck in line with the rest of the spine.
- Start with arms long: Let the bar hang below the shoulders with the lats stretched but the torso still locked in position.
Tip: Your stance should let the bar travel naturally into the lower ribcage or upper waist without the bar scraping awkwardly into the legs.
Execution (Step-by-Step)
- Lock in your hinge: Before the first rep, brace your abs, plant your feet, and keep the torso still.
- Initiate with the back: Begin by pulling the shoulder blades slightly back and down rather than curling the weight with your arms.
- Drive the elbows back: Row the bar upward toward the lower ribs or upper waist while keeping the elbows moving behind the body.
- Pause briefly at the top: Squeeze the mid-back hard without overextending the neck or lower back.
- Lower under control: Extend the arms slowly and let the shoulder blades move naturally at the bottom.
- Repeat smoothly: Maintain the same torso angle and bar path on every rep.
Pro Tips & Common Mistakes
- Keep the spine neutral: Do not round through the lower back as fatigue builds.
- Pull to the right target: Lower ribs or upper waist usually creates the best back-dominant path.
- Lead with the elbows: Think about driving elbows back, not curling the bar up with the hands.
- Do not stand up during the rep: Rising out of the hinge reduces back tension and turns the lift into a cheat row.
- Avoid excessive shrugging: Keep traps involved, but do not let the shoulders climb toward the ears.
- Control the negative: A slow lowering phase increases muscular tension and helps reinforce better mechanics.
- Use straps if grip limits your back work: This can help you keep more focus on the target muscles.
FAQ
What muscles does the Smith Bent-Over Pronated-Grip Row work most?
It mainly trains the lats, rhomboids, and middle traps. The pronated grip also increases involvement from the rear delts and upper-back musculature, while the erectors and core stabilize your bent-over position.
Is this better than a barbell bent-over row?
Not necessarily better—just different. The Smith machine gives you a fixed bar path and reduces balance demands, which can make it easier to focus on muscular tension. A free barbell row usually demands more coordination and stabilization.
Should I use an overhand or underhand grip?
The overhand grip is great for emphasizing the upper back and rear delts while still training the lats. An underhand grip often increases biceps involvement and can change the elbow path slightly.
How bent over should I be?
Most lifters do well with the torso around 45-70 degrees forward. A deeper hinge tends to increase back loading, but only if you can hold a neutral spine and stay braced.
Can beginners use this exercise?
Yes, but it is usually best once you already understand basic hip hinging and bracing. Beginners often benefit from starting with lighter weights and strict tempo before loading it hard.
Recommended Equipment
- Weight Lifting Straps — useful when grip fatigue limits your rowing volume before your back is fully challenged
- Weightlifting Belt — helpful for lifters who want extra trunk bracing awareness on heavier sets
- Weight Lifting Hooks — an alternative grip aid for higher-rep row work or when forearms fatigue early
- Liquid Chalk — improves hand traction on the bar without changing your pulling mechanics
- Flat-Sole Training Shoes — gives you a more stable base for hinging and rowing with better balance
Tip: Accessories should improve stability, grip, and execution quality—not cover up poor technique.