Sitting Side Reach Stretch: Proper Form, Benefits, Sets, Tips & FAQ
Learn how to do the Sitting Side Reach Stretch with proper form. Improve back, lat, and oblique flexibility with setup tips, step-by-step instructions, common mistakes, FAQs, and recommended equipment.
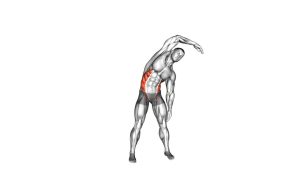
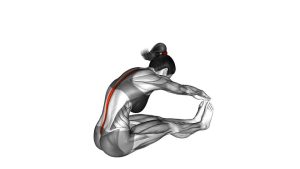
Sitting Side Reach Stretch
This stretch works best when performed with calm breathing and controlled posture. You should feel a gentle lengthening through the side of the torso, mid-back, and lower back rather than sharp pulling in the spine or hips. The motion is not about forcing your hands as far forward as possible. Instead, focus on gradually reaching, relaxing the shoulders, and letting the back muscles open up with each breath.
Quick Overview
| Body Part | Back |
|---|---|
| Primary Muscle | Latissimus dorsi |
| Secondary Muscle | Obliques, quadratus lumborum, erector spinae |
| Equipment | None |
| Difficulty | Beginner |
Sets & Reps (By Goal)
- Warm-up mobility: 1–2 sets per side × 20–30 second holds
- Flexibility improvement: 2–4 sets per side × 30–45 second holds
- Post-workout recovery: 2–3 sets per side × 20–40 second holds
- Desk-break reset: 1–2 easy rounds per side with slow breathing
Progression rule: Increase hold time before trying to reach farther. Better breathing, smoother control, and less tension are stronger signs of progress than chasing extra range.
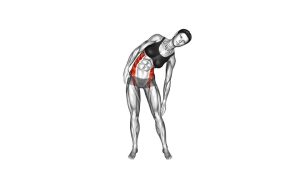
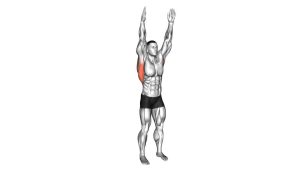
Setup / Starting Position
- Sit on the floor with one leg extended straight in front of you.
- Fold the opposite leg inward comfortably so your base feels stable.
- Square your hips as much as possible and sit tall through the spine.
- Reach both arms forward toward the extended leg side.
- Relax your shoulders and neck before beginning the stretch.
Tip: If sitting upright feels difficult, place a folded towel or yoga block under the hips to improve posture.
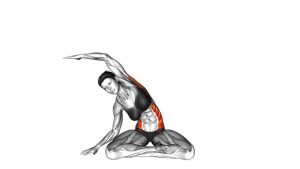
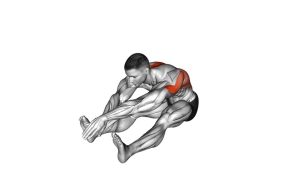
Execution (Step-by-Step)
- Start tall: Lengthen the spine and align your chest over the hips.
- Reach forward slowly: Slide your hands toward the extended leg while hinging gently from the hips.
- Add a slight side bias: Let your torso angle subtly toward the reaching side to emphasize the lat and side-body stretch.
- Allow a gentle spinal curve: As you go deeper, let the upper and mid-back round naturally without collapsing suddenly.
- Pause in the stretch: Hold the end position while breathing slowly and keeping the hips grounded.
- Return with control: Slowly bring the torso back to the upright seated position and repeat on the same side before switching.
Pro Tips & Common Mistakes
- Keep the movement smooth: Avoid bouncing or jerking deeper into the stretch.
- Don’t force the reach: Stretch quality matters more than touching the foot.
- Keep the hips anchored: Lifting or rotating too much reduces the intended back stretch.
- Relax the shoulders: Reaching with shrugged traps can shift tension away from the lats and obliques.
- Breathe into the stretch: Slow exhales help the torso relax and lengthen more naturally.
- Use support if needed: A block, folded towel, or strap can make the position more accessible.
FAQ
Where should I feel the Sitting Side Reach Stretch?
You should mainly feel it through the side of the back, lat area, obliques, and lower back on the reaching side. Some people also feel a mild stretch in the hamstring of the extended leg.
Is this a mobility exercise or a static stretch?
It can be used as both. Shorter controlled reps work well for mobility, while longer relaxed holds are useful for flexibility and recovery.
Should I round my back during this stretch?
A small natural rounding of the upper and mid-back can happen as you reach deeper, but avoid collapsing aggressively. The movement should stay controlled from start to finish.
Can beginners do this stretch?
Yes. It is beginner-friendly as long as the range is comfortable and the setup is adjusted to match your mobility level.
What if I cannot reach very far?
That is completely fine. Reach only to the point where you feel a comfortable stretch. Flexibility will improve over time with regular practice.
Recommended Equipment (Optional)
- Stretching Strap — helpful for assisted reach work and improving flexibility with more control
- Yoga Blocks — useful for elevating the hips or supporting limited mobility during seated stretches
- Yoga Wheel — can complement back mobility work and chest-opening drills between stretch sessions
- Foam Roller — useful for reducing back and lat tightness before or after mobility training
- Massage Ball — helpful for targeted soft-tissue work around the upper back, lats, and shoulder area
Tip: Use tools to improve comfort and control, not to force deeper range. Gentle progress usually works best for flexibility training.