Barbell Bent-Over Row: Proper Form, Sets, Tips & FAQ
Learn how to do the Barbell Bent-Over Row with proper form. Discover back muscle benefits, setup, execution steps, sets and reps by goal, common mistakes, FAQs, and recommended equipment.
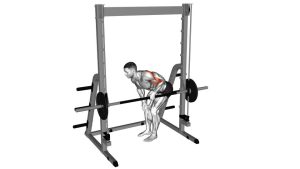
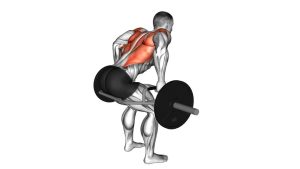
Barbell Bent-Over Row
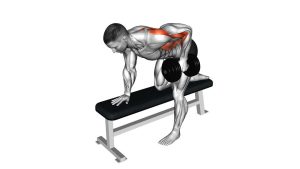
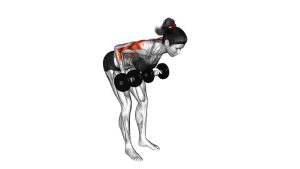
This exercise is excellent for developing back thickness, improving pulling strength, and reinforcing strong posture under load. In the video, the athlete demonstrates a solid bent-over position with a controlled bar path and a smooth elbow drive toward the torso. The best results come from keeping the spine neutral, bracing the core, and rowing with the back instead of jerking the weight upward.
Quick Overview
| Body Part | Back |
|---|---|
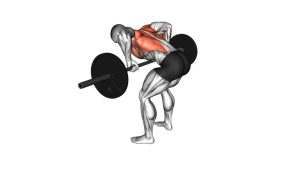
| Primary Muscle | Latissimus dorsi, rhomboids, middle trapezius |
| Secondary Muscle | Rear deltoids, biceps, brachialis, erector spinae, core, hamstrings, glutes |
| Equipment | Barbell and weight plates |
| Difficulty | Intermediate |
Sets & Reps (By Goal)
- Muscle growth: 3-4 sets × 8-12 reps with controlled tempo and full range
- Strength: 4-5 sets × 4-8 reps with heavier loads and strict torso positioning
- Technique practice: 2-3 sets × 10-15 reps using moderate weight and perfect bar path
- Back accessory work: 3 sets × 8-10 reps after deadlifts, pull-ups, or pulldowns
Progression rule: Increase weight only when you can keep the torso angle steady, pull the bar to the same point every rep, and lower it under control without losing spinal alignment.
Setup / Starting Position
- Stand over the bar: Place your feet about hip-width to shoulder-width apart with the bar over the midfoot.
- Grip the bar: Use a pronated grip slightly wider than shoulder width for a strong, stable rowing position.
- Hinge at the hips: Push your hips back and bend your knees slightly until your torso is roughly 45-60 degrees forward.
- Brace hard: Keep your chest open, spine neutral, and core tight before lifting the bar into the starting hang position.
- Let the arms hang: Start with elbows extended and the bar hanging below the knees while keeping the shoulders packed down and back.
Tip: Think of the start position as a strong athletic hinge, not a rounded reach toward the floor.
Execution (Step-by-Step)
- Lock in your torso: Set your hinge, brace your abs, and keep your head and neck in a neutral position.
- Initiate with the elbows: Drive your elbows back and pull the bar toward your lower ribs or upper waist.
- Keep the bar close: Row the bar in a straight, efficient path close to the thighs and torso.
- Squeeze at the top: Briefly contract your back muscles without overextending the spine or shrugging your shoulders.
- Lower with control: Extend the arms and return the bar to the start without dropping it or losing body tension.
- Repeat consistently: Maintain the same torso angle and range of motion on every rep.
Pro Tips & Common Mistakes
- Keep a neutral spine: Do not round the lower back during the hinge or pull.
- Row to the lower torso: Pulling too high can shift emphasis away from the lats and mid-back.
- Do not jerk the weight: Momentum reduces back tension and increases stress on the lower back.
- Stay hinged: Avoid standing up as you row. The torso angle should stay nearly constant.
- Brace your core hard: Strong abdominal tension protects the spine and improves force transfer.
- Control the eccentric: Lowering the bar deliberately improves muscle tension and technique quality.
- Do not shrug excessively: Let the elbows drive the movement while the shoulders stay organized.
FAQ
What muscles does the Barbell Bent-Over Row work the most?
It mainly targets the lats, rhomboids, and middle traps. It also trains the rear delts, biceps, spinal erectors, and core to stabilize your body throughout the lift.
Should I use an overhand or underhand grip?
An overhand grip is common for standard bent-over rows and emphasizes the upper back and lats well. An underhand grip can shift the feel slightly and may increase biceps involvement, but both can be useful when performed correctly.
How bent over should I be?
Most lifters perform well with the torso around 45-60 degrees forward. The exact angle can vary based on mobility, limb length, and training goal, but the spine should stay neutral and the torso should remain stable.
Is the Barbell Bent-Over Row good for building back thickness?
Yes. It is one of the best exercises for adding overall back density because it loads multiple upper- and mid-back muscles at the same time.
What is the biggest mistake in this exercise?
The most common problem is using too much momentum. When the hips and torso start swinging, the back muscles lose tension and the lower back takes on more stress than necessary.
Recommended Equipment (Optional)
- Olympic Barbell — the main tool for performing heavy and consistent bent-over rows
- Bumper Plates / Weight Plates — essential for progressive overload and steady strength gains
- Weightlifting Belt — useful for advanced lifters who want extra trunk bracing feedback during heavier sets
- Lifting Straps — helpful when grip strength limits back training on higher-volume sets
- Rubber Floor Mat — protects your training area and improves setup stability
Tip: Straps and belts can be helpful tools, but strong technique, bracing, and controlled reps should always come first.