Lever Seated Row: Proper Form, Muscles Worked, Sets, Tips & FAQ
Learn how to do the Lever Seated Row with proper form to build back thickness and improve pulling strength. Includes muscles worked, setup, step-by-step execution, sets and reps by goal, common mistakes, FAQs, and recommended equipment.
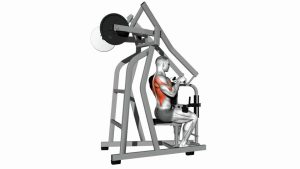
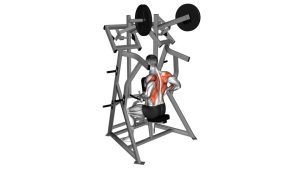
Lever Seated Row
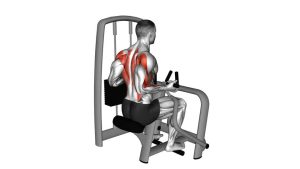
The Lever Seated Row is an excellent option for lifters who want a more supported row pattern without worrying about balance or lower-back fatigue. In the video, the movement is performed with a tall chest, controlled elbow drive, and minimal body swing, which makes it highly effective for training the mid-back and lats. This exercise works well in hypertrophy programs, general back training routines, and posture-focused workouts where quality scapular movement matters.
Quick Overview
| Body Part | Back |
|---|---|
| Primary Muscle | Latissimus dorsi, rhomboids, middle trapezius |
| Secondary Muscle | Rear deltoids, biceps, brachialis, forearms |
| Equipment | Lever / plate-loaded seated row machine |
| Difficulty | Beginner to Intermediate |
Sets & Reps (By Goal)
- Muscle growth: 3-4 sets × 8-12 reps with controlled tempo and a full squeeze
- Strength focus: 4-5 sets × 5-8 reps with heavier loading and strict form
- Technique / posture work: 2-3 sets × 10-15 reps using moderate weight and smooth scapular control
- Warm-up activation: 2 sets × 12-15 light reps before heavier back work
Progression note: Increase weight only when you can complete every rep without rocking your torso, shrugging your shoulders, or shortening the range of motion.
Setup / Starting Position
- Adjust the machine: Sit so the handles line up comfortably with your arms and upper torso, allowing a full stretch without losing posture.
- Place your feet firmly: Keep your feet planted on the foot platform to create a stable base.
- Set your torso: Sit tall with your chest up, core braced, and spine neutral.
- Grip the handles: Use the machine’s handles with a controlled grip, usually neutral or semi-neutral depending on the model.
- Start with arms extended: Let the shoulders reach slightly forward so the back muscles begin from a stretched position.
A good starting position should feel stable and athletic, not loose or overly relaxed. You want the machine to support the movement without encouraging sloppy posture.
Execution (Step-by-Step)
- Initiate with the upper back: Begin the pull by drawing your shoulder blades back rather than yanking with your arms first.
- Drive the elbows behind you: Pull the handles toward your torso in a smooth path, keeping the elbows close to the sides.
- Keep the chest proud: Maintain a tall torso and neutral spine as the handles approach the lower ribs or upper waist area.
- Squeeze at the back: Briefly pause at peak contraction and focus on the mid-back muscles shortening hard.
- Return under control: Slowly extend the arms forward and allow the shoulder blades to protract naturally for a complete stretch.
- Repeat with consistency: Use the same pulling path and tempo on every rep to keep tension where it belongs.
Pro Tips & Common Mistakes
- Lead with the elbows: This helps bias the back muscles instead of turning the movement into a biceps-dominant pull.
- Use a full stretch: Let the shoulder blades move forward at the start so you get more complete back activation.
- Pause at peak contraction: A brief squeeze improves mind-muscle connection and reduces rushed reps.
- Avoid leaning back hard: Excessive torso swing shifts tension away from the back and turns the exercise into a momentum-based movement.
- Don’t shrug the shoulders: Keep the neck relaxed and shoulders down so the mid-back and lats do the work.
- Don’t cut reps short: Partial rows reduce stretch and make the exercise less effective for full back development.
- Control the lowering phase: The eccentric portion is valuable for muscle growth, so don’t let the machine snap forward.
FAQ
What muscles does the Lever Seated Row work the most?
It mainly targets the lats, rhomboids, and middle traps. The rear delts, biceps, and forearms also assist during the pull.
Is the Lever Seated Row good for beginners?
Yes. The machine provides support and stability, which makes it easier for beginners to learn proper rowing mechanics without worrying as much about balance.
Should I pull to my chest or stomach?
In most setups, pulling toward the lower ribs or upper stomach area works best. The exact path depends on the machine design, but the elbows should travel back naturally without forcing the shoulders forward.
How is this different from a cable seated row?
A lever machine usually gives you a more fixed path and a stable setup, while a cable row often allows more freedom of motion. The lever version can make it easier to focus on controlled loading and strict form.
Can I use this exercise for posture improvement?
Yes. When performed correctly, it can help strengthen the muscles that support better upper-back posture and scapular control. It works even better when combined with other pulling and mobility exercises.
Recommended Equipment (Optional)
- Weightlifting Grips — helpful for reducing grip fatigue during high-volume rowing workouts
- Lifting Straps — useful when your forearms fail before your back muscles do
- Resistance Bands Set — great for warm-ups, activation drills, and extra upper-back work
- Lifting Belt — optional support for heavier training sessions when used properly
- Foam Roller — useful for upper-back mobility and recovery between training days
Choose tools that support better training quality, not shortcuts that replace good form. Strict reps, consistent control, and progressive overload remain the main drivers of progress.