Lever Seated Row: Proper Form, Muscles Worked, Sets, Tips & FAQ
Learn how to perform the Lever Seated Row with proper form to build back thickness and improve pulling strength. Includes muscles worked, setup, execution steps, sets and reps by goal, common mistakes, FAQs, and recommended equipment.
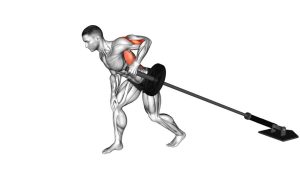
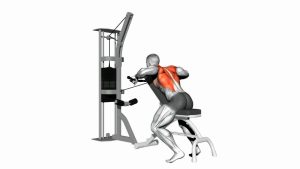
Lever Seated Row
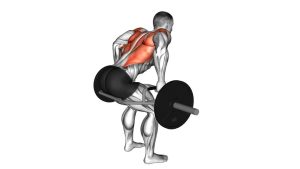
This exercise is excellent for lifters who want a stable rowing variation with strong muscle-building potential. Because the machine supports the movement path, you can concentrate on driving the elbows back, keeping the chest up, and contracting the back without relying on momentum. When performed correctly, the lever seated row trains both the lats and the upper-to-mid back while allowing a controlled, joint-friendly pulling pattern.
Quick Overview
| Body Part | Back |
|---|---|
| Primary Muscle | Latissimus dorsi, rhomboids, middle trapezius |
| Secondary Muscle | Rear deltoids, biceps, brachialis, forearms |
| Equipment | Lever seated row machine / plate-loaded row machine |
| Difficulty | Beginner to Intermediate |
Sets & Reps (By Goal)
- Muscle growth: 3–4 sets × 8–12 reps with controlled tempo and a full squeeze
- Strength focus: 4–5 sets × 5–8 reps using heavier loads and clean form
- Technique practice: 2–3 sets × 10–15 reps with light-to-moderate weight
- Back accessory work: 3 sets × 12–15 reps after heavier pulling exercises
Progression rule: Add weight only after you can complete all target reps with a full stretch, strong contraction, and no torso swinging.
Setup / Starting Position
- Adjust the machine: Set the seat height so the handles line up comfortably with your mid-torso or lower chest area.
- Sit tall: Plant your feet firmly and keep your torso upright with your chest lifted.
- Grip the handles: Use the machine’s handles with a neutral or machine-fixed grip.
- Start with extended arms: Reach forward until your arms are nearly straight while maintaining control.
- Brace your core: Keep the abs tight and the spine neutral before initiating the row.
Tip: Let the shoulders move slightly forward at the start so your back muscles get a full stretch, but do not collapse your posture.
Execution (Step-by-Step)
- Begin the pull with the back: Start by drawing the shoulder blades back rather than yanking with the arms.
- Drive the elbows backward: Pull the handles toward your torso in a smooth arc while keeping the chest up.
- Keep the wrists neutral: Hold the handles firmly without bending the wrists excessively.
- Squeeze at the finish: Bring the handles toward the lower ribs or mid-torso and contract the mid-back hard for a brief pause.
- Lower under control: Extend the arms slowly and allow the shoulder blades to move forward naturally into a full stretch.
- Repeat evenly: Maintain the same path and tempo on every rep without bouncing or rushing.
Pro Tips & Common Mistakes
- Lead with the elbows: This helps shift emphasis to the back instead of overusing the arms.
- Use full range of motion: A good stretch in front and a solid squeeze at the back make the exercise more effective.
- Keep the chest lifted: A rounded upper body reduces back engagement and weakens the finish.
- Avoid excessive momentum: Swinging the torso turns the row into a body-rocking movement instead of a strict pull.
- Do not shrug: Keep the shoulders away from the ears to maintain better lat and mid-back activation.
- Control the eccentric: Lowering the handles slowly improves muscle tension and reinforces better mechanics.
- Match the load to your goal: Heavier weight works well for strength, but moderate weight often gives better back contraction for hypertrophy.
FAQ
What muscles does the Lever Seated Row work?
The lever seated row mainly trains the latissimus dorsi, rhomboids, and middle trapezius. It also involves the rear deltoids, biceps, brachialis, and forearms as assisting muscles.
Is the Lever Seated Row good for building back thickness?
Yes. This exercise is excellent for building back thickness because it loads the mid-back and lats through a stable horizontal pulling pattern. It is especially useful when you want to focus on controlled contractions without balancing a free weight.
Should I pull to my chest or stomach?
In most setups, pulling toward the lower chest or mid-torso works best. The exact path depends on the machine design, but the goal is to keep the elbows traveling back naturally while maintaining tension in the back.
Can beginners use the Lever Seated Row?
Yes. The guided machine path makes it a beginner-friendly rowing option. It helps newer lifters learn how to retract the shoulder blades and row with the back while reducing the balance demands found in some free-weight variations.
What is the biggest mistake on this exercise?
The most common mistake is using too much weight and turning the rep into a jerking motion. That usually reduces back activation and shifts stress into the arms, traps, and lower back.
Recommended Equipment
- Weightlifting Straps — helpful if grip strength limits your back training on heavier rowing sets
- Gym Lifting Gloves — improve handle comfort and reduce palm fatigue during repeated pulling workouts
- Resistance Bands Set — useful for warm-ups, scapular activation drills, and pairing with back sessions
- Foam Roller — helpful for upper-back mobility work before or after rowing workouts
- Weightlifting Belt — optional support for lifters using heavier machine rows as part of a strength-focused back day
Tip: Accessories should support better training quality, not replace clean form. Prioritize full range of motion, controlled reps, and consistent progression first.