Prone Cervical Extension Isometric Hold: Safe Form, Sets, Tips & FAQ
Learn the prone cervical extension isometric hold to strengthen the posterior neck and improve posture. Step-by-step form, sets by goal, common mistakes, FAQs, and recommended equipment.
Prone Cervical Extension Isometric Hold: Safe Form, Sets, Tips & FAQ
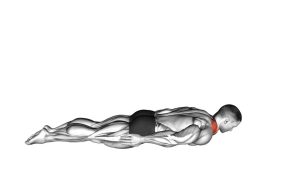
The prone cervical extension isometric hold is a controlled neck-strength drill that targets the muscles on the back of your neck. It’s useful for building endurance, supporting posture (especially for “tech neck”), and improving cervical stability for athletes and everyday lifters.
Quick Overview
| Body Part | Neck |
|---|---|
| Primary Muscle | Neck extensors (splenius capitis/cervicis, semispinalis capitis) |
| Secondary Muscle | Upper trapezius, levator scapulae, deep cervical stabilizers |
| Equipment | Mat + optional folded towel (progression: light band/plate only if pain-free) |
| Difficulty | Beginner → Intermediate |
Sets & Reps (By Goal)
- Posture / endurance: 2–4 sets × 15–30 seconds, rest 45–60s.
- Strength / stability: 3–5 sets × 10–20 seconds, rest 60–90s.
- Rehab-style control: 2–3 sets × 8–15 seconds, easy effort, perfect form.
Progress by adding hold time first (e.g., 15s → 20s → 30s). Add resistance only after you can hold alignment with shoulders relaxed and no low-back arching.
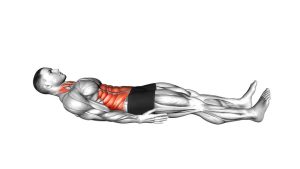
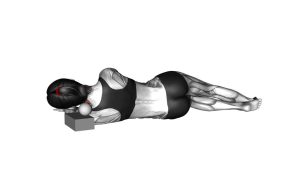
Setup / Starting Position
- Lie face-down on a mat. Keep ribs down and pelvis neutral (don’t arch the low back).
- Rest arms by your sides or place hands under your forehead for comfort; keep shoulders away from your ears.
- Start with a slight chin tuck (“long neck”) and eyes angled toward the floor.
Execution
- Lengthen first: imagine the crown of your head reaching forward.
- Lift gently: raise the head a small amount into comfortable extension—avoid cranking up.
- Hold + breathe: keep steady tension while breathing slowly through the nose; lower with control.
Tips & Common Mistakes
- Cue: “Lengthen, then hold.” Don’t jam the head back.
- Avoid shrugging: if traps take over, lower the lift or shorten the hold.
- Keep the torso quiet: don’t arch the low back to fake range.
- No breath-holding: steady breathing keeps the hold smooth and controlled.
FAQ
How high should I lift my head?
Not very high. A small lift is enough—as long as you feel the back of the neck working without pinching or strain.
How often can I do this exercise?
Most people do well with 2–4 days per week. If you’re using lighter, shorter holds for posture endurance, you can do it more often as long as you recover well and stay symptom-free.
When can I add weight or bands?
Only after you can hold perfect form for 20–30 seconds—no shrugging, no low-back arching, no pain. Start extremely light and keep the range small.
Recommended Equipment (Optional)
- Thick Yoga / Exercise Mat — More comfort in prone positions and better consistency for longer holds.
- Small Foam Pad (or folded towel) — Supports the forehead and can reduce “pinchy” setup discomfort.
- Mini Resistance Bands Set — Helpful for posture accessory work and gentle progressions when ready.
- Neck Harness — Advanced option for later loaded work (not required for this isometric).
- Light Adjustable Weights (very light) — Only for advanced users; keep load minimal and alignment strict.