Lat Foam Rolling: Proper Form, Benefits, Tips & FAQ
Learn how to perform Lat Foam Rolling with proper setup and technique to release tight lats, improve shoulder mobility, and support upper-body recovery. Includes tips, mistakes, FAQ, and recommended equipment.
Lat Foam Rolling
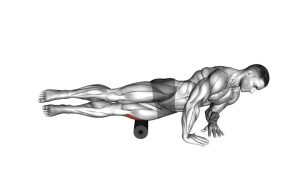
This drill is best used as part of a warm-up, mobility session, or post-workout recovery routine. In the video, the exerciser lies on one side with the arm extended overhead to lengthen the lat while the foam roller applies pressure to the outer upper-back region. The movement stays short and controlled, allowing the roller to target dense or sensitive tissue without turning the drill into a rushed full-body roll. When done well, Lat Foam Rolling can help improve movement quality for rows, pulldowns, pull-ups, and overhead pressing patterns.
Quick Overview
| Body Part | Back |
|---|---|
| Primary Muscle | Latissimus dorsi |
| Secondary Muscle | Teres major, serratus anterior, posterior shoulder connective tissue, thoracolumbar fascia |
| Equipment | Foam roller, exercise mat or floor space |
| Difficulty | Beginner-friendly mobility and recovery drill |
Sets & Reps (By Goal)
- Warm-up before upper-body training: 1–2 rounds per side for 20–40 seconds
- Mobility improvement: 2–3 rounds per side for 30–60 seconds with slow passes
- Post-workout recovery: 1–3 rounds per side for 30–45 seconds with relaxed breathing
- Tightness management on rest days: 2 rounds per side for 45–60 seconds, focusing on tender areas briefly
Progression rule: Increase time under control before increasing pressure. Better breathing, smoother passes, and improved shoulder motion matter more than forcing deeper pressure into sore tissue.
Setup / Starting Position
- Place the foam roller on the floor: Set it perpendicular to your body so it can contact the side of the upper back.
- Lie on one side: Position the roller just below the armpit along the outer upper-back area where the lat sits.
- Reach the bottom arm overhead: This lengthens the lat and exposes more tissue to the roller.
- Use the top leg for balance: Bend the top knee and place the foot in front of your body to help control pressure.
- Support with the top hand: Press lightly into the floor so you can guide the rolling motion rather than dumping all body weight onto the roller.
- Brace lightly through the trunk: Keep your torso stable and avoid collapsing through the shoulder.
Tip: Small body adjustments can shift pressure slightly toward the back or slightly toward the side ribs, helping you find the tightest part of the lat without losing control.
Execution (Step-by-Step)
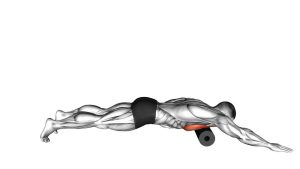
- Start with the roller under the lat: Settle onto the foam roller just below the armpit while keeping the lower arm overhead.
- Lift and guide your body gently: Use the top hand and front foot to control how much weight presses into the roller.
- Roll slowly through a short range: Move up and down a few inches over the outer upper-back area rather than covering a huge distance.
- Pause on tight spots briefly: If you find a tender area, stop for 5–15 seconds and breathe steadily instead of bouncing over it.
- Adjust your angle slightly: Rotate your torso a little forward or backward to explore nearby tissue along the lat and teres area.
- Keep the shoulder relaxed: Do not shrug the shoulder toward the ear or tense the neck while rolling.
- Switch sides: Complete the same controlled sequence on the other side.
Pro Tips & Common Mistakes
- Reach the working arm overhead: This places the lat in a better position for targeted soft tissue work.
- Use short passes: Small, focused movements work better than rolling across half the torso.
- Breathe slowly: Relaxed breathing reduces guarding and makes the release more effective.
- Control pressure with your hand and leg: You do not need to dump full body weight into the roller.
- Avoid rolling directly on the spine: Stay on the muscular outer upper-back region.
- Do not rush: Fast rolling usually misses the tight areas and turns the drill into random movement.
- Do not shrug the shoulder: Keep the neck relaxed and the shoulder away from the ear.
- Pair it with mobility drills: Lat foam rolling works especially well before overhead reaches, wall slides, or shoulder flexion drills.
FAQ
Where should I feel Lat Foam Rolling?
You should feel pressure along the outer upper back, just below the armpit and down the side of the torso where the lat runs. Mild tenderness is normal, but it should not feel sharp, nerve-like, or unstable in the shoulder joint.
Should I roll fast or slow?
Slow is better. Controlled passes help you find tight tissue and reduce the urge to tense up. Fast rolling usually decreases precision and makes the drill less effective.
Is this good before pull-ups or rows?
Yes. It can be useful before pulling workouts if your lats feel stiff or if overhead position is limited. Pair it with activation and mobility drills for the best result.
How long should I spend on each side?
Most people do well with 20 to 60 seconds per side per round. More is not always better. Quality pressure and steady breathing matter more than long sessions.
Can beginners do this exercise?
Yes. It is beginner-friendly as long as pressure stays manageable and body position remains controlled. Start with light pressure and a short duration.
Recommended Equipment (Optional)
- High-Density Foam Roller — the main tool for applying controlled pressure to the lats and upper-back soft tissue
- Textured Foam Roller — offers a more intense surface feel for lifters who want deeper soft tissue work
- Exercise Mat — adds comfort and grip while setting up on the floor for mobility and recovery drills
- Massage Ball or Peanut Roller — useful for more targeted pressure around tight shoulder and lat trigger points
- Resistance Bands Set — great for pairing with shoulder mobility and lat activation work after foam rolling
Tip: A standard smooth foam roller is the best starting point. If you are very sensitive or new to rolling, begin with lighter pressure and shorter sessions.