Bodyweight Standing Close-Grip One-Arm Row: Form, Benefits, Sets & FAQ
Learn how to perform the Bodyweight Standing Close-Grip One-Arm Row with proper form. Discover muscles worked, setup, execution, sets and reps, common mistakes, FAQs, and recommended equipment.
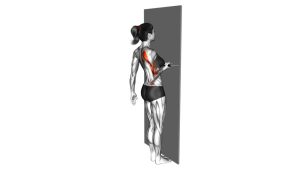
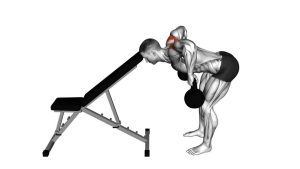
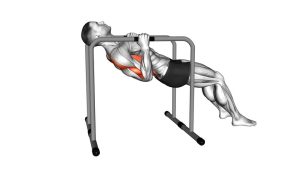
Bodyweight Standing Close-Grip One-Arm Row
This exercise is a practical bodyweight alternative to machine and cable rows when you want more unilateral control and a strong back-focused contraction without needing heavy external loading. The working arm pulls the torso toward the bar while the body stays braced and stable, making the movement excellent for improving pulling coordination, lat engagement, scapular control, and muscular balance between sides. Because your body angle changes the resistance, the exercise can be made easier or harder without changing equipment.
Quick Overview
| Body Part | Back |
|---|---|
| Primary Muscle | Latissimus dorsi |
| Secondary Muscle | Rhomboids, middle trapezius, rear deltoid, biceps, forearms, core stabilizers |
| Equipment | Stall bar, fixed bar, rack upright, or any sturdy support you can grip with one hand |
| Difficulty | Beginner to Intermediate |
Sets & Reps (By Goal)
- Technique practice: 2–3 sets × 6–8 reps per side with slow tempo and full control
- Muscle building: 3–4 sets × 8–15 reps per side with 45–75 seconds rest
- Strength emphasis: 3–5 sets × 5–8 reps per side using a harder body angle and longer rest
- Warm-up / activation: 2–3 sets × 10–12 smooth reps per side at easy-to-moderate effort
Progression rule: First improve control, symmetry, and range of motion. Then increase difficulty by walking the feet farther forward, leaning the body back more, slowing the eccentric, or pausing at peak contraction.
Setup / Starting Position
- Grip the support with one hand: Use a close, neutral-style hand position on a stable bar or rung around mid-torso to chest height.
- Set your stance: Walk your feet forward so your body leans back at an angle that matches your strength and control.
- Brace your torso: Keep the chest lifted, ribs stacked, and core engaged so the body moves as one unit.
- Free arm stays relaxed: Let the non-working arm rest naturally without swinging or over-assisting the row.
- Start with the arm extended: The working shoulder stays packed and the body remains long without collapsing forward.
Tip: A more upright body position makes the exercise easier. A deeper lean increases resistance and makes each rep more demanding.
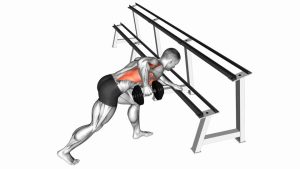
Execution (Step-by-Step)
- Lock in your position: Start with your feet planted, body leaning back, and working arm fully extended under control.
- Initiate with the back: Begin the rep by pulling the shoulder blade back and down before bending the elbow aggressively.
- Drive the elbow close to the torso: Pull your body toward the bar by guiding the elbow backward in a tight path rather than flaring it out.
- Squeeze at the top: Bring the torso in smoothly and pause briefly when the back is fully contracted.
- Lower with control: Extend the arm gradually and return to the starting position without dropping or twisting out of the rep.
- Repeat evenly on both sides: Match reps, tempo, and range of motion to keep strength development balanced.
Pro Tips & Common Mistakes
- Lead with the elbow: This helps keep the tension on the lats and upper back instead of turning the movement into an arm curl.
- Keep the shoulder packed: Avoid letting the working shoulder drift up toward the ear during the pull.
- Use body angle wisely: Choose a lean that allows strong reps without jerking or rotating too much.
- Don’t rush the eccentric: The lowering phase is where much of the back-building stimulus happens.
- Avoid over-rotation: A slight torso turn can happen naturally, but excessive twisting reduces clean back tension.
- Stay long through the torso: Don’t sag through the hips or round the chest as fatigue sets in.
- Train both sides honestly: Start with the weaker side and match that side’s quality with the stronger side.
FAQ
What muscles does the Bodyweight Standing Close-Grip One-Arm Row work?
It mainly targets the lats, while also training the rhomboids, middle traps, rear delts, biceps, forearms, and core stabilizers. Because it is unilateral, it also challenges anti-rotation control and side-to-side balance.
Is this exercise good for beginners?
Yes. It can be very beginner-friendly because you can make it easier by standing more upright. That makes it a great entry point for learning rowing mechanics before moving on to harder inverted rows or weighted one-arm row variations.
How do I make this exercise harder?
Increase the difficulty by leaning farther back, placing the feet farther forward, slowing the lowering phase, adding a pause at the top, or using longer sets with strict control.
Should I feel this more in my back or my arm?
You should mainly feel it in your back, especially the lats and muscles around the shoulder blade. Some biceps involvement is normal, but if your arm takes over completely, focus on initiating the pull with scapular movement and elbow drive.
Can this help fix left-to-right strength imbalances?
Yes. Since each side works independently, this row is useful for identifying and improving asymmetries in pulling strength, control, and coordination.
Recommended Equipment (Optional)
- Stall Bars / Wall-Mounted Gym Ladder — ideal for performing standing bodyweight rows at adjustable grip heights
- Doorway Pull-Up Bar — useful for home pulling variations and progression into harder back exercises
- Gymnastic Rings — excellent for scalable bodyweight rows and unilateral pulling drills
- Resistance Bands Set — helpful for back activation, warm-ups, and additional rowing assistance work
- Lifting Grips or Training Gloves — can improve comfort and grip support during higher-volume pulling sessions
Tip: Prioritize a stable anchor point first. Clean setup and controlled execution matter more than adding difficulty too early.