Hammer Grip Pull-Up on Dip Cage: Proper Form, Muscles Worked, Sets & Tips
Learn how to perform the Hammer Grip Pull-Up on a dip cage with proper form. Discover muscles worked, setup, execution steps, sets by goal, mistakes to avoid, FAQs, and recommended equipment.
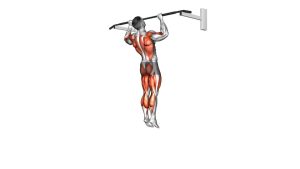
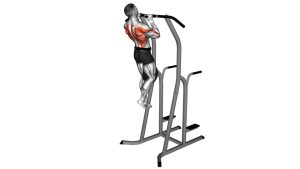
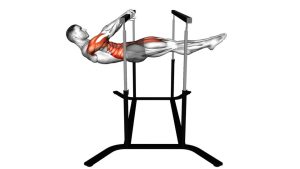
Hammer Grip Pull-Up on Dip Cage
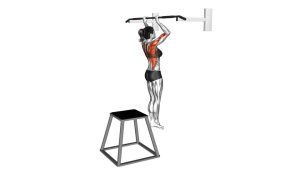
This variation is a great choice for lifters who want to build pulling strength, improve upper-body control, and develop a thicker, stronger back using bodyweight resistance. In the video, the movement is performed on the parallel handles of a dip cage, allowing a smooth elbow path close to the torso. A controlled dead hang, deliberate upward pull, and steady descent make this exercise more effective and much safer than rushing through partial reps.
Quick Overview
| Body Part | Back |
|---|---|
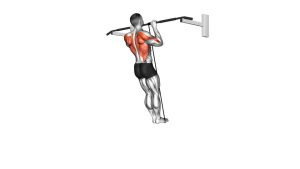
| Primary Muscle | Latissimus dorsi |
| Secondary Muscle | Biceps, rhomboids, middle traps, lower traps, rear delts, forearms |
| Equipment | Dip cage / power tower with parallel pull-up handles |
| Difficulty | Intermediate |
Sets & Reps (By Goal)
- Strength: 4–5 sets × 3–6 reps, resting 90–150 seconds between sets
- Muscle building: 3–4 sets × 6–10 reps, resting 60–90 seconds between sets
- Bodyweight control and technique: 3–4 sets × 4–8 clean reps with a slow lowering phase
- Endurance: 2–3 sets × 10–15 reps, only if form stays strict from start to finish
Progression rule: Add reps first, then add pauses at the top or slow eccentrics. Once your bodyweight reps become strong and consistent, consider using a dip belt or weighted vest for overload.
Setup / Starting Position
- Grip the parallel handles: Take a neutral grip with palms facing each other and wrap the thumbs securely around the handles.
- Hang under control: Let the arms extend fully while keeping the shoulders active rather than collapsing completely.
- Brace the torso: Tighten the core gently and keep the ribcage stacked so the body stays stable during the rep.
- Position the legs: Bend the knees slightly if needed and cross the feet behind you to reduce swinging.
- Set the head and neck: Keep your gaze forward with a neutral neck instead of jutting the chin upward.
A strong setup creates a cleaner pull. Before the first rep, think about drawing the shoulders down and away from the ears so the upper back is ready to work.
Execution (Step-by-Step)
- Start from a controlled hang: Extend the elbows fully and stabilize the body before beginning the pull.
- Initiate with the shoulder blades: Depress and slightly retract the scapulae so the back engages before the arms take over.
- Drive the elbows down: Pull your elbows toward your sides and slightly behind the torso as your body rises upward.
- Keep the torso steady: Stay tall through the chest without excessive arching, kicking, or swinging.
- Reach the top smoothly: Pull until your chin clears the handle level or your upper chest approaches the hands.
- Squeeze briefly: Pause for a moment at the top to reinforce back engagement.
- Lower under control: Descend slowly until the arms are straight again, maintaining tension instead of dropping.
Pro Tips & Common Mistakes
- Lead with the elbows: Think about pulling the elbows down rather than lifting the chin to the bar.
- Keep tension at the bottom: Avoid hanging passively if it makes your shoulders feel unstable.
- Use full range of motion: Start from straight arms and finish with a strong top contraction whenever possible.
- Do not kip the rep: Swinging the hips or kicking the legs shifts work away from the target muscles.
- Stay neutral through the wrists: A neutral grip should feel natural; do not over-bend or twist the hands.
- Control the eccentric: The lowering phase builds strength and muscle just as much as the upward pull.
- Avoid shrugging: Letting the shoulders rise too much can reduce lat involvement and create unnecessary neck tension.
- Scale when needed: If strict bodyweight reps are too hard, use resistance bands or assisted pull-up variations before forcing sloppy repetitions.
FAQ
What muscles does the Hammer Grip Pull-Up on Dip Cage work?
It mainly targets the lats, while also training the biceps, rhomboids, traps, rear delts, and grip muscles. The neutral grip usually allows a very natural pulling path that feels strong and joint-friendly.
Is a hammer grip pull-up easier than a wide-grip pull-up?
For many people, yes. The neutral grip often feels more comfortable on the shoulders and wrists, and it can make it easier to keep the elbows in a stronger pulling position.
Should I go all the way down at the bottom?
In most cases, yes. A full controlled stretch at the bottom helps develop strength through a complete range of motion, as long as your shoulders remain stable and pain-free.
What if I cannot do a full bodyweight rep yet?
Start with band-assisted pull-ups, eccentric-only reps, or machine-assisted pull-ups. These options help you build strength while practicing the same movement pattern.
How often can I train this exercise?
Most lifters do well with it 1–3 times per week, depending on total back volume, recovery, and training experience. Leave enough recovery time if your sessions are intense or include other heavy pulling movements.
Recommended Equipment
- Power Tower / Dip Station — the main setup for performing neutral-grip pull-ups safely at home
- Pull-Up Assistance Bands — helpful for beginners building strength toward strict full reps
- Lifting Grips or Pull-Up Grips — useful if grip fatigue limits your back training volume
- Dip Belt — ideal for adding external load once bodyweight reps become easy
- Weighted Vest — another effective way to progress pull-up difficulty without changing technique
Choose equipment that supports your current level. Beginners often benefit most from assistance bands, while advanced lifters usually gain more from weighted progression.