Roll Ball Scapula Levator Back: Form, Benefits, Tips & FAQ
Learn how to perform the Roll Ball Scapula Levator Back release to ease upper-back and neck tension, improve scapular mobility, and reduce tightness with proper form, tips, FAQs, and equipment suggestions.
Roll Ball Scapula Levator Back
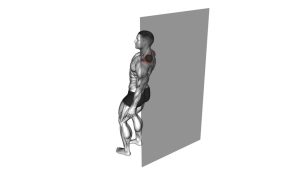
This drill is best used as a mobility and recovery tool for people who feel stiffness between the neck and shoulder blade, especially after long periods of sitting, desk work, upper-body training, or postural fatigue. The movement shown in the video emphasizes a wall-supported position with the ball placed on the upper inner scapular area. Instead of large rolling, the exercise works through small pressure adjustments and brief pauses over sensitive spots to help the muscle gradually release.
Quick Overview
| Body Part | Upper Back |
|---|---|
| Primary Muscle | Levator scapulae |
| Secondary Muscle | Rhomboids, upper trapezius, rear deltoid, scapular stabilizers |
| Equipment | Massage ball or lacrosse ball, wall |
| Difficulty | Beginner |
Sets & Reps (By Goal)
- Daily mobility: 1–2 rounds per side for 30–60 seconds on each tender area
- Warm-up before upper-body training: 1–2 rounds per side for 20–40 seconds, followed by light scapular movement
- Recovery / tension relief: 2–3 rounds per side for 45–90 seconds with pauses on tight trigger points
- Desk-break reset: 1 round per side for 20–30 seconds using light pressure
Progression note: Increase time under pressure gradually before increasing intensity. Better results usually come from consistent, controlled work than from pressing harder.
Setup / Starting Position
- Stand with your back to a wall: Place your feet slightly in front of you so you can lean back comfortably.
- Position the ball carefully: Place the ball between the wall and the upper inner border of your shoulder blade, near the levator scapulae area.
- Avoid the spine: Keep the ball on muscle tissue, not directly over the vertebrae.
- Relax your neck and shoulders: Let the upper trap soften instead of shrugging upward.
- Brace lightly: Keep a stable stance so you can control the amount of body weight pressing into the ball.
Tip: Small changes in ball placement can make a big difference. Move it slightly up, down, or inward until you find the most useful spot.
Execution (Step-by-Step)
- Lean into the wall: Apply gentle pressure through the ball by shifting your body weight backward.
- Find the tight area: Make small body movements until the ball reaches a tender spot around the levator scapulae or upper scapular region.
- Roll slowly: Use short up-and-down or side-to-side motions, not large sweeping rolls.
- Pause on trigger points: When you locate a tight area, hold the pressure for 15–30 seconds while breathing calmly.
- Stay relaxed: Keep the jaw loose, shoulders down, and neck neutral as the tissue begins to soften.
- Reposition as needed: Shift the ball slightly to explore nearby tight areas without rushing.
- Finish gradually: Step away from the wall slowly and gently move your shoulder or neck to notice the difference.
Pro Tips & Common Mistakes
- Use controlled pressure: Lean in gradually so the muscle can relax instead of guarding.
- Keep the neck neutral: Avoid craning the head forward or side-bending excessively during the release.
- Breathe continuously: Slow breathing helps reduce tension and improves tolerance to the pressure.
- Stay off the spine: Keep the ball slightly lateral to the vertebrae and on the soft tissue.
- Do not rush the roll: Fast rolling often misses the tight spot and reduces the release effect.
- Don’t shrug the shoulder: A relaxed shoulder position keeps the target area more accessible.
- Pair it with movement: After the release, gentle scapular circles, shoulder rolls, or upper-back mobility work can help reinforce the benefit.
FAQ
Where should I feel this exercise the most?
You should mainly feel pressure and release around the upper inner shoulder blade area and the muscle line running from the top of the scapula toward the neck. It may feel tender, but it should not feel sharp or electric.
Is this a strength exercise or a recovery drill?
This is primarily a recovery and mobility drill. It helps reduce tissue tightness and improve comfort, but it is not meant to replace strengthening work for the upper back, shoulders, or neck.
How long should I stay on one spot?
Most people do well with 15–30 seconds on a single tender point. If the area is highly sensitive, use lighter pressure and shorter holds.
Can this help with desk-related neck and upper-back tightness?
Yes, it can be useful for reducing tightness related to prolonged sitting, screen time, and postural fatigue. For best results, combine it with posture awareness, upper-back strengthening, and regular movement breaks.
What kind of ball should I use?
A massage ball or lacrosse ball works well for most people. Beginners often prefer a slightly softer ball, while experienced users may tolerate a firmer option.
Recommended Equipment (Optional)
- Massage Ball — ideal for targeted upper-back, shoulder-blade, and trigger-point release
- Lacrosse Ball — a firm, simple option for precise wall-based pressure work
- Peanut Massage Ball — useful for controlled upper-back release while helping avoid direct spinal pressure
- Trigger Point Therapy Ball Set — offers multiple firmness levels for different pressure preferences
- Resistance Bands Set — helpful for pairing release work with posture and upper-back activation exercises
Tip: Use the firmest tool you can tolerate without guarding or sharp pain. The best tool is the one that lets you stay relaxed and precise.