Roll Ball Rhomboid Back: Form, Benefits, Sets, Tips & FAQ
Learn how to perform the Roll Ball Rhomboid Back exercise for upper back trigger point release and posture relief. Includes setup, step-by-step execution, sets by goal, common mistakes, FAQ, and recommended equipment.
Roll Ball Rhomboid Back
This movement is best performed slowly and with intention. Rather than chasing pain, use the ball to explore tight or tender points along the inner border of the shoulder blade and upper back. You should feel deep, tolerable pressure in the muscle tissue, not sharp pain on the spine or joint surfaces. Controlled breathing and small body shifts usually make this drill far more effective than large rolling motions.
Quick Overview
| Body Part | Upper Back |
|---|---|
| Primary Muscle | Rhomboids |
| Secondary Muscle | Middle trapezius, rear shoulder stabilizers, scapular support muscles |
| Equipment | Massage ball or lacrosse ball, sturdy wall |
| Difficulty | Beginner |
Sets & Reps (By Goal)
- Warm-up / tissue prep: 1–2 rounds per side for 20–40 seconds on each tight area
- Recovery / soreness relief: 2–3 rounds per side for 30–60 seconds with calm breathing
- Posture mobility routine: 2 rounds per side, then follow with rows, band pull-aparts, or mobility work
- Desk-break reset: 1 light round per side for 20–30 seconds without excessive pressure
Progression rule: Increase time under pressure gradually before increasing intensity. Better control and better ball placement usually produce better results than using more force.
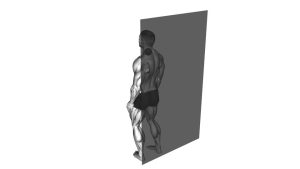
Setup / Starting Position
- Stand against a wall: Face away from the wall and place your feet slightly forward so you can lean back comfortably.
- Place the ball correctly: Position the ball between the wall and the muscle area between your shoulder blade and spine.
- Avoid the spine: Keep the ball just off the spine and on the muscular tissue of the upper back.
- Relax your shoulders: Let the upper traps stay soft and keep the neck neutral.
- Set your pressure: Lean in gradually until you feel firm but tolerable contact.
Tip: A slightly bent-knee stance helps you control body weight and makes it easier to fine-tune pressure.
Execution (Step-by-Step)
- Lean into the ball: Apply gentle-to-moderate body weight into the wall until the ball presses into the rhomboid area.
- Make small adjustments: Move slowly up, down, or side to side by a few centimeters to scan the upper-back tissue.
- Find tight spots: When you locate a tender trigger point, pause on it instead of rolling past it quickly.
- Hold and breathe: Stay on the spot for 15–30 seconds while breathing slowly and letting the muscle soften.
- Reposition as needed: Shift the ball slightly to explore nearby fibers along the inside edge of the shoulder blade.
- Repeat on the other side: Match time and pressure on both sides unless one area is especially irritated.
Pro Tips & Common Mistakes
- Use small movements: Tiny adjustments usually target the rhomboids better than large rolling motions.
- Do not roll directly over the spine: Stay on soft tissue, not the bony midline.
- Keep breathing: Holding your breath increases tension and makes release less effective.
- Do not overdo pressure: More pain does not equal better release.
- Relax the shoulder: Avoid shrugging or bracing the upper traps while rolling.
- Pair it with movement: After release work, light rowing or scapular mobility often helps reinforce better movement quality.
FAQ
Where should I feel the Roll Ball Rhomboid Back exercise?
You should feel focused pressure in the upper back, especially between the shoulder blade and spine. It may feel tender, but it should stay tolerable and muscular rather than sharp or nerve-like.
Is this a strength exercise or a recovery drill?
It is primarily a recovery and mobility drill. The main goal is tissue relief, trigger point work, and improved upper-back comfort, not muscular fatigue from resistance training.
How long should I stay on one tight spot?
A good starting point is 15–30 seconds on a tender area. You can extend that slightly if the pressure feels productive and symptoms improve.
Can beginners use this drill?
Yes. It is beginner-friendly as long as pressure stays controlled. A softer ball or lighter wall pressure can make it much more comfortable for first-time users.
When should I avoid this exercise?
Avoid it if you have an acute injury, severe inflammation, bruising, or symptoms like numbness, tingling, or radiating pain. In those cases, it is better to get professional guidance before doing deep pressure work.
Recommended Equipment (Optional)
- WOVTE Massage Lacrosse Ball — simple single-ball option for precise trigger point pressure against a wall
- KITWILD Peanut Massage Ball — peanut shape can help work around the spine while targeting upper-back muscles
- RAD Original Peanut Massage Ball — premium option designed to bracket the spine and improve mobility work
- Posture Magic Massage Ball Set — multi-tool kit with different shapes and firmness options for broader recovery use
- 4KOR Massage Balls for Trigger Point Therapy — set with multiple ball sizes for both pinpoint and slightly broader upper-back release
Tip: Start with a moderate-density ball and only move to firmer tools when you can control pressure comfortably.