Roll Ball Upper Trapezius Stretch: Form, Benefits, Tips & FAQ
Learn how to do the Roll Ball Upper Trapezius Stretch with proper form to release neck and upper-back tension. Includes setup, step-by-step instructions, sets by goal, mistakes, FAQs, and recommended equipment.
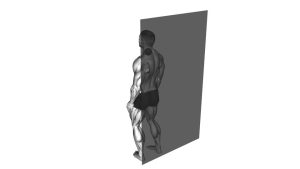
Roll Ball Upper Trapezius Stretch
This exercise is best used as a mobility and self-release tool, not a strength movement. You should feel focused pressure over the upper trap region, usually between the base of the neck and the top of the shoulder. The goal is to ease tension, reduce stiffness, and help the area relax without shrugging, clenching the jaw, or forcing range.
Quick Overview
| Body Part | Upper Back |
|---|---|
| Primary Muscle | Upper trapezius |
| Secondary Muscle | Levator scapulae, rear shoulder stabilizers, surrounding upper-back fascia |
| Equipment | Massage ball and a wall |
| Difficulty | Beginner (easy to learn, but works best with precise ball placement and controlled pressure) |
Sets & Reps (By Goal)
- Daily tension relief: 1–3 rounds per side for 30–60 seconds on each tight spot
- Warm-up before upper-body training: 1–2 rounds per side for 20–40 seconds, followed by light shoulder mobility
- Post-workout recovery: 2–3 rounds per side for 30–75 seconds with slow breathing
- Desk posture reset: 1–2 short rounds per side for 20–30 seconds during breaks
Progression rule: Increase time under pressure or improve control before using a firmer ball or more bodyweight. More pressure is not always better.
Setup / Starting Position
- Stand next to a wall: Position yourself sideways or slightly angled so the target upper trap can contact the ball.
- Place the ball carefully: Set the massage ball between the wall and the upper trapezius, just above the shoulder and slightly away from the spine.
- Find a balanced stance: Keep your feet comfortable and stable so you can lean in and out without losing posture.
- Relax the neck and jaw: Let the shoulders stay down and avoid tensing the face while setting pressure.
- Start with light pressure: Lean gently into the ball first, then make small adjustments until you feel a focused but tolerable release point.
Tip: A softer massage ball is usually better for beginners, while firmer lacrosse-style balls create deeper pressure.
Execution (Step-by-Step)
- Lean into the wall: Apply gentle pressure through the ball into the upper trap.
- Search for the tight spot: Make small body shifts up, down, or slightly side to side until you find the most restricted area.
- Pause or roll slowly: Either hold on the tender point for 20–30 seconds or perform short, controlled rolling passes over a small area.
- Breathe normally: Use slow breaths to help the muscle relax instead of bracing against the pressure.
- Reposition as needed: Move the ball a little higher, lower, or more lateral to explore neighboring tight spots.
- Finish gently: Step away from the wall, shrug lightly once or twice, and check whether the shoulder feels freer and less elevated.
Pro Tips & Common Mistakes
- Keep the pressure local: Stay on the muscle, not on the spine or bony points of the shoulder.
- Use short ranges: Tiny movements work better than large fast rolls when targeting trigger points.
- Do not shrug into the ball: Let the shoulder stay heavy and relaxed.
- Breathe through the release: Exhaling slowly can help the muscle soften under pressure.
- Do not chase pain: Strong discomfort usually creates guarding and makes the release less effective.
- Pair it with mobility work: Shoulder rolls, neck control drills, and upper-back strengthening often improve long-term results.
FAQ
Where should I feel this exercise?
You should feel focused pressure and release in the upper trapezius, which sits between the side of the neck and the top of the shoulder. Mild tenderness is normal, but sharp or electric pain is not.
Is this a stretch or a massage exercise?
It is mainly a self-myofascial release drill. It may create a stretching sensation, but its primary purpose is to reduce tightness and improve tissue comfort.
How long should I stay on one spot?
Most people do well with 20 to 60 seconds on a tight area. Start on the lower end and adjust based on comfort.
Can this help with desk-related neck and shoulder tension?
Yes, it can be useful for people who accumulate tension from prolonged sitting, typing, and forward-head posture. It works especially well when combined with posture awareness and upper-back training.
How often can I do it?
Many people can use it several times per week or even daily in short sessions, as long as the pressure is reasonable and the area does not become irritated.
Recommended Equipment (Optional)
- TriggerPoint MB1 Massage Ball — compact single massage ball for targeted upper-trap trigger point work
- Kieba Massage Lacrosse Balls — firm lacrosse-style balls that work well against a wall for deep tissue release
- Peanut Massage Ball — useful when you want more stable rolling and broader contact around the upper back
- Tune Up Fitness Therapy Ball PLUS — slightly more forgiving than a hard lacrosse ball, making it a good option for sensitive areas
- Trapezius Trigger Point Massager Tool — a manual alternative if you want to target the upper traps without leaning into a wall
Tip: Start with a softer option if your upper traps are highly sensitive. Firmer tools usually feel more intense and are better once you already tolerate pressure well.