Lying Scalene Activation: Safe Form, Sets & Reps, Tips, and FAQ
Learn how to perform Lying Scalene Activation to strengthen side-neck stabilizers safely. Step-by-step form cues, sets by goal, common mistakes, FAQs, and optional Amazon equipment.
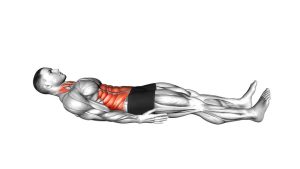
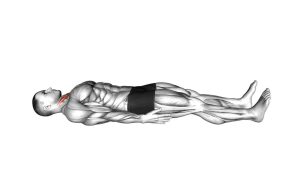
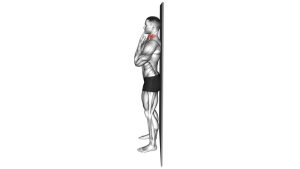
Lying Scalene Activation
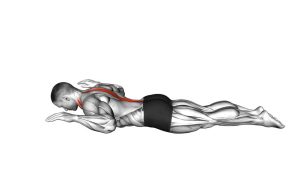
This drill is all about precision. The movement is small (sometimes nearly isometric), and you’ll get more benefit from smooth breathing and clean alignment than from pushing harder. If you feel jaw clenching, throat gripping, or the big “ropes” on the front of the neck (SCM) taking over, reduce effort and range.
Quick Overview
| Body Part | Neck |
|---|---|
| Primary Muscle | Scalenes (anterior / middle emphasis) |
| Secondary Muscle | Deep neck flexors (Longus colli / Longus capitis), cervical stabilizers |
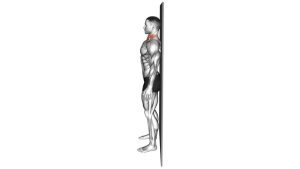
| Equipment | None (optional: small towel, thin pillow, wall for feedback) |
| Difficulty | Beginner (excellent for rehab-style control and posture practice) |
Sets & Reps (By Goal)
- Neck control / rehab: 2–3 sets × 6–10 reps (3–6 sec hold, 45–75 sec rest)
- Posture support (daily practice): 2–3 sets × 8–12 reps (2–5 sec hold, 30–60 sec rest)
- Warm-up before training: 1–2 sets × 8–12 reps (easy effort, smooth tempo)
- Desk-break “reset”: 1–2 sets × 5–8 reps (very light, no strain)
Progression rule: First increase hold time or add 1–2 reps. Only progress when the neck stays relaxed and the effort stays “quiet.”
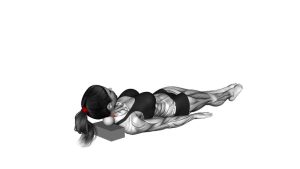
Setup / Starting Position
- Lie on your back: Knees bent or legs long—choose the position that lets your shoulders relax.
- Find neutral: Face level toward the ceiling. Neck feels long (not jammed into the floor).
- Jaw relaxed: Teeth not clenched; lips closed lightly. Tongue can rest gently on the roof of the mouth.
- Optional support: If your chin points up (neck extended), use a thin towel under the head to bring the face level.
- Breath check: Take 1–2 calm nasal breaths. Shoulders stay down and heavy.
Tip: You’re aiming for stacked alignment—ribcage calm, shoulders relaxed, neck long.
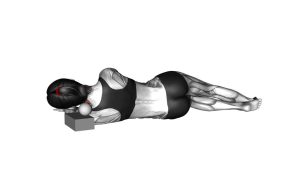
Execution (Step-by-Step)
- Set the baseline: Stay neutral and relaxed. Imagine the back of the head gently “floating” long, not pressing hard down.
- Create subtle side-neck tension: Without turning your head much, gently “lengthen” one side of the neck and feel light work along the front-side neck (scalenes).
- Keep it small: The movement is minimal—avoid big rotation, nodding, or lifting the head.
- Hold and breathe: Hold 3–6 seconds while breathing quietly. The jaw and shoulders stay soft.
- Return to neutral: Fully relax for 1–2 seconds, then repeat. Switch sides if you’re doing a left/right version.
Pro Tips & Common Mistakes
- Think “quiet tension,” not hard flexing: This is a control drill, not a max effort squeeze.
- Don’t lift the head: Head lifting shifts work to bigger muscles and often creates neck strain.
- Avoid chin jutting: Keep the face level; don’t push the chin forward to “find” the muscle.
- Stop shoulder help: If traps or shoulders engage, reset and lighten the effort.
- Keep the jaw soft: Jaw tension often means you’re working too hard or losing alignment.
- Pair with posture basics: Chin tuck practice + upper-back work (rows/face pulls) improves overall stacking.
FAQ
Where should I feel Lying Scalene Activation?
You should feel gentle work along the front-side of the neck (scalene region). If the big front-neck muscle (SCM) dominates, reduce effort and keep the movement smaller.
How often can I do this exercise?
Many people can perform it 3–6 days per week at low intensity. If you notice headaches, lingering soreness, or increased symptoms, reduce volume and keep the effort lighter.
Is this good for “tech neck” or forward head posture?
It can help by improving neck stability and control, but it works best when combined with upper-back strengthening and chest/pec mobility so your posture changes are supported globally.
Should I push harder to feel it more?
No. Higher effort usually increases compensation (jaw, SCM, traps). Stay around 5–7/10 effort and prioritize smooth breathing and clean alignment.
Who should be cautious with this drill?
If you have an acute neck injury, severe pain, dizziness, or nerve-like symptoms (tingling/numbness down the arm), avoid forcing neck work and seek guidance from a qualified healthcare professional.
Recommended Equipment (Optional)
- Cervical Contour Pillow — supports neutral neck alignment during supine practice or sleep
- Cervical Roll / Neck Support Roll — gentle positioning support to reduce neck extension
- Therapy Towel / Small Support Roll — simple feedback tool to fine-tune head position without forcing range
- Neck Traction Pillow / Neck & Shoulder Relaxer — optional decompression-style support (use lightly; stop if symptoms increase)
- Resistance Bands Set — useful for pairing with posture training (rows, pull-aparts, face-pulls)
Tip: Optional tools should make the drill easier and calmer. If any product increases symptoms, stop and reassess.