Roll Ball Side Lying Scalene Activation: Form, Sets, Tips & FAQ
Learn the Roll Ball Side Lying Scalene Activation to improve deep neck stability and posture. Step-by-step form, sets by goal, common mistakes, FAQs, and recommended equipment.
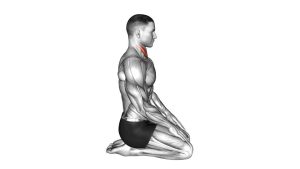
Roll Ball Side Lying Scalene Activation
This exercise is best performed with light pressure and a slow tempo. You’re training the neck to stay stable and “quiet” under gentle contact. You should feel mild activation along the side/front of the neck, not sharp pain, dizziness, throat gripping, jaw clenching, or a headache-like pressure. If you feel strain, reduce pressure and keep the movement smaller.
Quick Overview
| Body Part | Neck |
|---|---|
| Primary Muscle | Scalenes (anterior / middle / posterior) |
| Secondary Muscle | Deep cervical stabilizers; upper cervical stabilizers (SCM should stay minimal) |
| Equipment | Small soft ball (Pilates ball or massage ball); optional mat/pillow |
| Difficulty | Beginner (excellent for posture practice and rehab-style control) |
Sets & Reps (By Goal)
- Activation & control (daily): 2–3 sets × 6–10 reps per side (2–4 sec gentle hold, 30–60 sec rest)
- Neck stability warm-up: 2–4 sets × 8–12 reps per side (smooth tempo, 30–60 sec rest)
- Rehab-style (low irritability): 2–3 sets × 5–8 reps per side (4–6 sec hold, 45–75 sec rest)
- Desk break “reset”: 1–2 sets × 5–8 reps per side (very light effort, no strain)
Progression rule: Increase control before pressure. Add 1–2 reps or slightly longer holds first. Only increase ball firmness or pressure when your jaw/shoulders stay relaxed and symptoms stay calm.
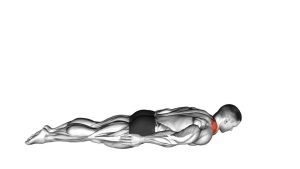
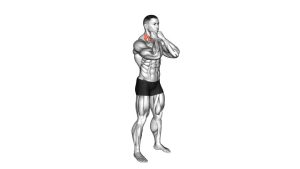
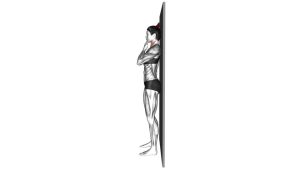
Setup / Starting Position
- Lie on your side: Head, neck, and torso in a straight line (avoid “crunching” the neck).
- Place the ball: Position a small ball along the side/front-lateral neck (near the scalene region), not directly on the throat.
- Find a neutral head position: Face stays level—no big side-bend.
- Relax the jaw and shoulders: Teeth not clenched; shoulders down and away from ears.
- Choose pressure level: Start with a soft ball and very light contact. The ball is feedback, not a trigger-point tool.
Tip: If alignment is hard, use a thin pillow/towel to keep the neck neutral and avoid compressing the side of the neck.
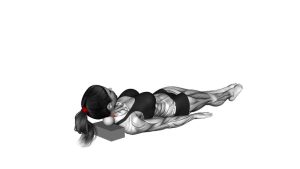
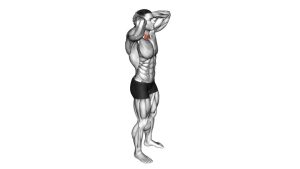
Execution (Step-by-Step)
- Set posture: Stack your head over your spine and breathe slowly through the nose.
- Gentle press/roll: Make a small controlled movement to increase contact into the ball (think 10–30% pressure).
- Hold with calm breathing: Maintain the pressure for 2–4 seconds while keeping the jaw relaxed.
- Release smoothly: Ease the pressure back to neutral—no dropping or collapsing into the ball.
- Repeat with quality: Each rep should feel quiet and controlled. Stop the set if you feel tension building in the jaw/shoulders.
Pro Tips & Common Mistakes
- Use light pressure: This is activation and proprioception—not deep tissue rolling.
- Keep the face level: Avoid big side-bends or twisting the head.
- Jaw stays soft: If you clench, you’ll recruit the wrong patterns.
- No shoulder hiking: Shrugging turns this into a trap/levator compensation.
- Move slowly: Fast rolling tends to irritate the area and reduces control.
- Avoid sensitive zones: Don’t press on the throat/front midline; reposition slightly back/lateral if uncomfortable.
- Pair smartly: Combine with chin tucks and upper-back work (rows/face pulls) for posture-friendly synergy.
FAQ
Where should I feel this exercise?
You should feel mild activation along the side/front of the neck where the scalenes live. It should not feel like sharp pain, throat pressure, or a deep “dig.” If it feels intense, reduce pressure and reposition the ball.
Is this a massage or a strengthening exercise?
It’s primarily a control/activation drill. The ball provides feedback so your neck stabilizers learn to stay steady. Any “release” sensation is secondary—and should happen with light pressure.
How often can I do it?
Many people can perform it 3–6 days per week at low effort. If you’re sensitive, start 2–3 days per week. If you get lingering soreness or headache-like symptoms, cut volume/pressure and keep reps smaller.
What if I feel dizziness or strange pressure?
Stop immediately. Reposition the ball away from sensitive areas and reduce pressure. If dizziness persists, avoid the drill and consult a qualified professional. This exercise should never create vascular-like symptoms.
How do I progress the exercise safely?
Progress by improving control: longer calm holds, smoother reps, and better relaxation of jaw/shoulders. Only later consider a slightly firmer ball or a tiny increase in pressure—never at the cost of comfort.
Recommended Equipment (Optional)
- Soft Pilates Ball (Small) — beginner-friendly feedback tool with gentle pressure
- Soft Massage Ball — useful for light contact work (avoid aggressive rolling)
- Cervical Contour Pillow — supports neutral neck alignment during side-lying or sleep
- Thick Exercise / Yoga Mat — improves comfort and stability during floor-based neck drills
- Resistance Bands Set — great for pairing with posture work (rows, pull-aparts, face pulls)
Tip: Choose the softest option first. If a tool increases symptoms, stop using it and reassess. The neck responds best to light loads, consistency, and clean technique.