Roll Rhomboids: Proper Form, Benefits, Technique, Tips & FAQ
Learn how to perform the Roll Rhomboids exercise with proper form to release upper-back tension, improve scapular mobility, and target the rhomboids. Includes setup, execution steps, tips, FAQ, and recommended equipment.
Roll Rhomboids
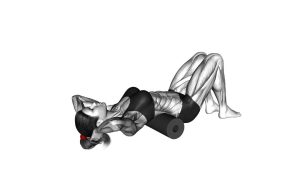
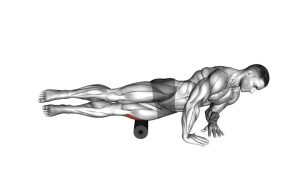
This movement is best used as a recovery, warm-up, or mobility tool rather than a strength exercise. In the video, the body stays supported on the floor while the roller is placed under the upper back, and the motion comes from a small controlled shift of the torso to massage the rhomboid area. The pressure should feel firm but manageable. You are looking for a productive release sensation, not sharp pain or breath-holding tension.
Quick Overview
| Body Part | Upper Back |
|---|---|
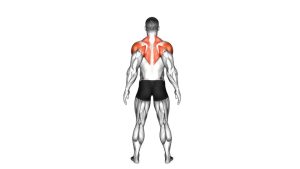
| Primary Muscle | Rhomboids |
| Secondary Muscle | Middle trapezius, rear deltoids, scapular stabilizers |
| Equipment | Foam roller |
| Difficulty | Beginner |
Sets & Reps (By Goal)
- Warm-up before upper-body training: 1–2 rounds of 20–40 seconds per side or area
- General recovery / tightness relief: 2–3 rounds of 30–60 seconds with slow controlled passes
- Posture and mobility work: 2 rounds of 5–8 slow rolls, pausing briefly on tight spots
- Post-workout cooldown: 1–2 rounds of 30–45 seconds with relaxed breathing
Progression rule: Increase time under control before increasing pressure. Better positioning and slower passes usually work better than rolling harder.
Setup / Starting Position
- Place the foam roller under the upper back: Position it so it contacts the area between the shoulder blade and spine.
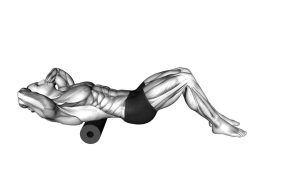
- Lie on your back with knees bent: Keep both feet flat on the floor to control pressure and movement.
- Cross your arms over your chest: This helps spread the shoulder blades slightly and exposes the rhomboid region more effectively.
- Lift your hips slightly if needed: A small bridge can help you shift body weight onto the roller without excessive pressure.
- Brace lightly and relax the neck: Keep your chin neutral and avoid pushing your head hard into the floor.
Tip: If the pressure feels too intense, keep more weight in your feet and reduce how much you lift the hips.
Execution (Step-by-Step)
- Start on the target area: Set the roller under one side of the upper back near the rhomboids.
- Create gentle pressure: Use your legs to shift your body weight onto the roller without collapsing through the spine.
- Roll slowly: Move a few inches at a time across the upper-back tissue, staying controlled instead of sweeping too far.
- Pause on tight spots: If you find a tender area, stop for 5–10 seconds and breathe steadily.
- Reposition as needed: Make subtle angle changes to explore slightly different lines of the rhomboids and mid-back.
- Repeat on the other side: Keep the motion symmetrical and avoid rushing through the second side.
Pro Tips & Common Mistakes
- Cross the arms to open the upper back: This often helps the roller contact the rhomboids more directly.
- Use slow passes: Fast rolling usually skips the tight areas instead of helping them release.
- Breathe through pressure: Calm breathing reduces guarding and makes the release more effective.
- Do not roll onto the neck: Stay on the muscular upper-back area, not the cervical spine.
- Avoid overextending the lower back: Use the legs to move, not a big arch through the torso.
- Less pressure can work better: Excess pain often causes the muscles to tighten instead of relax.
- Pair it with rowing or scapular drills: Release work plus activation is often better than release alone.
FAQ
What does the Roll Rhomboids exercise target?
It mainly targets the rhomboids and surrounding mid-upper back tissue. It can also affect the middle traps and other scapular stabilizers through pressure and positioning.
Is this a strength exercise or a recovery drill?
It is primarily a recovery and mobility drill. Its purpose is to improve tissue quality, reduce tightness, and prepare the upper back for better movement.
How long should I stay on a sore spot?
Usually 5 to 10 seconds is enough for a pause. Keep breathing, and do not stay so long that the area becomes irritated.
Can I do this every day?
Many people can perform it daily or several times per week if the pressure is moderate and symptoms improve. If you feel bruised or more irritated afterward, reduce frequency or pressure.
What if a standard foam roller feels too broad?
A peanut massage ball or a more targeted release tool can sometimes reach the space around the shoulder blades more precisely.
Recommended Equipment (Optional)
- High-Density Foam Roller — the main tool for this exercise and a practical choice for upper-back self-myofascial release
- Textured Foam Roller — useful if you want a firmer feel and a more focused surface texture
- Peanut Massage Ball — great for more targeted work around the shoulder blades and upper spine area
- Trigger Point Massage Ball Set — helpful for spot work when a full-size roller feels too broad
- Non-Slip Exercise Mat — adds comfort and stability when doing floor-based mobility and recovery work
Tip: Start with a standard high-density roller, then add a peanut or massage ball only if you want more targeted pressure. Current Amazon listings commonly include high-density foam rollers, peanut rollers, and thick non-slip mats in these categories.