Assisted Chest Dip (Kneeling): Safe Form, Chest Focus, Sets & Tips
Learn the assisted chest dip (kneeling) to build chest strength with controlled range of motion. Step-by-step form, sets by goal, mistakes to avoid, FAQs, and recommended equipment.
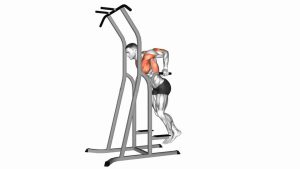
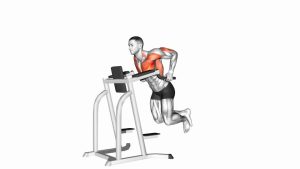
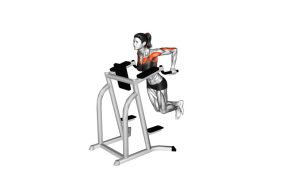
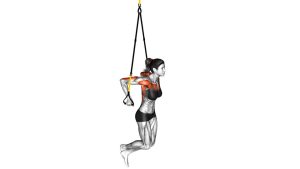
Assisted Chest Dip (Kneeling)
This is one of the best dip progressions for building chest strength safely because the assistance lets you choose a load you can control. Your goal is a stable shoulder position, a controlled descent, and a strong press without shrugging, swinging, or “dropping” into the bottom.
Quick Overview
| Body Part | Chest |
|---|---|
| Primary Muscle | Pectoralis major (lower/mid fibers) |
| Secondary Muscle | Triceps brachii, anterior deltoids, scapular depressors (lats/lower traps) |
| Equipment | Assisted dip machine (kneeling pad) or assisted dip station |
| Difficulty | Beginner → Intermediate (adjustable assistance makes it scalable) |
Sets & Reps (By Goal)
- Chest hypertrophy: 3–5 sets × 8–12 reps (1–3 reps in reserve, 60–120 sec rest)
- Strength focus: 4–6 sets × 4–8 reps (heavier = less assistance, 120–180 sec rest)
- Beginner technique: 2–4 sets × 6–10 reps (slow tempo, perfect form, 60–90 sec rest)
- Finisher/pump: 2–3 sets × 12–20 reps (more assistance, controlled burn, 45–75 sec rest)
Progression rule: First add reps (or slow down the eccentric), then reduce assistance slightly. Only progress when reps stay smooth—no shrugging, no swinging, no bounce.
Setup / Starting Position
- Set assistance: Choose a level that lets you complete reps with control (no “free-fall” in the bottom).
- Kneel on the pad: Knees centered and stable. Keep hips stacked under you—avoid excessive arching.
- Grip the handles: Neutral grip on the dip bars. Use a comfortable width (often shoulder-width to slightly wider).
- Start tall at the top: Arms straight, chest open, shoulders down away from ears.
- Chest bias position: Maintain a slight forward lean (not fully upright) with a braced core.
Tip: If you want more chest and less triceps, keep the torso slightly forward and don’t lock your elbows aggressively at the top.
Execution (Step-by-Step)
- Inhale and brace: Keep ribs controlled (avoid flaring) and shoulders depressed.
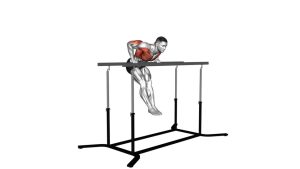
- Lower under control: Bend the elbows and descend smoothly. Keep the chest slightly forward.
- Track elbows naturally: Elbows can flare slightly—avoid forcing them extremely wide or extremely tucked.
- Hit a safe depth: Stop when you feel a strong chest stretch without shoulder pinching. For many lifters, upper arms reach about parallel (or slightly below).
- Press up: Drive the handles down, keep shoulders “packed,” and return to the top in a smooth line.
- Reset at the top: Stay controlled—no bouncing into the next rep. Repeat.
Pro Tips & Common Mistakes
- Use a slow eccentric: 2–3 seconds down builds control and better chest stimulus.
- Don’t shrug at the top: Keep shoulders down and stable—shrugging shifts stress to the shoulder.
- Avoid bouncing in the bottom: Rebound reps can irritate the shoulder and reduce chest tension.
- Control your depth: Deeper isn’t always better—go as low as you can without pinching.
- Keep the torso angle consistent: Don’t start chest-leaning then “stand up” halfway through the press.
- Choose the right assistance: Too little assistance turns reps into ugly grinders; too much removes tension. Aim for clean reps.
FAQ
Where should I feel the assisted chest dip?
You should feel it mostly in the chest, with assistance from the triceps and front delts. If you feel shoulder pinching, reduce depth, keep shoulders down, and use more assistance.
How do I make this more chest-focused (not triceps-focused)?
Use a slight forward lean, keep the chest open, and avoid staying perfectly upright. A moderate depth with control and a smooth tempo also helps keep tension on the pecs.
How much assistance should I use?
Use enough assistance to keep reps smooth and pain-free. A good target is finishing your set with 1–3 reps in reserve while maintaining form. Reduce assistance gradually as you get stronger.
Are dips safe for shoulders?
They can be, if you control your range, avoid bouncing, and keep shoulders stable (down and back). If dips consistently cause sharp shoulder pain, choose alternatives like push-ups, machine press, or cable fly variations.
What should I pair with assisted chest dips?
Great pairings include incline pressing (for upper chest), cable flys (for isolation), and rowing/pull work to balance shoulder health.
Recommended Equipment (Optional)
- Dip Belt — for progression once you can do bodyweight dips (adds weight safely)
- Dip Station / Parallel Bars — home option to practice dips and support holds
- Resistance Bands (Assistance Bands) — can replicate assisted dips on a dip station if you don’t have a machine
- Gymnastic Rings — advanced option for dips with more stability demand (only when shoulders tolerate it)
- Liquid Chalk / Grip Aid — improves grip security on dip handles, especially for higher reps
Tip: If any tool increases shoulder discomfort, stop and reassess. Dips should feel like strong chest/triceps work—never sharp joint pain.