Seated Rhomboid Stretch: Proper Form, Benefits, Sets, Tips & FAQ
Learn how to perform the Seated Rhomboid Stretch with proper form to loosen the upper back, improve posture, and relieve tension between the shoulder blades. Includes setup, execution, tips, FAQ, and recommended equipment.
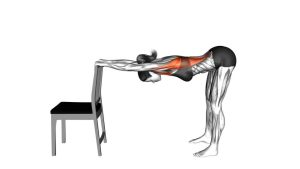
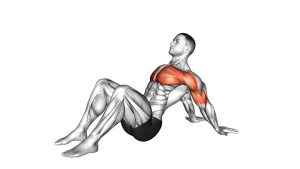
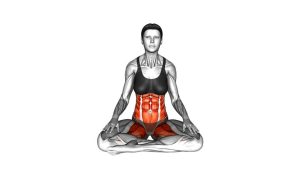
Seated Rhomboid Stretch
This movement works best when you focus on scapular protraction and a gentle upper-back curve. You should feel the stretch mainly between the shoulder blades and across the mid-to-upper back. The range does not need to be extreme. A small but deliberate rounding pattern is usually more effective than forcing a deep bend.
Quick Overview
| Body Part | Upper Back |
|---|---|
| Primary Muscle | Rhomboids |
| Secondary Muscle | Middle trapezius, rear deltoids, thoracic stabilizers |
| Equipment | None (bench or chair optional) |
| Difficulty | Beginner |
Sets & Reps (By Goal)
- Daily mobility: 2–3 sets × 20–30 second holds
- Warm-up before upper-body training: 1–2 sets × 15–20 second holds
- Post-workout recovery: 2–4 sets × 20–40 second holds
- Desk posture reset: 1–3 sets × 15–25 second holds throughout the day
Progression rule: Increase hold time gradually and only deepen the stretch if you can keep your shoulders relaxed and breathing calm.
Setup / Starting Position
- Sit on a bench or chair: Place your feet flat on the floor about hip-width apart.
- Start tall: Keep your chest lifted lightly and your spine neutral before moving into the stretch.
- Position the arms: Rest the hands on the knees, thighs, or lightly reach forward in front of the body.
- Relax the neck: Keep the jaw loose and avoid shrugging the shoulders upward.
- Prepare to round the upper back: Think about spreading the shoulder blades apart rather than simply folding forward.
Execution (Step-by-Step)
- Begin from a tall seated posture: Stack the head over the torso and keep the feet grounded.
- Reach forward slightly: Let the arms move forward as the shoulder blades begin to glide apart.
- Round the upper back gently: Create a controlled curve through the mid-to-upper spine.
- Drop the head naturally: Allow the chin to tuck slightly without forcing the neck down.
- Hold the stretch: Breathe slowly and feel the stretch between the shoulder blades.
- Return with control: Slowly restack the spine and come back to a neutral seated position.
Pro Tips & Common Mistakes
- Think “spread the shoulder blades”: This cue helps target the rhomboid area more effectively.
- Keep the movement gentle: You do not need a huge range of motion to get a good stretch.
- Breathe into the upper back: Slow breathing can help you relax tension and deepen the stretch naturally.
- Avoid shrugging: Lifting the shoulders toward the ears reduces the quality of the stretch.
- Do not yank the neck down: The head can relax forward slightly, but it should never be pulled forcefully.
- Do not bounce: Hold the position steadily instead of pulsing in and out.
- Use it with posture work: This stretch pairs well with rows, face pulls, and thoracic mobility drills.
FAQ
Where should I feel the seated rhomboid stretch?
You should mainly feel it between the shoulder blades and across the upper back. Some people also feel a mild stretch through the rear shoulders and mid back.
Is this stretch good for desk posture?
Yes. It can help relieve stiffness that builds up from long periods of sitting, rounded shoulders, and prolonged computer work.
Should I round my whole spine?
The emphasis should be on the upper back, not an exaggerated collapse through the lower back. Keep the movement controlled and focused on the shoulder blade area.
How long should I hold the stretch?
Most people do well with 15 to 40 seconds per hold depending on comfort, mobility level, and when they are using the stretch.
Can I use this before a workout?
Yes. It works well as a light mobility drill before upper-body sessions, especially if your upper back feels tight or stiff.
Recommended Equipment (Optional)
- High-Density Foam Roller — useful for upper-back soft-tissue work and thoracic mobility before stretching
- Peanut Massage Ball — great for targeting tension between the shoulder blades and along the upper back
- Stretching Strap — helpful for general mobility sessions and shoulder-friendly stretching routines
- Light Posture Corrector — can be used as an awareness tool to reduce rounded-shoulder positioning during the day
- Resistance Bands Set — useful for pairing this stretch with band pull-aparts, rows, and posture-focused upper-back work
Tip: These tools are optional. The stretch itself requires no equipment, but mobility and recovery tools can support upper-back comfort and posture work.