Barbell Incline Bench Press: Proper Form, Sets & Reps, Tips (Upper Chest Focus)
Learn how to do the barbell incline bench press with safe form to target the upper chest. Includes setup cues, step-by-step execution, sets & reps by goal, common mistakes, FAQs, and recommended equipment.
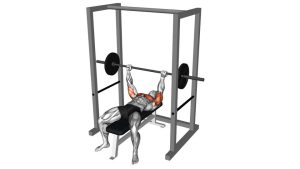
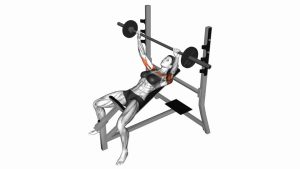
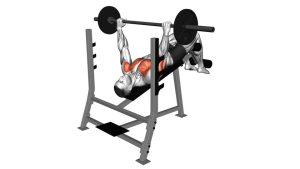
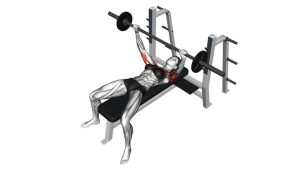
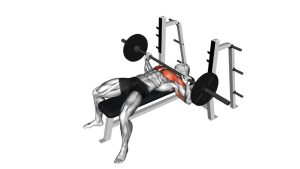
Barbell Incline Bench Press
Incline pressing rewards solid setup more than brute force. Your goal is a stable base (feet + upper back), a consistent touch point on the upper chest, and a smooth rep with no bouncing. If your shoulders feel pinchy, reduce the incline angle, narrow the grip slightly, and focus on keeping the shoulder blades back and down.
Quick Overview
| Body Part | Chest |
|---|---|
| Primary Muscle | Upper chest (clavicular head of pectoralis major) |
| Secondary Muscle | Anterior deltoids, triceps, serratus anterior (stability) |
| Equipment | Barbell, incline bench, rack (optional: collars, wrist wraps) |
| Difficulty | Intermediate (more technical than flat bench due to angle and bar path) |
Sets & Reps (By Goal)
- Hypertrophy (upper chest size): 3–5 sets × 6–12 reps (1–3 reps in reserve, 90–150 sec rest)
- Strength focus: 4–6 sets × 3–6 reps (2–4 min rest, crisp technique)
- Endurance / volume day: 2–4 sets × 10–15 reps (controlled tempo, 60–90 sec rest)
- Beginner technique phase: 2–3 sets × 6–10 reps (light load, perfect bar path)
Progression rule: Add reps first (within the range), then add a small amount of weight. Keep the same touch point and bar path every session—consistency beats “maxing out.”
Setup / Starting Position
- Set the bench angle: Aim for a moderate incline (about 30–45°). Too steep shifts stress to shoulders.
- Bar height in the rack: Set hooks so you can unrack with straight-ish arms, without losing shoulder position.
- Feet and base: Plant feet firmly. Create light leg drive by pushing the floor—not by lifting hips.
- Shoulders “packed”: Pull shoulder blades back and down and keep them there throughout the set.
- Grip: Hands slightly wider than shoulder-width; wrists stacked over forearms; use a full grip.
- Start position: Bar centered above the upper chest line; elbows slightly tucked (not flared straight out).
Tip: Think “proud chest + long neck.” If your shoulders shrug or roll forward, reset before you press.
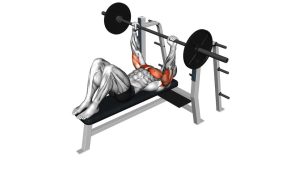
Execution (Step-by-Step)
- Unrack with control: Take a breath, brace your core, and pull the bar out until it’s over your upper chest.
- Lower to the upper chest: Bring the bar down smoothly to the upper chest/clavicular area.
- Keep forearms vertical: At the bottom, your wrists should be stacked over elbows—avoid letting elbows drift behind you.
- Light touch (no bounce): Briefly pause or lightly touch the chest while staying tight.
- Press up and slightly back: Drive the bar upward toward the rack, maintaining shoulder blades back/down.
- Finish strong: Lock out with control (no over-arching), then reset your breath for the next rep.
Pro Tips & Common Mistakes
- Use a moderate incline: Too steep turns it into a shoulder press and reduces upper-chest tension.
- Keep the touch point consistent: Upper chest every rep—don’t drift down toward mid-chest.
- Don’t flare hard: Excessive flare can irritate shoulders; aim for a natural angle with elbows slightly tucked.
- Avoid bouncing: Bounce shortens the range and increases joint stress—control the descent.
- Wrists stacked: Letting wrists bend back leaks power and can irritate wrists/forearms.
- Use collars & safeties: Especially when training near failure, set safety arms to protect you.
FAQ
Where should I feel the incline barbell bench press?
Primarily in the upper chest, with noticeable help from the triceps and front delts. If you feel mostly shoulders, your bench angle may be too high, your elbows may be flaring, or your shoulder blades may be losing position.
What’s the best incline angle for upper chest?
Most lifters do best around 30–45°. Lower angles often feel more chest-dominant; steeper angles shift more stress to the shoulders.
Should I touch the bar to my chest?
Yes—aim for a controlled light touch on the upper chest without bouncing. If touching causes shoulder discomfort, reduce range slightly and improve scapular control.
Can I do incline bench instead of flat bench?
You can, especially if your goal is upper-chest development. For balanced chest size and pressing strength, many programs include both incline and flat pressing across the week.
How can I make it safer when training alone?
Use a rack with safety arms set just below your bottom position, and avoid true failure reps. If your gym doesn’t have safeties, consider dumbbells for hard sets or keep 1–2 reps in reserve.
Recommended Equipment (Optional)
- Adjustable Incline Weight Bench — stable incline angles for consistent setup and progression
- Olympic Barbell Collars (2") — keeps plates secure for safer pressing and unracking
- Wrist Wraps for Lifting — adds wrist stability when loads get heavy
- Resistance Bands Set — great for warm-ups (band pull-aparts) and shoulder prep
- Power Rack / Safety Spotter Arms — essential for safer solo barbell pressing
Tip: If your shoulders tend to feel irritated on pressing days, add a quick warm-up: band pull-aparts + scap push-ups + light incline warm-up sets.