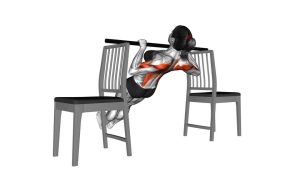
Ring Inverted Row: Proper Form, Muscles Worked, Sets, Tips & FAQ
Learn how to perform the Ring Inverted Row with proper form. Discover muscles worked, setup, execution steps, sets and reps by goal, common mistakes, FAQs, and recommended equipment.
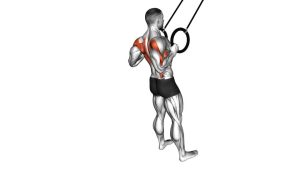
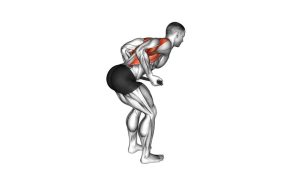
Ring Inverted Row
This exercise is an excellent horizontal pulling pattern for building back strength, improving scapular control, and reinforcing whole-body tension. Because the rings move independently, the exercise also challenges shoulder stability more than a fixed bar row. Performed well, the Ring Inverted Row strengthens the muscles that help support posture, improve pulling mechanics, and build a stronger foundation for advanced bodyweight exercises.
Quick Overview
| Body Part | Back |
|---|---|
| Primary Muscle | Rhomboids, middle trapezius, latissimus dorsi |
| Secondary Muscle | Rear deltoids, biceps, forearms, core, glutes |
| Equipment | Gymnastic rings or suspension rings anchored securely overhead |
| Difficulty | Intermediate (advanced when body is fully horizontal) |
Sets & Reps (By Goal)
- Muscle building: 3–5 sets × 6–12 reps
- Strength focus: 4–6 sets × 4–8 reps with a stricter body angle
- Technique and control: 2–4 sets × 8–10 reps with a 2–3 second lowering phase
- Beginner progression: 2–4 sets × 6–10 reps with a higher ring position and less horizontal body angle
Progression rule: First increase control and range of motion, then make the movement harder by lowering the rings or walking the feet forward until the body is closer to parallel with the floor.
Setup / Starting Position
- Set the rings: Adjust the rings so you can hang underneath them with your arms fully extended.
- Take your grip: Hold one ring in each hand with a neutral grip and step your feet forward.
- Create a straight body line: Keep your head, torso, hips, and legs aligned from shoulders to heels.
- Brace the body: Tighten the core and glutes so the torso does not sag or arch.
- Start at full reach: Let the arms extend fully while keeping the shoulders controlled, not loose or collapsed.
Tip: The lower your body angle, the harder the exercise becomes. A nearly horizontal torso turns this into a demanding bodyweight row.
Execution (Step-by-Step)
- Lock in your body position: Keep the legs straight, heels planted, and torso rigid before you begin the pull.
- Initiate with the upper back: Pull the shoulder blades back and down as you start the rep.
- Drive the elbows back: Bend the arms and pull your chest toward the rings while keeping the elbows close to the body.
- Reach the top under control: Bring the chest close to the rings without letting the neck jut forward or the hips drop.
- Squeeze briefly: Pause for a moment at the top to feel the upper back contract.
- Lower slowly: Extend the arms under control until you return to the starting position with full reach.
- Repeat smoothly: Maintain the same body line and tempo on every repetition.
Pro Tips & Common Mistakes
- Keep the body rigid: Treat the rep like a moving plank. Do not let the hips sag or the lower back overarch.
- Pull the chest, not just the hands: Focus on bringing the torso to the rings instead of curling with the arms only.
- Control the eccentric: Lowering slowly improves tension and makes each rep more effective.
- Avoid shrugging: Keep the shoulders away from the ears so the upper traps do not take over.
- Do not rush the top: A short squeeze at peak contraction improves back engagement.
- Adjust difficulty intelligently: Raise the rings or bend the knees slightly if you cannot maintain clean form.
- Do not flare the elbows too wide: Keep them moving back in a natural row path for better shoulder mechanics.
FAQ
What muscles does the Ring Inverted Row work most?
It primarily trains the upper back, especially the rhomboids, middle traps, and lats. The biceps, rear delts, forearms, core, and glutes also contribute to the movement.
Is the Ring Inverted Row harder than a regular inverted row on a bar?
Yes, usually. The rings move independently, which adds a stability challenge and makes shoulder control more important than on a fixed bar.
How do I make Ring Inverted Rows easier?
Raise the rings higher, reduce how horizontal your body is, or bend the knees slightly. Those changes reduce the amount of bodyweight you have to row.
How do I make them harder?
Lower the rings, walk the feet farther forward, keep the legs straight, pause at the top, or slow the lowering phase. You can also elevate the feet for an advanced version.
Should I feel this more in my arms or back?
You will feel the biceps working, but the main effort should come from the upper back and lats. If your arms dominate, focus on pulling the chest up and squeezing the shoulder blades together.
Recommended Equipment (Optional)
- Wooden Gymnastics Rings with Adjustable Straps — the main tool for performing Ring Inverted Rows and other suspension-based pulling exercises
- Exercise Mat — adds comfort and grip under the heels, especially on hard or slippery floors
- Resistance Band Set — useful for warm-ups, shoulder activation, and adding extra back work around your row training
- Workout Chalk — helps improve grip if your hands slip on the rings during high-rep sets
- Grip Strength Trainer — supports forearm and grip endurance, which can help with ring control and longer pulling sessions
Tip: For most people, the best first purchase is a solid pair of wooden rings with clearly marked straps, then a mat and bands to round out the setup.