Resistance Band Standing Archer Alternate Arm Row: Form, Muscles Worked, Sets & Tips
Learn how to do the Resistance Band Standing Archer Alternate Arm Row with proper form. Discover muscles worked, setup, step-by-step execution, sets by goal, mistakes to avoid, FAQs, and recommended equipment.
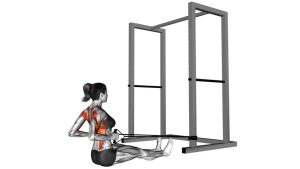
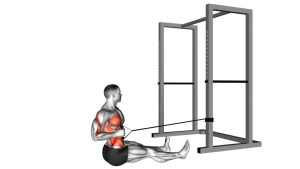
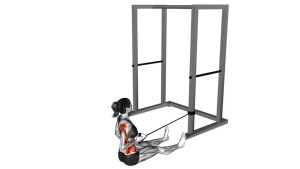
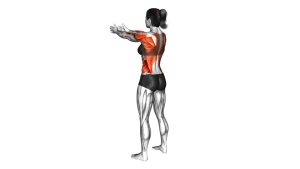
Resistance Band Standing Archer Alternate Arm Row
This movement works well for building back strength at home, improving posture awareness, and cleaning up pulling mechanics without needing heavy machines or dumbbells. Because each side works independently, it can also help expose and reduce left-to-right strength imbalances. Focus on pulling with the back instead of yanking with the arms, and keep constant tension on the band throughout the set.
Quick Overview
| Body Part | Back |
|---|---|
| Primary Muscle | Latissimus dorsi, rhomboids, middle trapezius |
| Secondary Muscle | Rear deltoids, biceps, forearms, core stabilizers |
| Equipment | Resistance band with handles or loop band, stable anchor point |
| Difficulty | Beginner to Intermediate |
Sets & Reps (By Goal)
- General muscle building: 3–4 sets × 8–15 reps per side
- Posture and control: 2–4 sets × 10–15 reps per side with a 1–2 second squeeze
- Warm-up / activation: 2–3 sets × 8–12 controlled reps per side using lighter tension
- Muscular endurance: 2–3 sets × 15–20 alternating reps per side with smooth tempo
Progression rule: First increase band tension or total reps only after you can keep the ribs down, shoulders relaxed, and torso stable on every rep.
Setup / Starting Position
- Anchor the band: Attach the resistance band to a sturdy point roughly around chest height.
- Stand tall: Face the anchor with feet about shoulder-width apart and a slight bend in the knees.
- Grab the handles: Hold one handle or band end in each hand and step back until light tension is present.
- Brace your body: Keep your chest up, core engaged, and shoulders down without arching the lower back.
- Start with both arms forward: Arms are extended in front of you with elbows soft, not locked out stiffly.
Tip: A split stance can make the movement more stable if you feel yourself rocking or rotating during the row.
Execution (Step-by-Step)
- Set your posture: Stand tall with your ribs stacked over your hips and your eyes forward.
- Row one side back: Pull one elbow toward your ribcage while keeping the opposite arm extended toward the anchor.
- Reach the archer position: At the top, the working elbow travels behind the torso slightly while the other arm stays long and steady.
- Squeeze the back: Briefly contract the lats and upper back without shrugging the shoulder upward.
- Return under control: Slowly extend the rowing arm back to the start instead of letting the band snap forward.
- Switch sides: Perform the same motion with the opposite arm and continue alternating smoothly.
Pro Tips & Common Mistakes
- Keep the torso quiet: Avoid twisting hard from side to side just to make the rep easier.
- Lead with the elbow: Pulling with the elbow helps you recruit the back better than over-gripping with the hand.
- Don’t shrug: Letting the shoulders rise toward the ears takes tension away from the upper back.
- Control the return: The eccentric phase matters. Do not let the band yank your arm forward.
- Use full but honest range: Row until the elbow passes the torso slightly, but do not over-rotate or hyperextend the shoulder.
- Choose the right band tension: If you cannot pause briefly at the top without twisting, the band is probably too heavy.
- Keep the wrist neutral: Avoid excessive curling or bending through the wrist as you pull.
FAQ
What muscles does the Resistance Band Standing Archer Alternate Arm Row work?
It mainly targets the lats, rhomboids, and middle traps, while the rear delts, biceps, and core stabilizers assist during the movement.
Is this exercise good for posture?
Yes. When performed with controlled shoulder blade movement and a stable torso, it can help strengthen the upper-back muscles that support better posture and cleaner pulling mechanics.
Should I alternate every rep or finish one side first?
Alternating every rep works well for rhythm, coordination, and equal tension between sides. You can also perform all reps on one side first if you want to focus more on unilateral strength and mind-muscle connection.
What if I feel this mostly in my arms?
Use a lighter band, slow the tempo, and focus on pulling the elbow back while keeping the shoulder down. A brief pause at the end of each rep can help shift the workload into the back.
Can beginners use this exercise?
Absolutely. It is a beginner-friendly back exercise as long as the band tension is manageable and the anchor point is secure. Start light and prioritize control over resistance.
Recommended Equipment
- Resistance Bands Set with Handles — ideal for adjustable tension, smoother rows, and a more comfortable grip
- Resistance Band Door Anchor — gives you a stable chest-height anchor point for standing row variations
- Resistance Band Handles — useful if you already own bands and want a more secure, comfortable rowing setup
- Exercise Mat — adds traction and comfort if you train on slippery flooring at home
- Full Resistance Bands Set — useful if you want multiple resistance options for rows, presses, pull-aparts, and full-body training
Tip: For this exercise, the most useful combination is a band set with handles plus a secure door anchor. That setup makes it easier to adjust tension and keep each rep smooth.