Lever One-Arm Shoulder Press: Proper Form, Sets, Tips & FAQ
Learn how to do the Lever One-Arm Shoulder Press with proper form. Discover muscles worked, setup, step-by-step execution, sets and reps by goal, common mistakes, FAQs, and recommended equipment.
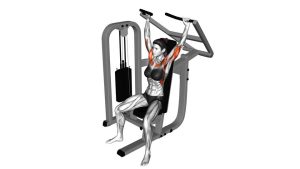
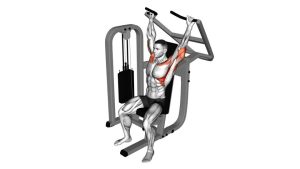
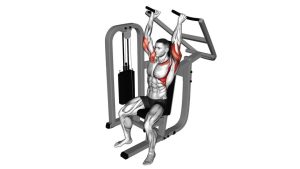
Lever One-Arm Shoulder Press
This exercise is especially useful for building shoulder strength with more control than many free-weight variations. The plate-loaded lever path creates a stable movement pattern, making it easier to focus on shoulder drive, elbow tracking, and a smooth lockout. It can fit well into hypertrophy programs, upper-body strength sessions, or unilateral accessory work for improving muscular symmetry.
Quick Overview
| Body Part | Shoulders |
|---|---|
| Primary Muscle | Anterior deltoid (front shoulder) |
| Secondary Muscle | Lateral deltoid, triceps, upper chest, core stabilizers |
| Equipment | Plate-loaded lever shoulder press machine |
| Difficulty | Beginner to Intermediate |
Sets & Reps (By Goal)
- Muscle growth: 3-4 sets × 8-12 reps per arm, 60-90 seconds rest
- Strength focus: 4-5 sets × 5-8 reps per arm, 90-120 seconds rest
- Technique and control: 2-3 sets × 10-15 reps per arm, light-to-moderate load, smooth tempo
- Accessory shoulder work: 2-4 sets × 8-10 reps per arm after compound pressing
Progression rule: Increase the load only when you can complete all target reps with steady torso position, controlled lowering, and no shoulder shrugging or momentum.
Setup / Starting Position
- Adjust the seat: Set the machine so the handle starts around shoulder height when you sit down.
- Sit tall: Place your back against the pad, keep your chest up naturally, and plant both feet firmly on the floor.
- Grip one handle: Use a secure, comfortable grip with the working hand while the non-working arm stays relaxed.
- Align the arm: Keep the elbow slightly in front of the body rather than flared too far out to the side.
- Brace the core: Tighten your midsection lightly to prevent rotation or leaning during the press.
Tip: Before starting your first rep, make sure your wrist is stacked over your forearm and your shoulder feels packed, not shrugged.
Execution (Step-by-Step)
- Start from the bottom: Begin with the handle near shoulder level and the elbow bent under control.
- Press upward: Drive the handle up along the machine’s fixed arc while keeping your torso still and your wrist neutral.
- Extend smoothly: Continue pressing until your arm is nearly straight overhead without forcefully locking out.
- Pause briefly: Hold the top for a moment to confirm balance and shoulder control.
- Lower under control: Bring the handle back down slowly to the starting position, resisting the weight on the way down.
- Repeat evenly: Complete all reps on one side, then switch arms or alternate sides based on your program.
Pro Tips & Common Mistakes
- Keep the torso quiet: Avoid twisting toward or away from the working arm.
- Do not over-arch: Press with the shoulder, not by turning the movement into an incline-style backbend.
- Use full control on the eccentric: Lowering slowly improves muscle tension and protects the shoulder.
- Watch elbow position: Keep it in a strong pressing line rather than excessively flared.
- Do not slam the top: Finish each rep with control instead of snapping into lockout.
- Train both sides honestly: Let the weaker arm set the standard for reps and load when needed.
- Warm up first: Light shoulder mobility and activation drills can improve pressing comfort.
FAQ
What muscles does the Lever One-Arm Shoulder Press work most?
The main target is the anterior deltoid. The exercise also trains the lateral deltoid, triceps, and core stabilizers that help keep your torso steady during one-arm pressing.
Is this better than a dumbbell shoulder press?
It is not automatically better, but it is often easier to control. The lever machine provides a guided path, which can help lifters focus on shoulder tension, symmetry, and safer repetition quality.
Should I press one arm at a time or alternate arms?
Both methods work. Doing all reps on one side first can help you focus on stability and effort. Alternating sides can reduce local fatigue and keep the session moving faster.
How heavy should I go?
Choose a load that lets you press through a full, controlled range without torso movement or painful shoulder pinching. Clean reps matter more than forcing extra weight.
Can beginners use this exercise?
Yes. Many beginners find this variation more approachable than free weights because the machine improves balance and makes the pressing path easier to repeat consistently.
Recommended Equipment
- 2-Inch Olympic Weight Plates — essential for loading most plate-loaded shoulder press machines
- Weightlifting Wrist Wraps — helpful for extra wrist support during heavier pressing sets
- Elbow Sleeves — useful for warmth, joint comfort, and support during high-volume upper-body training
- Resistance Bands Set — great for shoulder warm-ups, activation drills, and accessory work before pressing
- Liquid Chalk — can improve grip security if your hands get sweaty during training
Choose equipment that improves control and comfort, not just heavier loading. Stable wrists, smooth reps, and consistent technique will do more for long-term progress than chasing weight too early.