Standing Reverse Shoulder Stretch: Form, Benefits, Sets, Tips & FAQ
Learn how to do the Standing Reverse Shoulder Stretch with proper form. Improve shoulder mobility, open the chest, reduce tightness, and support better posture with step-by-step guidance, stretching tips, FAQs, and recommended equipment.
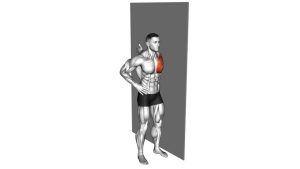
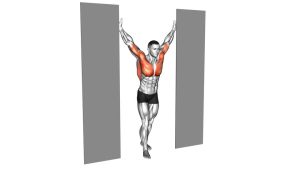
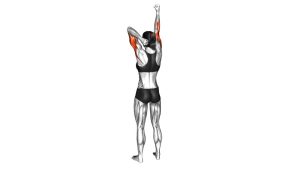
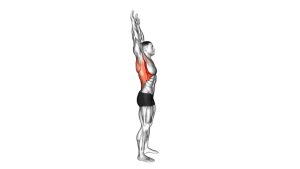
Standing Reverse Shoulder Stretch
This stretch works best when performed with patience and control. It can be useful during warm-ups, after upper-body training, or as a quick posture reset during long periods of sitting. You should feel a gentle stretch across the front of the shoulders and chest, not pinching in the shoulder joint or strain in the lower back. Keep the movement smooth, stay tall through the torso, and stop well before discomfort turns into pain.
Quick Overview
| Body Part | Shoulders |
|---|---|
| Primary Muscle | Anterior deltoids |
| Secondary Muscle | Pectoralis major and minor, biceps long head |
| Equipment | None |
| Difficulty | Beginner |
Sets & Reps (By Goal)
- Warm-up mobility: 1–2 sets × 20–30 seconds, using a light and controlled stretch
- Post-workout flexibility: 2–4 sets × 20–45 seconds, resting 20–30 seconds between sets
- Posture reset during the day: 2–3 sets × 15–25 seconds at easy intensity
- General shoulder mobility routine: 2–4 sets × 30–45 seconds, performed without forcing the end range
Progression rule: Increase stretch quality before adding duration. The best progress comes from smoother control, better posture, and a slightly more comfortable end range over time.
Setup / Starting Position
- Stand tall: Place your feet about hip-width apart and keep your knees soft, not locked.
- Bring the arms behind the body: Interlace your fingers behind your hips, or hold one wrist with the opposite hand if that feels more comfortable.
- Set the torso: Lift the chest gently, keep the ribs controlled, and maintain a neutral spine.
- Relax the shoulders: Let the shoulders sit down away from the ears rather than shrugging up.
- Start with the arms low: Begin with the hands close to the back of the hips before lifting into the stretch.
Tip: If clasping the hands is difficult, use a stretching strap or towel between the hands to reduce strain and improve positioning.
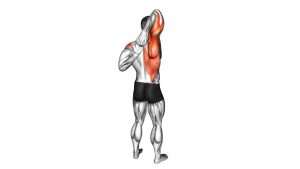
Execution (Step-by-Step)
- Brace your posture lightly: Stand upright, keep the chin neutral, and avoid leaning the head forward.
- Move the hands away from the body: With the arms behind you, gently draw the hands backward.
- Lift into the stretch: Raise the arms slightly upward behind the body while keeping the elbows mostly straight and the chest open.
- Pause at a comfortable end range: Hold the stretch where you feel lengthening across the front delts and chest, but no joint pain.
- Breathe slowly: Use calm breaths to relax into the position without forcing extra height.
- Return with control: Lower the arms gradually back to the starting position and reset before repeating.
Pro Tips & Common Mistakes
- Keep the spine neutral: Do not turn the stretch into a lower-back arch.
- Lift only as high as you can control: More height does not always mean a better stretch.
- Keep the shoulders down: Avoid shrugging the traps toward the ears.
- Stay smooth: Never jerk or bounce the arms upward.
- Open the chest gently: Let the sternum rise naturally without flaring the ribs too hard.
- Use a strap if needed: A mobility strap or towel can make the stretch more accessible.
- Do not force straight elbows: A soft bend is fine if it keeps the shoulders comfortable.
- Pair it with pulling work: Rows, band pull-aparts, and rear-delt exercises can complement this stretch well.
FAQ
Where should I feel the Standing Reverse Shoulder Stretch?
You should mainly feel it across the front of the shoulders and often into the chest. The sensation should be broad and controlled, not sharp or pinching.
Is this stretch good for rounded shoulders?
It can help offset the tight feeling many people get from desk posture by opening the chest and front delts. It works best when combined with upper-back strengthening and improved daily posture habits.
Should I hold the stretch or repeat reps?
Most people get the best result by holding the stretch for time. You can also use slow controlled reps, but avoid turning it into a fast swinging movement.
Can beginners do this exercise?
Yes. It is beginner-friendly as long as the range is kept comfortable and controlled. A towel or strap can make the position easier if shoulder mobility is limited.
When should I avoid this stretch?
Be cautious if you have a current shoulder injury, front-shoulder pain, instability, or nerve symptoms. If the stretch feels painful in the joint rather than muscular, stop and modify it.
Recommended Equipment (Optional)
- Stretch Out Strap — useful for making the behind-the-back hand position more accessible and adjustable
- ProStretch Shoulder Flex — a shoulder mobility tool that can help support range-of-motion work
- Posture Corrector Brace — a light awareness tool for posture habits, best used as support rather than a replacement for mobility work
- Resistance Band Set — great for pairing this stretch with band pull-aparts, rows, and rear-delt activation drills
- Foam Roller — helpful for upper-back mobility work that complements shoulder-opening stretches
Tip: Use accessories to improve comfort and control, not to force a bigger stretch. Gentle mobility done consistently is usually more effective than aggressive stretching.