Barbell Standing Close-Grip Military Press : Form, Sets, Tips & FAQ
Learn how to perform the Barbell Standing Close-Grip Military Press with proper form. Includes muscles worked, setup, execution steps, sets and reps by goal, common mistakes, FAQ, and recommended equipment.
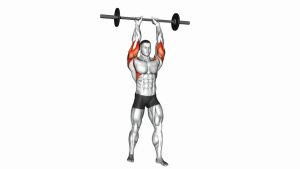
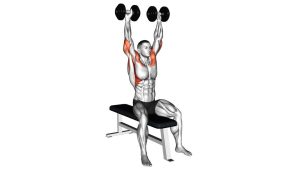
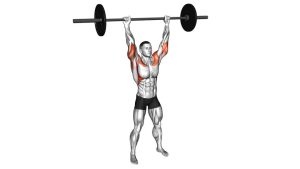
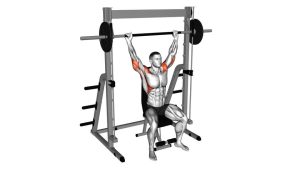
Barbell Standing Close-Grip Military Press
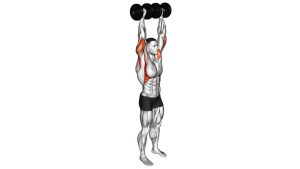
This variation works best when you stay tall, brace your midsection, and press the bar in a straight line over the body. The goal is not to lean back and “heave” the bar up, but to create a clean, controlled overhead path while keeping tension through the shoulders, triceps, and core. A close grip can increase triceps contribution, but the front delts still do much of the heavy lifting.
Quick Overview
| Body Part | Shoulders |
|---|---|
| Primary Muscle | Anterior deltoids (front shoulders) |
| Secondary Muscle | Triceps, lateral deltoids, upper chest, upper traps, core stabilizers |
| Equipment | Barbell, weight plates, optional rack |
| Difficulty | Beginner to Intermediate |
Sets & Reps (By Goal)
- Strength: 4–6 sets × 3–6 reps with 2–3 minutes rest
- Muscle growth: 3–5 sets × 6–10 reps with 60–90 seconds rest
- Technique practice: 3–4 sets × 5–8 reps with light to moderate load and perfect bar control
- Shoulder endurance: 2–4 sets × 10–15 reps with lighter weight and strict form
Progression rule: Add weight only when you can press through the full range without leaning back, losing wrist position, or pressing the bar forward.
Setup / Starting Position
- Set your stance: Stand with feet about hip-width apart and weight balanced through the mid-foot.
- Grip the bar closely: Take a narrow grip that is inside shoulder width but still comfortable for your wrists and elbows.
- Rack the bar high: Hold the bar at upper-chest or collarbone level with wrists stacked and forearms mostly vertical.
- Brace the torso: Tighten the abs and glutes to prevent excessive rib flare or lower-back arching.
- Set the elbows: Keep them slightly forward of the bar instead of flaring them straight out to the sides.
Tip: Before pressing, think “chin back, ribs down, squeeze glutes.” That combination usually cleans up the bar path.
Execution (Step-by-Step)
- Start from the upper chest: Begin with the bar resting near the top of the chest and the torso braced.
- Press straight up: Drive the bar vertically while keeping the elbows under control and the wrists stacked.
- Move the head slightly back if needed: Let the bar clear the face without swinging it around the body.
- Lock out overhead: Finish with straight arms, active shoulders, and the bar aligned over the shoulders and mid-foot.
- Lower with control: Bring the bar back down to the upper chest without dropping it or letting the elbows flare wildly.
- Repeat smoothly: Each rep should look nearly identical, with no bouncing, jerking, or excessive torso lean.
Pro Tips & Common Mistakes
- Keep the ribs down: Avoid over-arching the lower back to finish the rep.
- Use a truly close grip, not an extreme grip: Too narrow can irritate the wrists and reduce pressing efficiency.
- Press in a vertical line: Do not arc the bar far forward.
- Brace your glutes and abs: A stable torso improves power transfer.
- Do not rush the descent: Controlled eccentrics help shoulder stability and cleaner technique.
- Watch the wrists: Keep them stacked instead of bent far backward.
- Do not turn it into a push press: Avoid using the knees unless that is the intended variation.
- Own the lockout: Finish with the shoulders active overhead, not with a loose, unstable top position.
FAQ
What does the close grip change in this military press?
A closer grip usually brings the elbows slightly more forward and can increase the contribution from the triceps. It also makes the movement feel more compact than a wider overhead press.
Is this exercise better for shoulders or triceps?
The front delts remain the main driver, but the triceps play a bigger supporting role than they do in many wider-grip pressing setups.
Should I use a rack for this movement?
Yes, a rack is helpful for safe unracking and reracking, especially once the weight gets heavier. Light sets can sometimes be cleaned into position, but a rack is usually more practical.
Can beginners do the standing close-grip military press?
Yes, as long as the load stays manageable and the lifter can maintain a neutral torso, controlled bar path, and comfortable wrist position.
What are the most common mistakes?
The biggest problems are leaning back too much, pressing the bar forward, using an excessively narrow grip, and losing control during the lowering phase.
Recommended Equipment
- Wrist Wraps for Weightlifting — useful for added wrist support during heavier overhead pressing
- Resistance Bands Set — helpful for shoulder warm-ups, activation drills, and accessory work
- Barbell Collars — keeps plates secure and improves lifting safety
- Weightlifting Belt — optional for advanced lifters who want extra torso support on heavier sets
- Foam Roller — useful for upper-back mobility work that can improve pressing position
Tip: Prioritize stable basics first: a secure barbell setup, good collars, and reliable wrist support. Bands and mobility tools are best used to improve warm-up quality and shoulder positioning.