Lever Chest Press : Proper Form, Sets & Reps, Tips & FAQ
Learn the Lever Chest Press with perfect setup and pressing mechanics. Includes sets & reps by goal, step-by-step form, common mistakes, FAQs, and recommended equipment.
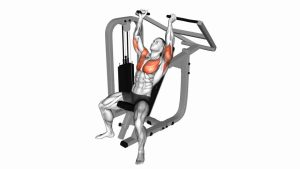
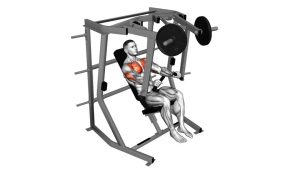
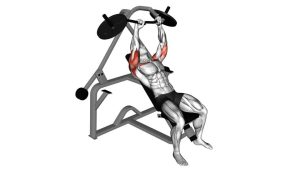
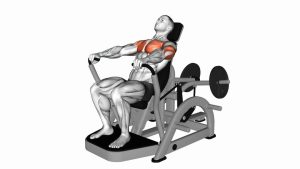
Lever Chest Press (Plate-Loaded)
The lever chest press rewards tight setup and controlled tempo. Your goal is to press with the chest while keeping the shoulders stable: shoulder blades back and down, wrists stacked, and elbows tracking slightly below shoulder height. Avoid bouncing the bottom—use a smooth press and a slower return for maximum tension.
Quick Overview
| Body Part | Chest |
|---|---|
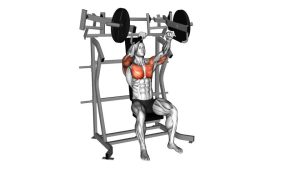
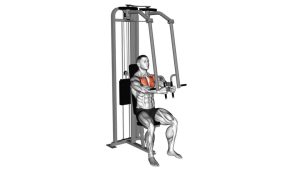
| Primary Muscle | Pectoralis major (mid-chest emphasis) |
| Secondary Muscle | Triceps, anterior deltoids (assist) |
| Equipment | Plate-loaded lever chest press machine + weight plates |
| Difficulty | Intermediate (beginner-friendly with lighter loads and shorter range) |
Sets & Reps (By Goal)
- Muscle growth (hypertrophy): 3–5 sets × 8–12 reps (60–120 sec rest)
- Strength focus: 4–6 sets × 4–6 reps (2–3 min rest)
- Endurance / pump: 2–4 sets × 12–20 reps (45–75 sec rest)
- After free weights (finisher): 2–3 sets × 10–15 reps (controlled tempo)
Progression rule: Add reps first (top of the range), then add a small amount of weight. Keep reps smooth—no bouncing or shoulder shrugging to “force” extra load.
Setup / Starting Position
- Set the seat height: Handles should line up around mid-chest. You want a strong press path without shoulder pinching.
- Back on the pad: Sit tall with glutes and upper back supported. Keep ribs down—avoid excessive arching.
- Lock in the shoulders: Pull shoulder blades back and down (packed), chest proud but not overextended.
- Grip and wrist position: Use a firm grip with wrists neutral (stacked over forearms) to transfer force efficiently.
- Foot drive: Plant feet flat and stable. Use light leg drive for full-body tension without lifting hips.
Tip: If you feel more shoulders than chest, adjust the seat so your elbows track slightly below shoulder height and keep your shoulder blades pinned.
Execution (Step-by-Step)
- Unrack / start position: Begin with elbows bent and handles close to the chest. Brace your core and keep the back on the pad.
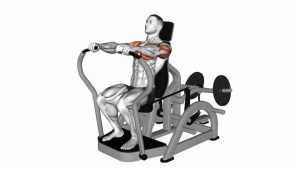
- Press smoothly: Drive the handles forward and slightly inward (depending on machine path), focusing on “bringing the arms away from the chest” with control.
- Stay chest-dominant: Keep shoulders down—do not shrug. Elbows track naturally (not flared hard to 90°).
- Controlled lockout: Reach near full extension without slamming the joints or losing shoulder position.
- Slow return: Lower the handles under control until you feel a strong chest stretch—stop before the plates fully crash or the shoulder rolls forward.
Pro Tips & Common Mistakes
- Use a 2–3 second eccentric: Slower lowering builds more chest tension and control.
- Don’t bounce the bottom: Pausing briefly near the bottom improves stability and reduces shoulder stress.
- Avoid flared elbows: Extreme flare can irritate shoulders. Aim for elbows slightly tucked from 90°.
- Don’t shrug or reach forward: Keep shoulders down and back—reaching turns it into more front-delts.
- Keep wrists stacked: Bent wrists waste power and can strain joints—align knuckles with forearms.
- Adjust seat for emphasis: Slightly lower seat often shifts stress higher on the chest; slightly higher can feel more mid/lower chest (varies by machine).
FAQ
Should I lock out at the top?
You can reach near full extension, but avoid aggressively slamming into lockout. Keep tension on the chest and maintain shoulder stability.
Why do I feel this more in my shoulders than my chest?
Common causes are a seat height that’s too high/low, elbows flaring too wide, or shoulders rolling forward at the bottom. Repack the shoulder blades, adjust the seat so handles align with mid-chest, and use a slightly tucked elbow path.
How deep should I lower the handles?
Lower until you feel a strong chest stretch without shoulder pinching or losing scapular position. Depth varies by machine and shoulder mobility.
Is this better than bench press?
It’s not “better,” just different. The lever press is more stable and easier to load safely, making it great for hypertrophy and volume. Bench press builds more free-weight skill and stabilization. Many programs use both.
Where should I place it in my workout?
For strength, place it early (after warm-up). For hypertrophy, it works well as a main press or after dumbbells/barbell to add controlled volume.
Recommended Equipment (Optional)
- Olympic Weight Plates (2" hole) — the essential load for plate-loaded lever machines
- Fractional Plates / Micro Plates — small jumps for cleaner progression when you’re stuck
- Wrist Wraps — extra wrist support for heavier sets and higher volume
- Lifting Gloves — improves grip comfort on machine handles (optional)
- Resistance Bands Set — great for warm-ups (band pull-aparts) and shoulder prep before pressing
Tip: Pair your pressing with upper-back work (rows, rear delts) to keep shoulders healthy and posture strong.